🧢 Beautiful ✨ Detailed πŸ’ Adorable

Pika the Electric Mouse Amigurumi Pattern

Pika the Electric Mouse Amigurumi Pattern
4.6β˜… Rating
5-7 Hours Time Needed
1.6K Made This
βœ‚οΈ

Intermediate Level

Ideal for those with basic crochet experience, featuring slightly more advanced stitches and techniques to expand your skills.

⏱️

Weekend Treat

Takes 5-7 hours, making it an enjoyable project to finish over a couple of days.

🧸

Cute Companion

An adorable friend to cherish, handcrafted with love to bring comfort and joy for years to come.

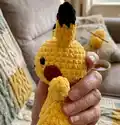
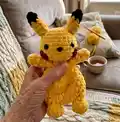
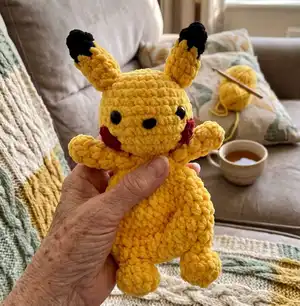
About This Pika the Electric Mouse Amigurumi Pattern

This pattern teaches you how to crochet a plush Pika the Electric Mouse using bulky Bernat Blanket yarn for a super soft finish. It includes step-by-step rounds for the head, body, arms, legs, ears, cheeks and tail, plus assembly and photo references. The design focuses on easy shaping with half double crochet and single crochet techniques to create an expressive, huggable toy.

Pika the Electric Mouse Amigurumi Pattern crochet pattern - detailed view of completed project

Clear abbreviations and a special invisible colour change technique are explained, with recommended tools and supplies listed. The pattern is ideal for crafters comfortable with basic increases, decreases and sewing pieces together.

Why You'll Love This Pika the Electric Mouse Amigurumi Pattern

I absolutely love this pattern because it turns simple stitches into a wonderfully tactile and squishy companion that brightens any shelf. I enjoyed using Bernat Blanket yarn to achieve a plush texture that even beginners will find irresistible. I love how the invisible colour change creates neat ear details without bulky seams. I also appreciate that the pattern is photo-supported so you can see how each step should look as you work.

Pika the Electric Mouse Amigurumi Pattern step 1 - construction progress Pika the Electric Mouse Amigurumi Pattern step 2 - assembly progress Pika the Electric Mouse Amigurumi Pattern step 3 - details and accessories Pika the Electric Mouse Amigurumi Pattern step 4 - final assembly and finishing

Switch Things Up

I love how easy it is to customize this pattern by swapping colors β€” try soft pastels for a gentle look or neon brights for a playful twist.

I sometimes change the yarn type and hook size to make minis or jumbo versions; use fingering yarn with a smaller hook for keychains or bulky yarn with a larger hook for huggable pillows.

I often embroider different faces to give each Pika a unique personality β€” moving the eyes or shaping the nose changes the expression dramatically.

For a wearable twist, I add a tiny crocheted cape or scarf to make a themed gift; you can experiment with different accessories using leftover yarn.

If you want posable limbs I occasionally add thin wire in the arms before stuffing so they can hold small props or be posed on a shelf.

I sometimes replace safety eyes with embroidered eyes for baby-safe toys β€” just embroider several passes to build a full round eye as described in the pattern.

Try making a family of different sizes by changing hook sizes and yarn weights and arrange them as a display set or mobile.

I also like to tweak the cheek color and placement to create shy or bold expressions β€” a slightly lower cheek placement gives a sleepy look.

Experiment with different tail shapes: a spiral tail, a wider paddle tail, or even a heart-shaped tail to personalize each Pika.

Don't be afraid to combine textures β€” you can use a chenille yarn for body and a smooth yarn for facial details so the face reads clearer while the body stays plush.

Common Mistakes & How to Fix Them

βœ— Skipping stitch markers when placing legs can lead to uneven spacing and misaligned feet; mark the 5 stitches for each leg with stitch markers before you begin to ensure accurate placement. βœ— Understuffing the head or body will create a floppy, undefined shape; stuff gradually and firmly, checking shape as you go to achieve a smooth, rounded finish. βœ— Forgetting to change colour invisibly at the ear transition will make the seam obvious; use the invisible colour change method described to hide the seam and reduce bulk. βœ— Cutting yarn tails too short makes finishing and sewing difficult; leave generous tails (6" for head, 10" for legs) so you can weave and sew securely. βœ— Not counting stitches after increases or decreases can throw off shaping and stitch counts; count at the end of each round to confirm the correct number of stitches.

Pika the Electric Mouse Amigurumi Pattern

Make a cuddly Pika the Electric Mouse with this friendly amigurumi pattern. You will enjoy working with plush Bernat Blanket yarn to create a soft, squishy toy with clear, photographed instructions. The pattern includes head, body, arms, legs, ears, cheeks, tail and assembly steps so you can finish a complete plush friend. Perfect for gifting or keeping as a sunny, handmade companion.

Intermediate 5-7 Hours

Materials Needed for Pika the Electric Mouse Amigurumi Pattern

β€” Main Fabric

  • 01
    Bulky weight 6 Bernat Blanket Brights - Yellow (main color for body/head) - small amount (one or two skeins depending on size)
  • 02
    Bernat Blanket - Black (small amount for ear tips and nose)
  • 03
    Bernat Blanket - Cranberry (small amount for cheeks)

β€” Tools Required

  • 01
    Crochet hook size L 8.0mm
  • 02
    14mm safety eyes (2 pieces)
  • 03
    Stuffing / polyester fiberfill
  • 04
    Tapestry needle for sewing and weaving ends
  • 05
    Stitch markers
  • 06
    Scissors
  • 07
    Optional: pins for positioning pieces

Progress Tracker

0% Complete

β€” Head :

Round 1 :

8 Sc into Magic Ring (8)

Round 2 :

Inc x 8 (16)

Round 3 :

(Sc 1, Inc) x 8 (24)

Round 4-6 :

Sc around (24) (3 Rounds x 24 Sc = 72 Sc)

Round 7 :

(Sc 3, Inc) x 6 (30)

Round 8-9 :

Sc around (30) (2 Rounds x 30 Sc = 60 Sc)

Round 10 :

(Sc 3, Dec) x 6 (24)

Round 11 :

(Sc 2, Dec) x 6 (18)

Round 12 :

(Sc 1, Dec) x 6 (12)

Info :

Place safety eyes between rounds 7 & 8, 5 stitches apart. (PHOTO A) If embroidering eyes, loop yarn through repeatedly until you have a full, round eye. Tie ends off and leave the tails inside the head. Nose can be added at this time, or at the end. Refer to Page 6 for instructions. Stuff the head until the desired firmness is achieved.

Round 13 :

Dec x 6 (6)

Info :

Tie off, leaving a 6" tail. Using a tapestry needle, finish off the head by picking up the front loops of the final 6 stitches. Pull tight to close and then hide the yarn tail through the piece and trim the excess. (PHOTO B)

β€” Arms :

Round 1 :

1.5 Hdc into Magic Ring (5)

Round 2-4 :

Hdc around (5) (3 Rounds x 5 Hdc = 15 Hdc)

Round 5 :

Hdc 3, Hdc Dec (4)

Info :

Fasten off and leave a long tail for sewing onto the body. (PHOTO C) Set aside for sewing later.

β€” Ears :

Round 1 :

5 Sc into Magic Ring (5)

Round 2 :

Sc 4, Inc (6)

Info :

Invisible colour change to Yellow:

Round 3 :

Sl st, Sc 5 (6) (The sl st reduces the appearance of the colour change).

Round 4 :

(Sc 2, Inc) x 2 (8)

Round 5 :

Sc around (8)

Round 6 :

Dec x 4 (4)

Info :

Fasten off and leave a long tail for sewing onto the head. (PHOTO D)

β€” Body :

Info :

Begin by holding the head upside down and face pointing away from you. Note: You will be placing 6 sc into the bottom of the head (using Round 13 as a guide for stitch placement). You will start the row at the back of the head.

Round 1 :

6 sc into head (6) (PHOTO E)

Round 2 :

Hdc Inc x 6 (12)

Round 3 :

(Hdc 1, Hdc Inc) x 6 (18)

Round 4 :

(Hdc 2, Hdc Inc) x 6 (24)

Round 5 :

Hdc around (24)

Round 6 :

(Hdc 3, Hdc Inc) x 6 (30)

Round 7-8 :

Hdc around (30) (2 Rounds x 30 Hdc)

Round 9 :

(Hdc 3, Hdc Dec) x 6 (24)

Round 10 :

(Hdc 2, Hdc Dec) x 6 (18)

Info :

Add extra Hdc to get to the centre of the back. Do not fasten off yet, you will go directly to the leg instructions.

β€” Legs :

Info :

Lay the body flat to figure out how to place the legs (There will be 5 stitches designated for each leg, that will leave 8 stitches unworked). Recall that on the previous page that you added extra Hdc to get to the centre of the back. Using stitch markers, mark 5 stitches for each leg, with a 4 stitch gap in between on each side. (PHOTO F). Add extra Hdc to get to the first st marker, if needed.

First Leg :

1. Sc Inc x 5 (10) (PHOTO G)

Round 2 :

(Sc 4, Inc) x 2 (12)

Round 3 :

(Sc 2, Dec) x 3 (9)

Round 4 :

(Sc 1, Dec) x 3 (6)

Info :

Fasten off and weave in tail. (PHOTO H)

Second Leg :

Add Yellow yarn to Round 10 of body, leaving a 10" yarn tail. The second leg will be worked the same way as the first leg. (PHOTO I) Use the 10" yarn tail to sew closed the gap between the legs. (PHOTO J)

β€” Assembly :

Info :

Sew the arms onto Round 2 of the body, 4 stitches apart, at the front. (PHOTO K) Sew the ears onto either side of the head, between Rounds 3 & 4. (PHOTO L)

β€” Nose :

Info :

In Black: Sew a strand of black yarn around the the centre stitch between Rounds 8 & 9, between the eyes. Secure the ends inside the head. (PHOTO M)

β€” Cheeks :

Cheeks (Make 2) :

In Cranberry: 1.5 Sc into Magic Ring (5) Sl st. Fasten off and sew between Rounds 9 & 11, slightly behind the eyes. (PHOTO N)

β€” Tail :

Info :

* Leave a long tail at the beginning to sew onto body. In Yellow:

Round 1 :

Ch 6

Round 2 :

Starting 2nd Ch from the hook: Sc 5 (5) Ch 1 & turn

Round 3 :

Sc 5 (5) Ch 1 & turn

Round 4 :

Sc 2 (2) Ch 1 & turn

Round 5 :

Sc 2, Ch 4 (6) turn

Round 6 :

Starting 2nd Ch from the hook: Sc 5 (5) Ch 1 & turn

Round 7 :

Sc 5 (5) Ch 1 & turn

Round 8 :

Sc 5

Info :

Fasten off and sew between Rounds 7 & 8, at a slight angle. (PHOTO O & P)

Assembly Instructions

  • Sew the arms onto Round 2 of the body, spacing them 4 stitches apart at the front so they are evenly positioned (PHOTO K).
  • Sew the ears onto either side of the head between Rounds 3 and 4, aligning the base of each ear symmetrically (PHOTO L).
  • Use the 10" yarn tail from the second leg to sew closed the gap between the legs and secure the lower body seam (PHOTO J).
  • Attach the cheeks between Rounds 9 and 11 slightly behind the eyes; position them evenly on both sides for symmetry (PHOTO N).
  • Sew the tail between Rounds 7 and 8 at a slight angle, and hide and secure all yarn tails inside the body for a neat finish (PHOTO O & P).

Important Notes

  • πŸ’‘Use stitch markers to mark rounds and leg placement, especially when creating the two legs to keep spacing accurate.
  • πŸ’‘Stuff firmly but evenly so shapes hold β€” overstuffing can distort curves while under stuffing leaves floppy sections.
  • πŸ’‘Use the invisible colour change method at the ear transition to reduce visible seams and bulk at colour joins.
  • πŸ’‘Leave long yarn tails where indicated (6" for head closing, 10" for leg sewing) to make sewing pieces together easier.

This sunny Pika the Electric Mouse is a delightful project that brings a smile with every stitch. The plush Bernat Blanket yarn makes it irresistibly soft and snuggly, perfect for kids or as a cheerful handmade gift. Follow the step-by-step instructions and photos to assemble a neat, expressive toy you will love to display and share. 🧢✨😊

You ask,

we answer.

FAQs

What size will the finished piece be?

The finished amigurumi measures approximately 20-25 cm tall when using Bernat Blanket yarn and an 8mm hook, though size varies slightly with tension.

Can I use different yarn weights for this pattern?

Yes, you can use different yarn weights, but this will affect the final size; choose an appropriate hook for your yarn and expect differences in proportions.

Do I need prior crochet experience for this pattern?

This pattern is rated intermediate; it assumes familiarity with single crochet, half double crochet, increases, decreases, magic ring and basic sewing.

How long does this project typically take to complete?

Most crocheters finish this project in about 5-7 hours, depending on experience level and how much time is spent on assembly and finishing.

Where should I place the safety eyes?

Place safety eyes between Rounds 7 and 8 of the head, spaced 5 stitches apart; check photo A for exact placement reference.