๐Ÿงถ Beautiful โœจ Detailed ๐Ÿ’ Adorable

Pig Phone Pouch Pattern

Pig Phone Pouch Pattern
4.6โ˜… Rating
5-7 Hours Time Needed
1.2K Made This
โœ‚๏ธ

Intermediate Level

Ideal for those with basic crochet experience, featuring slightly more advanced stitches and techniques to expand your skills.

โฑ๏ธ

Weekend Treat

Takes 5-7 hours, making it an enjoyable project to finish over a couple of days.

โœจ

Stylish Touch

An elegant detail to elevate any look, combining traditional techniques with contemporary design sensibilities.

About This Pig Phone Pouch Pattern

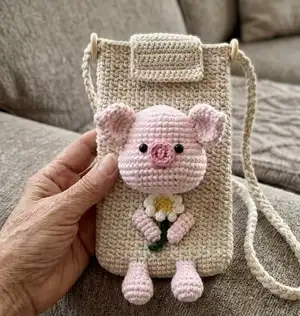
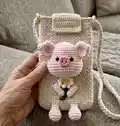
This pattern creates a textured phone pouch decorated with a cute pig amigurumi holding a daisy. You will crochet the bag in spirals, make a lid with a button closure, and assemble small stuffed parts for the pig. The design uses simple shaping and joining techniques for a polished finished piece.

Pig Phone Pouch Pattern crochet pattern - detailed view of completed project

Perfect for gifting or personal use, this pouch combines practical storage with playful character design. Clear step-by-step rounds and assembly notes make the process enjoyable.

Why You'll Love This Pig Phone Pouch Pattern

I absolutely love this pattern because it blends a functional accessory with a sweet amigurumi character, making each finished pouch both useful and playful. I enjoy the texture you get when working the bag in spirals and alternating stitch rowsโ€”it gives a handcrafted, professional look. Sewing and gluing the small parts lets me personalize placement and expression, so every pig ends up a little different. I also love that the pattern is compact enough to finish in a weekend but detailed enough to feel satisfying.

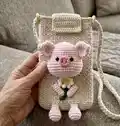
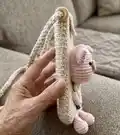
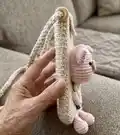
Pig Phone Pouch Pattern step 1 - construction progress Pig Phone Pouch Pattern step 2 - assembly progress Pig Phone Pouch Pattern step 3 - details and accessories Pig Phone Pouch Pattern step 4 - final assembly and finishing

Switch Things Up

I love how easy it is to change the look of this pouch by swapping yarn colors; try pastel tones for a soft, baby-friendly version or bright hues for a more playful style.

For a sturdier pouch, I sometimes use a slightly thicker yarn and a larger hook to make a chunkier, more robust bag.

I like to add a lining to the pouch for extra protectionโ€”cut fabric to size and hand-stitch it inside for a neat finish.

To make a mini keychain version, use thinner yarn and a smaller hook, reduce the bag size and attach a keyring to the strap.

I often experiment with different closure types, like buttons, snaps, or a small zipper, depending on how secure I want the pouch to be.

Embroidering a name or initials on the back is a lovely personalization; use contrasting yarn and a yarn needle to stitch letters.

If you want the pig to be removable, sew buttons to the back of the head and corresponding loops on the pouch so you can swap decorations.

I sometimes replace the daisy with other tiny amigurumi flowers or tiny hearts to match seasonal themes or holiday gifts.

Try adding a small pocket inside the pouch for cardsโ€”crochet a rectangle and sew it on the interior wall for extra function.

I also like to mix fibers, such as a cotton blend for the pouch body and a softer acrylic for the pig, to create different textures and feels.

Common Mistakes & How to Fix Them

โœ— Skipping stitch markers when working the bag in spirals can make it hard to identify the start of rounds; place a marker and move it each round to stay on track. โœ— Forgetting to count the foundation chain and first round can change the pouch shape; count stitches carefully after Rnd 1 to ensure the correct stitch totals. โœ— Not stuffing the head before finishing the decreases leads to a flattened shape; stuff gradually and firmly before completing Rnd 21-22 of the head. โœ— Sewing parts without pinning or checking placement may cause asymmetry; pin or use fabric glue temporarily to test placement before final sewing.

Pig Phone Pouch Pattern

Create a charming pig-themed phone pouch that doubles as a cute accessory and a tiny amigurumi friend. This pattern walks you through crocheting a textured pouch body, a removable lid, a shoulder strap, and an adorable pig with head, ears, muzzle, arms, legs and a daisy. You will enjoy both the bag construction and the small amigurumi assembly to personalize your pouch.

Intermediate 5-7 Hours

Materials Needed for Pig Phone Pouch Pattern

โ€” Main Fabric

  • 01
    Jeans from YarnArt - beige 05 (main pouch color)
  • 02
    Jeans from YarnArt - pink pastel 74 (pig main)
  • 03
    Jeans from YarnArt - pink 36 (pig detail if desired)
  • 04
    Jeans from YarnArt - yellow 35 (flower center)
  • 05
    Jeans from YarnArt - cream 03 (flower petals)

โ€” Tools Required

  • 01
    Crochet hook size 2.3 mm
  • 02
    Two 6 mm safety eyes
  • 03
    Two 15 mm button
  • 04
    Polyester fiberfill
  • 05
    Stitch markers
  • 06
    Scissors
  • 07
    Yarn needle for sewing
  • 08
    Fabric glue

Progress Tracker

0% Complete

โ€” Bag :

Info :

There are 2 ways to make a single crochet: v-stitch (yarn over single crochet) and x-stitch (yarn under single crochet). I use x-stitch (yarn under single crochet). Work in spirals.

Info :

Make 24 ch, start in the second ch from hook

Round 1 :

22 sc, 3 sc in the last stitch, continue on the other side of the foundation chain, 21 sc, inc (48)

Round 2 :

inc, 21 sc, 3 inc, 21 sc, 2 inc (54)

Round 3 :

inc, 24 sc, 3 inc, 24 sc, 2 inc (60)

Round 4 :

60 sc (60)

Round 5 :

(1 ch, skip 1 stitch, 1 sc in the next stitch)*30 (60)

Round 6 :

(1 sc in the space of 1 ch, 1 sc in the next stitch)*30 (60)

Info :

From here: the odd rounds (7, 9, 11, 13, 15โ€ฆ) will be made same as round 5, the even rounds (8, 10, 12, 14, 16โ€ฆ) will be made same as round 6. Stop after finishing the 48th round.

โ€” Lid of pouch :

Info :

Identify the 14 stitches in the middle of the 46th round

Round 1 :

14 sc, turn

Round 2-13 :

14 sc. Cut and weave the yarn. Sew the button into the lid of pouch.

โ€” Make shoulder - strap :

Info :

Make 3 ch, start in the second ch from hook: 2 sc, turn

Round 2 :

2 sc, turn

Info :

Crochet repeat 2 sc until the shoulder-strap is about 120 cm. Fasten off and weave the yarn. Sew the shoulder - strap and button into the pouch.

โ€” Pig :

โ€” Head :

Info :

Start in pink pastel

Round 1 :

6 sc in the magic ring (6)

Round 2 :

6 inc (12)

Round 3 :

(1 sc, inc)*6 (18)

Round 4 :

(inc, 2 sc)*6 (24)

Round 5 :

(3 sc, inc)*6 (30)

Round 6 :

1 sc, inc, (4 sc, inc)*5, 3 sc (36)

Round 7-10 :

36 sc (36)

Round 11 :

7 sc, 7 inc, 7 sc, 7 inc, 8 sc (50)

Round 12-15 :

50 sc (50)

Round 16 :

7 sc, dec, 10 sc, dec, 7 sc, dec, 10 sc, dec, 8 sc (46)

Round 17 :

7 sc, dec, 8 sc, dec, 7 sc, (dec, 8 sc)*2 (42)

Round 18 :

7 sc, (dec, 2 sc)*2, dec, 7 sc, (dec, 2 sc)*2, dec, 8 sc (36)

Round 19 :

(dec, 4 sc)*6 (30)

Round 20 :

(3 sc, dec)*6 (24)

Info :

Stuff the head

Round 21 :

12 dec (12)

Round 22 :

6 dec, slst. Stuff the head. Fasten off and weave the yarn.

Info :

Put in the eyes between rows 11-12, leaving 6 stitches space between them. Use fabric glue to pin the head into the pouch.

โ€” Ear (make 2) :

Info :

Start in pink pastel

Round 1 :

4 sc in the magic ring (4)

Round 2 :

(1 sc, inc)*2 (6)

Round 3 :

6 inc (12)

Round 4 :

(1 sc, inc)*6 (18)

Round 5 :

(inc, 2 sc)*6 (24)

Round 6-7 :

24 sc (24)

Round 8 :

(2 sc, dec)*6 (18)

Round 9 :

(1 sc, dec)*6, slst. (12)

Info :

Fasten the yarn, leaving a long tail for sewing. Donโ€™t stuff the ear, flatten and fold the top of the ear. Put in the ears between rows 5-11.

โ€” Muzzle :

Info :

Start in pink

Round 1 :

6 sc in the magic ring (6)

Round 2 :

6 inc (12)

Info :

Fasten off and weave the yarn. Sew the nose with red yarn.

Info :

Sew the mouth between rows 14-15 with red.

โ€” Leg (make 2) :

Info :

Start in pink pastel

Round 1 :

6 sc in the magic ring (6)

Round 2 :

6 inc (12)

Round 3 :

(2 sc, inc)*4 (16)

Round 4-5 :

16 sc (16)

Round 6 :

(2 sc, dec)*4 (12)

Round 7 :

(dec, 2 sc)*3 (9)

Round 8-9 :

9 sc (9)

Info :

Slst and fasten the yarn, leaving a long tail for sewing. Stuff up to the 5th row of the leg. Sew the legs at row 4.

โ€” Arm (make 2) :

Info :

Start in pink pastel

Round 1 :

7 sc in the magic ring (7)

Round 2-7 :

7 sc (7)

Info :

Slst and fasten off the yarn, leaving a long tail for sewing. Donโ€™t stuff the arm. Sew the arms between rows 13-15.

โ€” Flower :

Info :

Start in yellow

Round 1 :

6 sc in the magic ring (6)

Round 2 :

(1 sc, inc)*3 (9)

Info :

Change to cream: (make 4 ch, start to crochet on the second chain from the hook: 3 sc, slst into 1 single crochet stitch on round 2)* repeat 9 times. Fasten off and weave the yarn.

โ€” Branch :

Info :

Start in green, make 13 ch, start to crochet on the second chain from the hook: 12 slst. Fasten off and weave the yarn.

โ€” Assembling :

Item Name (P1) :

Sew the legs at row 4.

Item Name (P2) :

Sew the arms into the pouch between rows 13-15.

Item Name (P3) :

Use fabric glue to paste the branch into the pouch.

Item Name (P4) :

Use fabric glue to paste the flower into the pouch.

Item Name (P5) :

Use fabric glue to paste the head into the pouch.

Assembly Instructions

  • Sew the legs at row 4 so they hang evenly from the bottom of the pouch, using the long tail left from the leg and a yarn needle for secure stitches.
  • Sew the arms into the pouch between rows 13-15, spacing them symmetrically and angling slightly inward to hold the flower.
  • Use fabric glue to paste the branch into the pouch in the desired position, then press and let dry before adding the flower.
  • Use fabric glue to paste the flower into the pouch on the branch, ensuring the center faces outward and petals are visible.
  • Use fabric glue to paste the pig head into the pouch, centering it above the flower and holding until set; secure with a few whipstitches if needed.

Important Notes

  • ๐Ÿ’กWork the pouch in spirals and use a stitch marker to mark the start of each round for consistent texture.
  • ๐Ÿ’กPlace safety eyes between rows 11-12 of the head, leaving six stitches between them before fastening the backs.
  • ๐Ÿ’กStuff the head firmly before completing the final decreases so it keeps a round shape and stays secure when glued to the pouch.
  • ๐Ÿ’กLeave long yarn tails when fastening off small parts for easier sewing and secure attachment during assembly.

Thank you for choosing this Pig Phone Pouch pattern โ€” I hope it brings a little smile to your day and a cute companion to your phone! ๐Ÿท๐Ÿงถ This pattern mixes bag construction with tiny amigurumi techniques to create a delightful wearable keepsake.โœจ Have fun making it, and donโ€™t forget to share your finished pouch with friends or on social media! ๐ŸŽ€

You ask,

we answer.

FAQs

What size will the finished piece be?

If you use the same yarn and hook, the phone pouch will be approximately 17 cm in length and 10 cm in width.

Can I use a different yarn weight or hook size?

Yes, using a different yarn weight and adjusting your hook will change the finished size; choose a hook appropriate for your yarn and check gauge by measuring a small swatch.

Where should I place the safety eyes?

Place the safety eyes between rows 11-12 of the head, leaving 6 stitches of space between the eyes before securing the backs.

Do I need to stuff the arms and ears?

No, do not stuff the ears or arms; leave them flat and use the long tail to sew them into position so they sit naturally on the pouch.