🧢 Beautiful ✨ Detailed πŸ’ Adorable

Nemo The Clown Fish Amigurumi Pattern

Nemo The Clown Fish Amigurumi Pattern
4.7β˜… Rating
5-7 Hours Time Needed
2.4K Made This
βœ‚οΈ

Intermediate Level

Ideal for those with basic crochet experience, featuring slightly more advanced stitches and techniques to expand your skills.

⏱️

Weekend Treat

Takes 5-7 hours, making it an enjoyable project to finish over a couple of days.

🧸

Cute Companion

An adorable friend to cherish, handcrafted with love to bring comfort and joy for years to come.

About This Nemo The Clown Fish Amigurumi Pattern

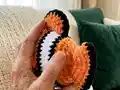
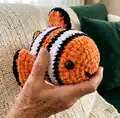
This pattern creates a cuddly Nemo-style clown fish using plush Himalaya Velvet yarn in orange, white and black. It includes complete round-by-round instructions for the body, side fins, upper fins and tail with color-change guidance. The toy features safety eyes and a smiling embroidered face for a friendly finish.

Nemo The Clown Fish Amigurumi Pattern crochet pattern - detailed view of completed project

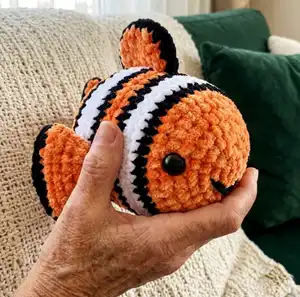
The instructions include helpful photos and tips for sewing and assembly to make finishing easy. The finished fish measures approximately 20-24 cm when made with the recommended yarn and hook.

Why You'll Love This Nemo The Clown Fish Amigurumi Pattern

I absolutely love this pattern because it combines soft, tactile yarn with bold, playful stripes that bring instant personality to the piece. I adore the way the color changes create the classic clown fish look with clear, repeatable rounds. I love that the pattern balances simple amigurumi shaping with slightly more advanced finishing like edging the fins and embroidered details. I also enjoy how flexible the design is β€” you can make adjustments to size and color to make each fish uniquely yours.

Nemo The Clown Fish Amigurumi Pattern step 1 - construction progress Nemo The Clown Fish Amigurumi Pattern step 2 - assembly progress Nemo The Clown Fish Amigurumi Pattern step 3 - details and accessories Nemo The Clown Fish Amigurumi Pattern step 4 - final assembly and finishing

Switch Things Up

I love how easy it is to customize this Nemo pattern by changing colors and yarn weight β€” try pastel tones for a softer baby-safe version.

I often make smaller keychain versions by using thinner yarn and a smaller hook to create miniature Nemo friends.

I sometimes make a larger, cuddlier fish by using a bulkier chenille or velvet yarn and increasing hook size for a plush toy.

I like to experiment with eye styles; swap safety eyes for embroidered eyes if you prefer a fully handmade, child-safe toy.

I sometimes add a tiny loop at the top to turn the fish into an ornament or bag charm β€” perfect for gifting.

I recommend trying fun stripe placements or extra thin stripes for a whimsical look on the body.

I occasionally add a felt or crocheted bow or small accessories to personalize the fish for birthdays or themed gifts.

I encourage you to try embroidering different mouth expressions β€” a small smile, a surprised O, or even a wink to change the personality.

I like to mix yarn textures; pairing the velvet body with a slightly different textured yarn for the fin edging creates a neat contrast.

I also suggest blocking or gently shaping the sewn fins after sewing to get a crisp and attractive final appearance.

Common Mistakes & How to Fix Them

βœ— Skipping stitch markers during the continuous spiral can make counting rounds difficult; place a marker at the start of each round to maintain your place. βœ— Changing colors without securing yarn tails can cause loose ends and unraveling; carry or weave ends neatly and tuck them between stitches as you go. βœ— Overstuffing the body will distort the shape and make sewing the tail and fins awkward; stuff gradually and shape gently for even curvature. βœ— Not checking stitch counts after increases or decreases will cause uneven shaping; count your stitches at the end of each round to catch mistakes early.

Nemo The Clown Fish Amigurumi Pattern

Bring a cheerful Nemo the Clown Fish to life with this detailed crochet amigurumi pattern. You will enjoy color changes, cute fins, and a smiling embroidered face as you work. The pattern includes step-by-step rounds, assembly photos, and finishing tips to guide you. Perfect for gifting or adding a playful touch to your handmade collection.

Intermediate 5-7 Hours

Materials Needed for Nemo The Clown Fish Amigurumi Pattern

β€” Main Fabric

  • 01
    Himalaya Velvet Yarn - Orange 90016 (use for main body and fins)
  • 02
    Himalaya Velvet Yarn - White 90001 (use for stripes)
  • 03
    Himalaya Velvet Yarn - Black 90011 (use for stripe edges and fin edging)

β€” Tools Required

  • 01
    Crochet hook 4 mm
  • 02
    Safety eyes 16 mm (2 pieces)
  • 03
    Small amount of black amigurumi thread for smiling face embroidery
  • 04
    Tapestry needle
  • 05
    Filling (polyester stuffing)
  • 06
    Scissors

Progress Tracker

0% Complete

β€” Materials :

Info :

Yarn/wool: I have used Himalaya Velvet Yarn: Orange 90016, White 90001, Black 90011. Crochet hook: 4 mm. Safety eyes 16 mm. Small amount of black amigurumi thread for smiling face embroidery. Tapestry needle. Filling. Scissors.

β€” Abbreviations :

Infos :

Sc - single crochet. Slst - slip stitch. Ch - Chain. Inc - Increase (2 sc in next st). Dec - Decrease (2 sc worked off together). HDC - Half Double Crochet. ()* - repeat the instruction stated in parantheses all around. FO - fasten off. (B) - Change with Black thread. (W) - Change with White thread. (O) - Change with Orange thread.

β€” Important Notes :

Info :

All rounds are worked in a continuous spiral. You may find it useful to use a stitch marker for counting your rounds. While stuffing take care to give each part a nice shape. Knit using the crossed stitch. Using the given yarn and hook size the complete size of Nemo Clown Fish will be 20 cm -24 cm (7.87401 inches - 9.44881 inches).

β€” Body :

Round 1 :

6 sc into the magic ring (6)

Round 2 :

(inc) * 6 (12)

Round 3 :

(sc, inc) * 6 (18)

Round 4 :

sc, inc, (2 sc, inc)* 5, sc (24)

Round 5 :

(3 sc, inc)* 6 (30)

Round 6 :

2 sc, inc, (4 sc, inc) * 5, 2 sc (36)

Round 7 :

sc, inc, (3 sc, inc) * 8, 2 sc (45)

Round 8 :

45 sc (B) (45)

Round 9-10 :

45 sc (W) 2 rows (45)

Round 11 :

45 sc (B) (45)

Round 12-13 :

45 sc (O) 2 rows (45)

Round 14 :

45 sc (B) (45)

Round 15-17 :

45 sc (W) 3 rows (45)

Round 18 :

45 sc (B) (45)

Round 19-20 :

45 sc (O) 2 rows (45)

Info :

Safety eyes will be attached between the 5th and 6th row.

Round 21 :

sc, dec, (3 sc, dec)* 8, 2 sc (O) (36)

Round 22 :

2 sc, dec, (4 sc, dec)* 5, 2 sc (B) (30)

Round 23 :

(3 sc, dec)* 6 (W) (24)

Round 24 :

(2 sc, dec)* 6 (B) (18)

Round 25 :

(sc, dec)* 6 (O) (12)

Round 26 :

(dec)* 6 (O) (6)

Info :

1 Slst to next empty stitch, pull 1 chain. F.O. Stuff. Cut the yarn short and hide.

β€” Side Fin (x2) :

Info :

With orange thread. Leave the orange thread long for sewing and cut when indicated.

Round 1 :

6 sc into the magic ring (6)

Round 2 :

(inc)* 6 (12)

Round 3 :

(3 sc, inc)* 3 (15)

Round 4 :

(4 sc, inc)* 3 (18)

Round 5 :

(5 sc, inc)* 3 (21)

Round 6 :

(6 sc, inc)* 3 (24)

Info :

With black thread: Take opposite stitches and crochet 12 sc as you can see in the pics.

Info :

1 Slst to next empty stitch, pull 1 chain. F.O. Cut the yarn short and hide.

β€” Upper Fin (x2) :

Info :

With orange thread. Pull 4 chains. Start to crochet in second chain. All rows will be HDC. Leave thread long for sewing.

Round 1 :

3 HDC, turn and Ch1 (3)

Round 2 :

2 HDC, inc HDC, turn and Ch1 (4)

Round 3 :

4 HDC, turn and Ch1 (4)

Round 4 :

4 HDC, turn and Ch1 (4)

Round 5 :

Dec HDC, 2 HDC, turn and Ch1 (3)

Round 6 :

HDC, Dec HDC (2)

Info :

1 Slst to next empty stitch. Leave the thread long for sew.

Info :

Place the second piece you knit on top of the first piece. As noted in the figure: the bottom straight edge will have 9 sc with orange thread and the curved edges will be edged with 11 sc with black thread (see diagram). The edges will be crocheted 1 row.

Info :

With black thread take opposite stitches and crochet 15 sc as you can see in the pics for the upper fin edge.

Info :

1 Slst to next empty stitch, pull 1 chain. F.O. Cut the yarn short and hide.

β€” Tail :

Info :

With orange thread. Leave the orange thread long for sewing and cut after knitting.

Round 1 :

6 sc into the magic ring (6)

Round 2 :

(inc)* 6 (12)

Round 3 :

(3 sc, inc)* 3 (15)

Round 4 :

(4 sc, inc)* 3 (18)

Round 5 :

(5 sc, inc)* 3 (21)

Round 6 :

(6 sc, inc)* 3 (24)

Round 7 :

(7 sc, inc)* 3 (27)

Round 8 :

(8 sc, inc)* 3 (30)

Info :

With black thread: Take opposite stitches and crochet 15 sc as you can see in the pics. 1 Slst to next empty stitch, pull 1 chain. F.O. Cut the yarn short and hide.

β€” Assembly & Finishing :

Item Name (P1) :

Sewing the tail: The tail will be sewn to the last 2 rows of the body.

Item Name (P2) :

Sewing the side fins: The upper/larger side fin will be sewn between the 12th and 15th rows of the body (position both fins symmetrically).

Item Name (P3) :

Sewing the upper fin: The upper fin will be sewn between the 11th and 20th rows of the body (center on top).

Item Name (P4) :

Smiling face embroidery: Use black amigurumi thread and tapestry needle to embroider a smiling mouth on the front. Work placement as shown in photos and secure ends on the inside.

Info :

Safety eyes will be attached between the 5th and 6th row. Fasten off and hide all ends after sewing pieces securely.

Assembly Instructions

  • Sew the tail to the opening at the rear of the body, aligning it with the last two rounds of the body and sew securely with the long orange tail using whipstitch.
  • Position and sew each side fin between the 12th and 15th rows of the body, matching the stripes and spacing the fins evenly on each side before stitching.
  • Place and sew the upper fin centered on the top of the body between the 11th and 20th rows, using the long tail and whipstitch to secure it firmly.
  • Attach safety eyes between the 5th and 6th round, checking placement and symmetry before locking them in place; secure safely if intended for children.
  • Embroider the smiling face with black amigurumi thread, following the photo guide for shape and placement, and secure the thread ends inside the body.
  • Weave in and hide all yarn ends after assembly; stuff the body evenly throughout assembly to maintain a smooth, round shape.

Important Notes

  • πŸ’‘All rounds are worked in a continuous spiral; avoid joining rounds with slip stitch unless explicitly instructed.
  • πŸ’‘Use a stitch marker to keep track of the start of each round, especially when changing colors and shaping your piece.
  • πŸ’‘Stuff gradually and shape as you go to avoid overstuffing which can distort the finished shape of the fish.
  • πŸ’‘Leave long sewing tails for fins and tail when instructed so you can position pieces before finishing sewing.

This Nemo the Clown Fish pattern makes a delightful, squishy friend that is as fun to make as it is to cuddle. It features bold stripes, soft plush texture, and an irresistible smile that brightens any shelf or nursery. Perfect for gifting or adding a handmade touch to your home β€” happy crocheting! 🧢🐟

You ask,

we answer.

FAQs

What size will the finished piece be?

The finished amigurumi measures approximately 20-24 cm tall when using the recommended Himalaya Velvet yarn and 4 mm hook.

Can I use different yarn weights for this pattern?

Yes, you can use different yarn weights, but it will affect the final size and stitch definition; adjust your hook size accordingly for best results.

Do I need prior crochet experience for this pattern?

This pattern is rated intermediate, so basic knowledge of single crochet, increases, decreases, and simple color changes is recommended.

How long does this project typically take to complete?

Most crocheters complete this project in 5-7 hours, though time may vary based on experience level and how much time you spend on finishing and assembly.