๐Ÿงถ Beautiful โœจ Detailed ๐Ÿ’ Adorable

Penguin Lilo Amigurumi Pattern

Penguin Lilo Amigurumi Pattern
3.9โ˜… Rating
5-7 Hours Time Needed
4.0K Made This
โœ‚๏ธ

Intermediate Level

Ideal for those with basic crochet experience, featuring slightly more advanced stitches and techniques to expand your skills.

โฑ๏ธ

Weekend Treat

Takes 5-7 hours, making it an enjoyable project to finish over a couple of days.

๐Ÿงธ

Cute Companion

An adorable friend to cherish, handcrafted with love to bring comfort and joy for years to come.

About This Penguin Lilo Amigurumi Pattern

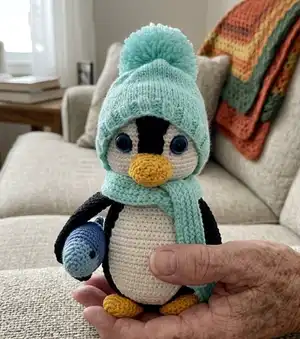
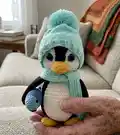
This pattern creates a sweet little penguin named Lilo with a knitted hat, pompom and scarf. You will crochet the body, head, wings, tail, beak, paws and a tiny fish, then assemble and add knitted accessories. The pattern includes step-by-step rounds and turning rows with photos to help you along the way.

Penguin Lilo Amigurumi Pattern crochet pattern - detailed view of completed project

Perfect for gift-making or adding to your amigurumi collection, the design uses soft yarns for a plush finish. Both crochet and simple knitting instructions are included for hat and scarf.

Why You'll Love This Penguin Lilo Amigurumi Pattern

I absolutely love this pattern because the character has so much personality packed into a small design. I enjoyed combining textured yarn for the body with bright accent colors for the beak and feet, which brings the penguin to life. The knitted hat and scarf add a cozy finishing touch that makes the project feel complete. I also appreciate that it mixes crochet and simple knitting โ€” it keeps the process varied and fun.

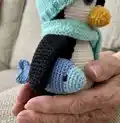
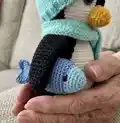
Penguin Lilo Amigurumi Pattern step 1 - construction progress Penguin Lilo Amigurumi Pattern step 2 - assembly progress Penguin Lilo Amigurumi Pattern step 3 - details and accessories Penguin Lilo Amigurumi Pattern step 4 - final assembly and finishing

Switch Things Up

I love how easy it is to customize Penguin Lilo with color swaps; try pastel shades for a nursery-friendly version or bold brights for a playful look.

Change the yarn weight and hook to make different sizes โ€” bulky yarn gives a cuddly chunky penguin, while thinner yarn yields a tiny keychain-sized friend.

I often switch the hat color or add stripes to the scarf for seasonal variations; stripes, polka dots or tiny embroidered hearts add personality.

You can swap safety eyes for embroidered eyes if the toy is for very small children to make it fully soft and safe.

For a posable version, insert a short piece of wire in the wings or legs before stuffing, and wrap it in yarn to hide and secure it.

Add accessories such as a tiny crocheted backpack, a bow or miniature mittens to create themed characters like holiday or birthday penguins.

Try using eyelash or textured yarn for the body to create a fluffy, soft-feel penguin that looks different and tactile.

I sometimes embroider eyelashes or eyebrows to alter the expression and personality โ€” small placement changes of the mouth and eyes change the character a lot.

Make a matching set by crocheting several fish toys, each with different colors, and hang them on a tiny cord for a playful accessory the penguin can 'hold'.

Don't be afraid to experiment with the knitted hat length or pompom size โ€” a gigantic pompom creates a whimsical look while a small one keeps it classic.

Common Mistakes & How to Fix Them

โœ— Placing eyes too high or too low can change the penguin's expression; measure and mark between rounds 16 and 17 and space eyes 7-8 loops apart before securing. โœ— Skipping stuffing until later causes gaps and uneven shaping; start stuffing gradually at the recommended rounds and continue stuffing as you shape decreases to maintain a smooth silhouette. โœ— Pulling decreases too tight can distort stitch tension and create dimples; use consistent tension and ease the stuffing while finishing decrease rounds to avoid puckering. โœ— Forgetting to leave long sewing tails makes assembly fiddly; leave generous thread ends when fastening off so you can sew pieces securely without ripping stitches to get more yarn.

Penguin Lilo Amigurumi Pattern

Make your own adorable Penguin Lilo with this complete crochet and knitting pattern. You will create a soft, poseable penguin with a knitted hat, pompom and scarf โ€” perfect as a gift or display. Detailed instructions guide you through crocheting each part, assembly and finishing touches so you can craft a charming handmade friend.

Intermediate 5-7 Hours

Materials Needed for Penguin Lilo Amigurumi Pattern

โ€” Main Fabric

  • 01
    YarnArt Jeans 160m/50g - No.03 Milk - half a skein
  • 02
    YarnArt Jeans 160m/50g - No.35 Yellow - a little, for the beak and paws
  • 03
    Alize Softy 115m/50g - black - a little more than half a skein
  • 04
    Alize Lana Cotton 160m/50g - No.15 Mint - half skein for hat and scarf crocheted
  • 05
    Acrylic yarn 200m/50g - half skein for hat, pompom, scarf knitted and fish
  • 06
    Matching faux fur pompom - 1
  • 07
    Small amounts of milky (cream) color for belly and head

โ€” Tools Required

  • 01
    Crochet hook size No.2 (2.0 mm)
  • 02
    Knitting needles size 2 mm for hat and scarf
  • 03
    Safety eyes d=12 mm (2 pieces)
  • 04
    2 half-beads diameter 6 mm for fish (and glue)
  • 05
    Scissors
  • 06
    Yarn needle for sewing
  • 07
    Stitch markers or pins
  • 08
    Polyester stuffing (filler)
  • 09
    Pins for assembly
  • 10
    Glue for fish beads

Progress Tracker

0% Complete

โ€” Head :

Round 1 :

6 sc in MR (6)

Round 2 :

6 inc (12)

Round 3 :

(sc,inc)*6 (18)

Round 4 :

(2 sc,inc)*6 (24)

Round 5 :

(3sc,inc)*6 (30)

Round 6 :

(4sc,inc)*6 (36)

Round 7 :

(5 sc,inc)*6 (42)

Round 8 :

(6sc,inc)*6 (48)

Round 9 :

(7sc,inc)*6 (54)

Round 10-17 :

54 sc (8 rnds)

Info :

Insert the eyes between the 16 and 17 rows, at a distance of 7-8 loops

Round 18 :

9sc, (sc,inc)*6, 12 sc, (inc,sc)*6, 9 sc (66)

Round 19-24 :

66 sc (5 rnds)

Round 25 :

9sc, (sc,dec)*6, 12 sc, (dec,sc)*6, 9sc (54)

Round 26 :

(7sc,dec)*6 (48)

Info :

Start filling the part

Round 27 :

(6sc,dec)*6 (42)

Round 28 :

(5sc,dec)*6 (36)

Round 29 :

(4sc,dec)*6 (30)

Round 30 :

(3sc,dec)*6 (24)

Round 31 :

(2sc,dec)*6 (18)

Info :

The thread to secure and trim

โ€” Beak :

Info :

Crochet with a yellow color. It consists of two identical parts. Crochet in turning rows.

Row 1 :

3 ch, turn. We begin to crochet in the 2nd st from the hook

Row 2 :

2 inc, ch, turn

Row 3 :

4 sc, ch, turn

Row 4 :

inc, 2sc, inc, ch, turn

Row 5 :

inc, 4sc, inc, ch, turn

Row 6 :

inc, 6sc, inc, ch. Tie the part sc, trim the thread.

Info :

We don't cut the thread on the second part. When two parts are connected put them together and crochet sc. Do not crocheting the part where the beak will be sewn to the head.

โ€” Hood :

Info :

Crochet with Alize Softy, black color.

Round 1 :

6 sc in MR (6)

Round 2 :

6 inc (12)

Round 3 :

(sc, inc)*6 (18)

Round 4 :

(2 sc, inc)*6 (24)

Round 5 :

(3sc, inc)*6 (30)

Round 6 :

(4sc, inc)*6 (36)

Round 7 :

(5 sc, inc)*6 (42)

Round 8 :

(6sc, inc)*6 (48)

Round 9 :

(7sc, inc)*6 (54)

Round 10 :

(8sc, inc)*6 (60)

Round 11 :

(9sc, inc)*6 (66)

Round 12-19 :

66 sc (8 rnds)

Info :

Next, we crochet in turning rows

Row 20-22 :

8 sc, ch, turn

Row 23 :

sc, dec, 2sc, dec, sc, ch. turn

Row 24 :

sc, 2 dec, sc, ch, turn

Row 25-28 :

4 sc

Info :

The thread to secure and trim

โ€” Assembly and design of the head :

Info :

Wear a hood and sew it to head (photos 1, 2). Fill the beak and sew it to the head as shown in the photo (photo 8, 9). Make a tightening (photo 3-7).

โ€” Body :

Info :

Crochet with Alize Softy, black color.

Round 1 :

6 sc in MR (6)

Round 2 :

6 inc (12)

Round 3 :

(sc, inc)*6 (18)

Round 4 :

(2 sc, inc)*6 (24)

Round 5 :

(3sc,inc)*6 (30)

Round 6 :

(4sc,inc)*6 (36)

Round 7 :

(5 sc,inc)*6 (42)

Round 8 :

(6sc,inc)*6 (48)

Round 9 :

(7sc,inc)*6 (54)

Round 10 :

(8sc,inc)*6 (60)

Round 11-18 :

60 sc (8 rnds)

Round 19 :

(8 sc,dec)*6 (54)

Round 20-22 :

54 sc (3 rnds)

Round 23 :

(7 sc,dec)*6 (48). Start filling the part

Round 24-25 :

48 sc

Round 26 :

(6sc,dec)*6 (42)

Round 27-28 :

42 sc

Round 29 :

(5sc,dec)*6 (36)

Round 30-31 :

36 sc

Round 32 :

(4sc,dec)*6 (30)

Round 33-34 :

30 sc

Info :

The thread to secure and trim

โ€” Tail :

Info :

Crochet with Alize Softy, black color. Do not fill the part.

Round 1 :

6 sc in MR (6)

Round 2 :

(sc,inc)*3 (9)

Round 3 :

(2sc,inc)*3 (12)

Round 4 :

(3sc,inc)*3 (15)

Round 5 :

(4sc,inc)*3 (18)

Round 6 :

(5sc,inc)*3 (21)

Info :

Fold the part in half and crocheting the both side. Fasten the thread and cut it off, leave the end for sewing.

โ€” Belly :

Info :

Crochet with a milky color, crochet in turning rows.

Row 1 :

11 ch, turn. In the next row, we begin to crochet with the 2nd st from the hook

Row 2-3 :

10 sc, ch, turn

Row 4 :

sc, inc, 6sc, inc, sc, ch, turn

Row 5 :

12 sc, ch, turn

Row 6 :

sc, inc, 8sc, inc, sc, ch, turn

Row 7 :

14 sc, ch, turn

Row 8 :

sc, inc, 10sc, inc, sc, ch, turn

Row 9 :

16 sc, ch, turn

Row 10 :

sc, inc, 12sc, inc, sc, ch, turn

Row 11 :

18 sc, ch, turn

Row 12 :

sc, inc, 14sc, inc, sc, ch, turn

Row 13-19 :

20 sc, ch, turn (7 rows)

Row 20 :

sc, dec, 14sc, dec, sc, ch, turn

Row 21 :

18 sc, ch, turn

Row 22 :

sc, dec, 12sc, dec, sc, ch, turn

Row 23 :

16 sc, ch, turn

Row 24 :

sc, dec, 10sc, dec, sc, ch, turn

Row 25 :

sc, dec, 8sc, dec, sc, ch, turn

Row 26 :

sc, dec, 6sc, dec, sc, ch, turn

Row 27 :

sc, dec, 4sc, dec, sc, ch, turn

Row 28-29 :

8 sc, ch, turn

Info :

Crochet from all sides, use sc. The thread to secure and trim, leaving the end for sewing.

โ€” Wings :

Info :

Crochet 4 parts: 2 in milky color and 2 in black color. First crochet the light details then the black ones. Crocheting in turning rows.

Row 1 :

2 ch, turn. In the next row, we begin to crochet with the 2nd st from the hook

Row 2 :

inc, ch, turn

Row 3 :

2 inc, ch, turn

Row 4 :

2 sc, inc, sc, ch, turn

Row 5 :

5 sc, ch, turn

Row 6 :

3 sc, inc, sc, ch, turn

Row 7 :

6 sc, ch, turn

Row 8 :

4sc, inc, sc, ch, turn

Row 9 :

7 sc, ch, turn

Row 10 :

5sc, inc, sc, ch, turn

Row 11 :

8sc, ch, turn

Row 12 :

6sc, inc, sc, ch, turn

Row 13 :

9sc, ch, turn

Row 14 :

7sc, inc, sc, ch, turn

Row 15 :

10 sc, ch, turn

Row 16 :

8 sc, inc, sc, ch, turn

Row 17 :

11sc, ch, turn

Row 18 :

9sc, inc, sc, ch, turn

Row 19-23 :

12 sc, ch, turn (5 rows)

Row 24 :

9sc, dec, sc, ch, turn

Row 25 :

11sc, ch, turn

Row 26 :

8sc, dec, sc, ch, turn

Row 27 :

10sc, ch, turn

Row 28 :

7 sc, dec, sc, ch, turn

Row 29 :

sc, dec, 6sc, ch, turn

Row 30 :

5 sc, dec, sc, ch

Info :

Crochet from all sides, use sc. Clip and trim the thread. We don't cut the thread on the black part. Fold the light and dark parts and crocheting them together use sc. For one wing, the light part should be in front, for the second behind.

โ€” Paws :

Round 1 :

6 sc in MR (6)

Round 2 :

6 inc (12)

Round 3 :

(sc,inc)*6 (18)

Round 4 :

(5 sc,inc)*3 (21)

Round 5-6 :

21 sc

Round 7 :

(5 sc,dec)*3 (18)

Round 8 :

18 sc

Info :

Fill the part slightly. Fold the part in half and crocheting both sides 9 sc. The thread to secure and trim, leaving the end for sewing.

โ€” Assembling a toy :

Item :

Sew the belly to the body.

Item :

Sew on the head.

Item :

Sew on the wings, tail and paws.

Item :

Wear a hood and sew it to head; fill the beak and sew it to the head; make tightening to shape the face as shown in photos.

โ€” Fish :

Info :

Crochet from acrylic yarn. We fill it in the process of crocheting, not tightly.

Round 1 :

6 sc in MR (6)

Round 2 :

(sc, inc)*3 (9)

Round 3 :

(2 sc, inc)*3 (12)

Round 4 :

(3 sc, inc)*3 (15)

Round 5 :

15 sc

Round 6 :

(4 sc, inc)*3 (18). Changing the yarn color

Round 7 :

(8 sc, inc)*2 (20)

Round 8 :

(9 sc, inc)*2 (22)

Round 9 :

(10 sc, inc)*2 (24)

Round 10-14 :

24 sc (5 rnds)

Round 15 :

(10 sc, dec)*2 (22)

Round 16-17 :

22 sc (2 rnds)

Round 18 :

(9 sc, dec)*2 (20)

Round 19 :

20 sc

Round 20 :

(8 sc, dec)*2 (18)

Round 21 :

18 sc

Round 22 :

(7 sc, dec)*2 (16)

Round 23 :

(6 sc, dec)*2 (14)

Round 24 :

(5 sc, dec)*2 (12)

Round 25 :

(4 sc, dec)*2 (10)

Round 26 :

(3 sc, dec)*2 (8)

Info :

Fold in half and crochet on both sides 4 sc. Fasten and trim the thread. Glue the half-bead eyes (6 mm) for the fish.

โ€” Hat and Scarf knitted with knitting needles :

Info :

We knit from acrylic yarn with knitting needles number 2. The cap is knitted without a seam, in a circle. Dial 72 loops, close in a circle.

Instruction :

Knit 6 rows K2P2. Knit another 30 rows, unchanged, all loops knit stitch.

Instruction :

Then in each row we make subtractions: (10K, K2tog)*6; (9K, K2tog)*6; (8K, K2tog)*6; (7K, K2tog)*6; (6K, K2tog)*6; (5K, K2tog)*6; (4K, K2tog)*6; (3K, K2tog)*6; (2K, K2tog)*6. Pull the hole. Make a pompom and sew it to the hat.

Instruction :

Scarf: knit the front stitch. Dial 10 loops and knit to the desired length.

โ€” Hat and scarf crocheted :

Info :

Crochet from Alize Lana Cotton. Crocheted in turning rows.

Row 1 :

26 ch, start with the 2nd st from the hook, 25 sc, ch, turn

Row 2-51 :

BLO 25 sc, ch, turn (50 rows)

Row 52 :

BLO 25 sc. Fasten the thread and cut it off, leaving the end for sewing. Sew the first and last rows of the cap. Pull the hole off on one side. Attach a pompom.

Scarf :

How to crochet a scarf is shown in the video link. 1 row- 111 ch, start with the 2nd st from the hook, crochet 110 slst, ch. turn. 2-7 rows- 110 slst, ch, turn. 8 row- 110 slst. Fasten and trim the thread.

Assembly Instructions

  • Wear the hood over the head and sew it to the head (photos 1-2), arranging the face opening evenly and pinning before sewing.
  • Insert safety eyes between rounds 16 and 17 spaced 7-8 loops apart, then continue crocheting and finish the head; fill and tighten the face area using the tightening method shown in photos 3-7.
  • Fill the beak, assemble the two beak halves, sew the beak to the head centered on the face as shown in photos 8-9.
  • Sew the belly panel to the front of the body, then attach the head to the top opening; sew wings, tail and paws to the body ensuring even spacing for a balanced finish.

Important Notes

  • ๐Ÿ’กPlace stitch markers at the beginning of each round and when changing from rounds to turning rows to maintain accurate shaping.
  • ๐Ÿ’กStuff gradually and evenly as you work decreases so the shape stays smooth and stuffing does not become visible through stitches.
  • ๐Ÿ’กPin all parts in place and check symmetry before sewing permanently; this ensures even placement of wings, feet and facial features.

Thank you for choosing Penguin Lilo โ€” I hope this pattern sparks joy as you stitch! ๐Ÿงถ Make something cozy and heartfelt for yourself or a loved one, and enjoy every step of the process. ๐Ÿงต Share your finished penguin so others can be inspired by your handmade creation! โœจ

You ask,

we answer.

FAQs

What size will the finished piece be?

The finished amigurumi measures approximately 9.05 inches tall when using the recommended yarns and hook/needle sizes noted in the materials section.

Can I use different yarn weights for this pattern?

Yes, you can use different yarn weights but the final size will change; adjust hook and needle sizes accordingly and expect differences in texture and stuffing needs.

Do I need prior crochet and knitting experience for this pattern?

This pattern is rated intermediate; basic crochet stitches, working in the round, turning rows, and simple knitting (K2,P2 and K2tog) are recommended for best results.

How long does this project typically take to complete?

Most crafters complete this project in 5-7 hours, though time may vary depending on experience level and whether you knit the hat and scarf by hand or machine.