🧢 Beautiful ✨ Detailed πŸ’ Adorable

Storm the Deer Amigurumi Pattern

Storm the Deer Amigurumi Pattern
4.7β˜… Rating
5-7 Hours Time Needed
2.0K Made This
βœ‚οΈ

Intermediate Level

Ideal for those with basic crochet experience, featuring slightly more advanced stitches and techniques to expand your skills.

⏱️

Weekend Treat

Takes 5-7 hours, making it an enjoyable project to finish over a couple of days.

🧸

Cute Companion

An adorable friend to cherish, handcrafted with love to bring comfort and joy for years to come.

About This Storm the Deer Amigurumi Pattern

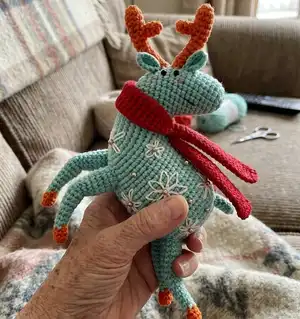
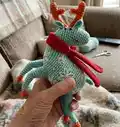
This pattern teaches you to crochet a playful deer amigurumi with separate antlers, ears, legs and a scarf. It features shaping rounds for a rounded body and detailed finishing like embroidered flowers. The instructions include clear round counts, stuffing guidance and assembly tips so you can recreate the pictured deer.

Storm the Deer Amigurumi Pattern crochet pattern - detailed view of completed project

Perfect for gifting or decorating, the pattern uses Gazzal Jeans yarn and small amounts of accent colors for details. Photos and finishing notes help you place eyes, embroider motifs, and sew everything neatly together.

Why You'll Love This Storm the Deer Amigurumi Pattern

I absolutely love this pattern because it balances simple rounds with charming details that bring the deer to life. I enjoy how the separate antler pieces let you position the branches for personality. The embroidery options let me add my own creative touch each time I make one. I also appreciate the clear assembly notes that make sewing the legs, ears and scarf straightforward and satisfying.

Storm the Deer Amigurumi Pattern step 1 - construction progress Storm the Deer Amigurumi Pattern step 2 - assembly progress Storm the Deer Amigurumi Pattern step 3 - details and accessories Storm the Deer Amigurumi Pattern step 4 - final assembly and finishing

Switch Things Up

I love switching colors to change the mood of this deer; using pastel shades gives a sweet nursery friend while bright colors make a festive decoration.

I often swap yarn weights to create size variations β€” a thicker yarn with a larger hook makes a chunkier cuddly deer, while thinner yarn makes a tiny keychain-ready version.

I sometimes replace the wire in the antlers with pipe cleaners for a safer, bendable option for kids' toys.

I like to add beads or small bells to the embroidered flowers for a sparkly finishing touch that catches light.

If I want a winter look I embroider snowflakes in white and use silver thread for shiny accents across the body.

To create a set, I crochet multiple deer in complementary colors and make scarves in alternating colors for a charming collection.

I also experiment with eye styles β€” safety eyes, sewn-on beads or embroidered eyes each change the character significantly.

For a different silhouette, I sometimes lengthen the legs by adding a few extra rounds before shaping the hooves for a lankier look.

I personalize some as ornaments by adding a loop of yarn at the top of the head for hanging on a tree.

Finally, I vary the scarf style β€” a chunky ribbed scarf, a tiny bow, or a long flowing scarf β€” to give each deer its own personality and charm.

Common Mistakes & How to Fix Them

βœ— Skipping stitch markers at the start of rounds causes you to lose your place quickly; place a marker at the last stitch to mark the beginning of each round. βœ— Stuffing too late or unevenly leads to lumps and an odd shape; stuff gradually as you work and check shape often to maintain even fullness. βœ— Using a hook that is too large creates loose stitches that show stuffing; use the recommended hook size and crochet tightly for amigurumi firmness. βœ— Forgetting to count stitches after increases or decreases results in incorrect shaping; count after every shaping round to ensure correct stitch totals. βœ— Sewing parts without pinning first makes placement uneven; pin legs, ears and antlers in position and check symmetry before stitching them securely.

Storm the Deer Amigurumi Pattern

Create a whimsical hand-crocheted deer full of personality with this complete amigurumi pattern. You will crochet the body, head, legs, ears, antlers and a cozy scarf, then add embroidered flowers and finishing touches. Clear round-by-round instructions guide you through shaping and assembly so you can make a charming keepsake or gift.

Intermediate 5-7 Hours

Materials Needed for Storm the Deer Amigurumi Pattern

β€” Main Fabric

  • 01
    Gazzal Jeans yarn (58% cotton, 42% polyacrylic; 170m / 50g) - main color (beige or teal) approx 50-100g depending on size
  • 02
    Scraps of yarn in contrasting colors for embroidery and details (small amounts, may use embroidery thread)
  • 03
    Accent color yarn (teal blue or orange) small amounts for antlers, hooves and details
  • 04
    Pink yarn scrap for scarf (or main scarf color) approx 20-30g

β€” Tools Required

  • 01
    Crochet hook size B-1 / 2.0 mm
  • 02
    Sewing needle for finishing
  • 03
    Yarn/tapestry needle for weaving ends
  • 04
    Stitch markers
  • 05
    Pins for assembly
  • 06
    Scissors
  • 07
    Polyester fiberfill for stuffing
  • 08
    Approx. 12 cm of wire for antlers
  • 09
    Small black glass beads 2 mm (optional) or safety eyes
  • 10
    Embroidery thread or scraps for decoration

Progress Tracker

0% Complete

β€” Please read carefully before getting started :

Infos :

Most of the pieces are crocheted in spiral. Use a stitch marker or piece of contrasting color yarn to mark the beginning of each round. Crochet tightly to avoid stuffing showing through. Add stuffing in small portions so it is distributed evenly. Use the artistic side to find positions for the facial features, eyes, ears, smile and antlers when assembling the toys. Use pins to hold the pieces in place before sewing.

β€” Body and Head :

Info :

Ch 11 in beige

Round 1 :

start in second ch from hook, inc, 8 sc, 4 sc in next st, 8 sc, inc |24|

Round 2 :

2 inc, 8 sc, 4 inc, 8 sc, 2 inc |32|

Round 3 :

(sc, inc) x 2, 8 sc, (sc, inc) x 4, 8 sc, (sc, inc) x 2 |40|

Round 4 :

sc in all 40 st |40|

Round 5 :

(sc, inc) x 3, 8 sc, (sc, inc) x 6, 8 sc, (sc, inc) x 3 |52|

Round 6 :

sc in all 52 st |52|

Round 7 :

(sc, inc) x 3, 40 sc, (sc, inc) x 3 |58|

Round 8 :

26 sc, (2 sc, inc) x 2, 26 sc |60|

Round 9 :

(sc, inc) x 3, 48 sc, (sc, inc) x 3 |66|

Round 10-12 :

(3 rounds) sc in all 66 st |66|

Info :

Divide the work into 4 parts with stitch markers, using 20 stitches for the head, 5 stitches for the neck, 36 stitches for the body and another 5 stitches for the neck. Continue crocheting the body in beige yarn.

Round 13 :

(5 sc, inc) x 3, skip 30 sc, (5 sc, inc) x 3 |42|

Info :

Leave the remaining stitches unworked.

Round 14-25 :

(12 rounds) sc in all 42 st |42|. Stuff the body firmly with fiberfill and continue stuffing as you go.

Round 26 :

(5 sc, dec) x 6 |36|

Round 27 :

sc in all 36 st |36|

Round 28 :

9 sc, (sc, dec) x 6, 9 sc |30|

Round 29 :

6 sc, (sc, dec) x 6, 6 sc |24|

Round 30 :

sc, (dec, 2 sc) x 5, dec, sc |18|

Round 31 :

(sc, dec) x 6 |12|

Round 32 :

6 dec |6|

Info :

Fasten off leaving a tail about 10 cm long and cut the yarn. Using a tapestry needle, weave the yarn tail through the front loops of the six stitches and pull tight to close. Weave in the yarn end.

Info :

Go back to round 12. Hold the body with the open side towards you. Count 5 stitches from the body and pull up a loop of beige yarn in the 6th stitch. Leave a long starting yarn tail. Start crocheting the head.

Round 1 :

sc in all 20 st |20|. Leave the remaining stitches unworked. Sc in the first st to close the round.

Info :

Mark the last stitch with a stitch marker, this is the new beginning of the round.

Round 2-4 :

(3 rounds) sc in all 20 st |20|

Round 5 :

dec, 14 sc, dec, 2 sc |18|

Round 6-7 :

(2 rounds) sc in all 18 st |18|

Round 8 :

(sc, dec) x 6 |12|

Round 9 :

6 dec |6|

Info :

Fasten off leaving a tail long and cut the yarn. Using a tapestry needle, weave the yarn tail through the front loops of the six stitches and pull tight to close. Weave in the yarn end. Use the beige starting yarn tail to sew the gap on the neck closed. Before you make the last stitch, make sure the toy is stuffed tightly and evenly, with no palpable lumps and holes inside.

β€” Leg (make 4) :

Info :

Start in teal blue

Round 1 :

6 sc in a MR |6|

Round 2 :

BLO, sc in all 6 st |6|

Round 3 :

sc in all 6 st |6|

Info :

Change to beige yarn. Cut the teal blue yarn.

Round 4 :

inc, 5 sc |7|

Round 5-6 :

(2 rounds) sc in all 7 st |7|

Round 7 :

2 inc, 5 sc |9|

Round 8-9 :

(2 rounds) sc in all 9 st |9|

Info :

Stuff the leg with fiberfill and continue stuffing as you go (don't stuff rounds 1-3).

Round 10 :

4 slst, sc, 3 hdc, sc |9|

Round 11 :

sc, 2 inc, 6 sc |11|

Round 12-13 :

(2 rounds) sc in all 11 st |11|

Round 14 :

3 sc, inc, 7 sc |12|

Round 15-16 :

(2 rounds) sc in all 12 st |12|

Info :

Slst in next st. Fasten off, leaving a long tail for sewing. Sew the legs on the bottom part of the body. Front legs between rounds 5 and 12 an interspace of approx. 2 stitches from below, back legs between rounds 21 and 27 an interspace of approx. 2 stitches from each other.

β€” Antler (make 2) :

Info :

The antler consists of two parts that will be sewn together.

Part 1 - Round 1 :

In teal blue: 6 sc in a MR |6|

Part 1 - Round 2 :

(sc, inc) x 3 |9|

Part 1 - Round 3-4 :

(2 rounds) sc in all 9 st |9|

Part 1 - Info :

Stuff the horn up to this point with fiberfill. The next rounds don't need to be stuffed.

Part 1 - Round 5 :

7 sc, dec |8|

Part 1 - Round 6-7 :

(2 rounds) sc in all 8 st |8|

Part 1 - Round 8 :

6 sc, dec |7|

Part 1 - Round 9-10 :

(2 rounds) sc in all 7 st |7|

Part 1 - Round 11 :

5 sc, dec |6|

Part 1 - Round 12-13 :

(2 rounds) sc in all 6 st |6|

Part 1 - Round 14 :

4 sc, dec |5|

Part 1 - Info :

Slst in next st. Fasten off, leaving a long tail for sewing. Insert a piece of wire.

Part 2 - Round 1 :

In teal blue: 6 sc in a MR |6|

Part 2 - Round 2-3 :

(2 rounds) sc in all 6 st |6|

Part 2 - Info :

Slst in next st. Fasten off, leaving a long tail for sewing. The part 2 doesn't need to be stuffed. Sew the part 2 to the part 1 between rounds 4 and 7 of the part 1. Sew the antlers at the top of the head between rounds 8 and 11 an interspace of approx. 1 stitch from each other.

β€” Ear (make 2) :

Info :

Ch 6 in beige

Round 1 :

start in second ch from hook, slst, 2 sc, hdc, 4 hdc in next st, continue on the other side of the foundation chain, hdc, 2 sc, slst |12|

Info :

Fasten off, leaving a long tail for sewing. Sew the ears to the head under the antlers, before sewing, make a couple of stitches on the ear.

β€” Tail :

Round 1 :

In beige: 5 sc in a MR |5|

Round 2 :

inc, 4 sc |6|

Round 3 :

inc, 5 sc |7|

Round 4 :

inc, 6 sc |8|

Info :

Slst in next st. Fasten off, leaving a long tail for sewing. The tail doesn't need to be stuffed. Sew the tail to the back between rounds 28 and 30 of the body.

β€” Scarf :

Info :

The scarf doesn't need to be stuffed. Ch 5 in pink.

Round 1 :

start in second ch from hook, inc, 2 sc, 4 sc in next st, 2 sc, inc |12|

Round 2-3 :

(2 rounds) sc in all 12 st |12|

Round 4 :

10 sc, dec |11|

Round 5-6 :

(2 rounds) sc in all 11 st |11|

Round 7 :

9 sc, dec |10|

Round 8-9 :

(2 rounds) sc in all 10 st |10|

Round 10 :

8 sc, dec |9|

Round 11-12 :

(2 rounds) sc in all 9 st |9|

Round 13 :

7 sc, dec |8|

Round 14-15 :

(2 rounds) sc in all 8 st |8|

Round 16 :

6 sc, dec |7|

Round 17-18 :

(2 rounds) sc in all 7 st |7|

Round 19 :

5 sc, dec |6|

Round 20 :

sc in all 6 st |6|

Round 21 :

(sc, inc) x 3 |9|

Round 22-23 :

(2 rounds) sc in all 9 st |9|

Round 24 :

(2 sc, inc) x 3 |12|

Round 25-53 :

(23 rounds) sc in all 12 st |12|

Round 54 :

(2 sc, dec) x 3 |9|

Round 55-56 :

(2 rounds) sc in all 9 st |9|

Round 57 :

(sc, dec) x 3 |6|

Round 58 :

sc in all 6 st |6|

Round 59 :

5 sc, inc |7|

Round 60-61 :

(2 rounds) sc in all 7 st |7|

Round 62 :

6 sc, inc |8|

Round 63-64 :

(2 rounds) sc in all 8 st |8|

Round 65 :

7 sc, inc |9|

Round 66-67 :

(2 rounds) sc in all 9 st |9|

Round 68 :

8 sc, inc |10|

Round 69-70 :

(2 rounds) sc in all 10 st |10|

Round 71 :

9 sc, inc |11|

Round 72-73 :

(2 rounds) sc in all 11 st |11|

Round 74 :

10 sc, inc |12|

Round 75-76 :

(2 rounds) sc in all 12 st |12|

Info :

Flatten the scarf and work the next round through both layers to close.

Round 77 :

sc in all 6 st |6|

Info :

Fasten off and weave in the yarn end. Sew the scarf to the deer's neck using pink yarn.

β€” Finishing Touches :

Info :

Glue eyes or embroider them on the head between the ears an interspace of approx. 1-2 stitches from each other. Embroider cheek blushes under the eyes using pink yarn and smile using teal blue yarn. Use scraps of teal blue yarn to embroider flowers or snowflakes on body. A water-soluble marker or sewing pins may come in handy here. You can follow the example in the pictures or decorate the deer to your own taste.

Assembly Instructions

  • Sew the legs on the bottom part of the body: position front legs between rounds 5 and 12 with an interspace of approx. 2 stitches from below, and sew back legs between rounds 21 and 27 with approx. 2 stitches spacing between them.
  • Sew the antlers to the top of the head between rounds 8 and 11, leaving an interspace of approximately 1 stitch between the two antlers; insert wire into the antlers before closing for stability.
  • Sew the ears under the antlers on the head; pin them in place and make a couple of anchoring stitches on each ear before secure sewing.
  • Use the beige starting yarn tail to sew the neck gap closed after stuffing; before the final stitch ensure the toy is evenly stuffed with no palpable lumps or holes inside.
  • Sew the tail to the back of the body between rounds 28 and 30 using the long tail left from fastening off.
  • Flatten the scarf and sew through both layers to close the tube, then attach the finished scarf around the deer's neck with pink yarn.

Important Notes

  • πŸ’‘Most pieces are crocheted in spiral; mark the beginning of each round with a stitch marker to keep track of rounds.
  • πŸ’‘Crochet tightly to prevent stuffing from showing through; add filling in small portions so it is distributed evenly.
  • πŸ’‘Pin pieces in position and check symmetry before sewing to ensure correct placement of legs, ears and antlers.
  • πŸ’‘Use a tapestry needle to weave tails through front loops to close openings neatly, and weave in ends securely.
  • πŸ’‘Insert wire into the antlers before closing the pieces if you want the antlers to hold their shape and be slightly posable.

This adorable Storm the Deer amigurumi is perfect for gifting or seasonal decor, with sweet embroidered flowers and a cozy scarf to personalize. Make one in cheerful colors or soft pastels for a unique handmade friend to cherish. Enjoy the satisfying shaping and stitching as your little deer comes to life! 🧢🧡

You ask,

we answer.

FAQs

What size will the finished piece be?

The finished amigurumi measures approximately 20 cm tall with antlers when made with the recommended Gazzal Jeans yarn and 2.0 mm hook.

Can I use different yarn weights for this pattern?

Yes, you can use different yarn weights, but the final size will change; switch hook size appropriately and expect looser or denser fabric depending on yarn choice.

Do I need prior crochet experience for this pattern?

This pattern is rated intermediate and assumes you know single crochet, increases, decreases, working in the round and basic finishing techniques.

How do I make the antlers stable?

Insert approx. 12 cm of wire into the antler part before sewing the two parts together and closing the base; this gives the antlers shape and slight flexibility.

Where should I place the eyes and facial features?

Glue eyes or embroider them between the ears with an interspace of about 1-2 stitches; use the photos as reference for placing cheeks and the smile.