🧶 Beautiful ✨ Detailed 💝 Adorable

Felted Bowl Trio Pattern

Felted Bowl Trio Pattern
4.5★ Rating
5-7 Hours Time Needed
4.2K Made This
✂️

Beginner Friendly Level

Perfect for those just starting their crochet journey, with clear instructions and simple techniques

⏱️

Weekend Treat

Takes 5-7 hours, making it an enjoyable project to finish over a couple of days.

🏡

Cozy Accent

A warm touch for your space that transforms ordinary corners into inviting nooks filled with handmade charm.

About This Felted Bowl Trio Pattern

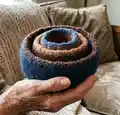
This pattern creates a trio of nesting felted bowls in three sizes using non-superwash worsted wool yarn. The bowls are crocheted in single crochet rounds from the center-bottom outward and finished by felting in the washing machine. The pattern includes color-change finishing methods so you can add contrasting rims or embroidered details using a pen-style felting tool.

Felted Bowl Trio Pattern crochet pattern - detailed view of completed project

Each bowl is sized to nest inside the next and is forgiving in final dimensions thanks to the felting step. Use the included yardage and color suggestions to create a coordinated set or mix colors for a more eclectic look.

Why You'll Love This Felted Bowl Trio Pattern

I absolutely love this pattern because it combines very simple crochet with the satisfying transformation of felting. I enjoy how quickly a circle becomes a bowl and how the felting process gives each piece a sturdy, tactile finish. The project is perfect for experimenting with color and texture, and I often customize the rims and add needle-felted motifs. Making sets of these bowls always feels like a small, handmade celebration of yarn and technique.

Felted Bowl Trio Pattern step 1 - construction progress Felted Bowl Trio Pattern step 2 - assembly progress Felted Bowl Trio Pattern step 3 - details and accessories Felted Bowl Trio Pattern step 4 - final assembly and finishing

Switch Things Up

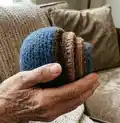
I love changing up the color scheme on these bowls to match different rooms; try tonal blues for a calming set or high-contrast rims for a modern look.

To make larger or smaller bowls, I change my hook size and yarn weight and then test a small swatch to see how felting will affect the final dimensions.

I often combine two strands of lighter yarn held together for a marled effect before felting to create a unique texture after washing.

Try adding needle-felted embroidery or small motifs after the bowls are felted and dry for a permanent decorative finish that pops against the felted background.

For portable or keychain-sized bowls, I use fingering weight wool and a smaller hook, then felt carefully to preserve shape while reducing the final size.

Play with rim finishing by carrying a contrasting color and pulling the tail through at the final round, or by slip stitching with a contrasting yarn to create a neat edge.

I sometimes add a light coating of diluted fabric stiffener after shaping and drying if I want a very firm bowl for small heavy items.

Use a washing bag or pillowcase if youre nervous about felting directly in the machine; it helps protect both the bowls and the washer while still allowing agitation.

If you want a softer, less fulled look, remove the bowls earlier in the felting cycle and reshape by hand, checking frequently so you keep the desired feel.

I also like making coordinated sets in different color families and arranging them nested together; they make lovely handmade gifts and organizers for craft supplies or small household items.

Common Mistakes & How to Fix Them

✗ Using superwash yarn or the wrong fiber; choose non-superwash, 100% wool to ensure successful felting and follow the yarn recommendations in the materials list. ✗ Skipping stitch markers when working in continuous rounds; place a marker at the beginning of the round to avoid losing your place, especially during extended rounds with no increases. ✗ Not weaving in ends before felting; secure and weave in loose ends so they dont become exposed or create uneven felting as the piece goes through the washing machine. ✗ Pulling yarn tails too quickly when changing colors on the last round; gently pull the previous color tail until the loop disappears and then finish the row to avoid loose loops or gaps. ✗ Felting at too high a temperature or with delicate items in the same load; felt bowls alone or with similar wool items and use hot water and agitation per your machines capabilities to avoid felting problems.

Felted Bowl Trio Pattern

Create a set of three nesting felted bowls using simple single crochet rounds and 100% wool yarn. This pattern guides you through three sizes — large, medium, and small — with clear round-by-round instructions and finishing tips for felting and decorating. Perfect for organizing notions, holding small treasures, or gifting as a handmade set. Youll enjoy the tactile process of crocheting and watching the bowls transform in the felting process.

Beginner Friendly 5-7 Hours

Materials Needed for Felted Bowl Trio Pattern

— Main Fabric

  • 01
    Non-superwash, worsted weight, 100% wool yarn
  • 02
    Color A (blue) - approximately 115 yards
  • 03
    Color B (dark brown) - approximately 85 yards
  • 04
    Color C (light golden brown) - approximately 50 yards

— Tools Required

  • 01
    Crochet hook size L (8.0 mm) or size needed to obtain gauge
  • 02
    Locking stitch markers
  • 03
    Tapestry needle
  • 04
    Pen-style felting tool
  • 05
    Washing machine for felting (follow machine safety and care)
  • 06
    Scissors

Progress Tracker

0% Complete

— Large Bowl :

Round 1 :

Using A, make an adjustable ring, 6 sc in ring, pull on beg yarn tail to close hole - 6 sts, do not join, but work in the rnd. Use stitch marker to keep track of beg of rnds.

Round 2 :

2 sc in each st around - 12 sts.

Round 3 :

[Sc in next st, 2 sc in next st] 6 times - 18 sts.

Round 4 :

[2 sc in next st, sc in next 2 sts] 6 times - 24 sts.

Round 5 :

[1 sc in next 2 sts, 2 sc in next st, sc in next st] 6 times - 30 sts.

Round 6 :

[1 sc in next 4 sts, 2 sc in next st] 6 times - 36 sts.

Round 7 :

[1 sc in next 2 sts, 2 sc in next st, sc in next 3 sts] 6 times - 42 sts.

Round 8 :

[1 sc in next 5 sts, 2 sc in next st, sc in next st] 6 times - 48 sts.

Round 9 :

[1 sc in next 1 sts, 2 sc in next st, sc in next 5 sts] 6 times - 54 sts.

Round 10 :

Sc around.

Round 11 :

[1 sc in next 3 sts, 2 sc in next st, sc in next 5 sts] 6 times - 60 sts.

Round 12 :

Sc around.

Round 13 :

[1 sc in next 9 sts, 2 sc in next st] 6 times - 66 sts.

Round 14-21 :

Sc around. Use contrasting st marker to mark post of first st of Rnd 14. This will help keep track of how many rnds have been worked even.

Round 22 :

[1 sc in next 9 sts, sc2tog] 6 times - 60 sts.

Round 23 :

[1 sc in next 3 sts, sc2tog, sc in next 5 sts] 6 times, sl st in first st of rnd - 54 sts.

Round 24 :

Yo with B and pull up loop, pull on A yarn tail until last A loop disappears, ch 1 (does not count as a stitch), sc around, sl st in first sc to fasten off.

Info :

Weave in ends.

— Medium Bowl :

Info :

Using B, work Rnds 1 - 6 of Large Bowl directions.

Round 7 :

Sc around.

Round 8 :

[1 sc in next 2 sts, 2 sc in next st, sc in next 3 sts] 6 times - 42 sts.

Round 9 :

Sc around.

Round 10 :

[1 sc in next 5 sts, 2 sc in next st, sc in next st] 6 times - 48 sts.

Round 11-15 :

Sc around. Use contrasting st marker to mark post of first st of Rnd 11. This will help keep track of how many rnds have been worked even.

Round 16 :

[1 sc in next 6 sts, sc2tog] 6 times - 42 sts.

Round 17 :

[1 sc in next 3 sts, sc2tog, sc in next 2 sts] 6 times, sl st in first st of rnd - 36 sts.

Round 18 :

Yo with C and pull up loop, pull on B yarn tail until last B loop disappears, ch 1 (does not count as a stitch), sc around, sl st in first sc to fasten off.

Info :

Weave in ends.

— Small Bowl :

Info :

Using C, work Rnds 1 - 3 of Large Bowl directions.

Round 4 :

Sc around.

Round 5 :

[2 sc in next st, sc in next 2 sts] 6 times - 24 sts.

Round 6 :

Sc around.

Round 7 :

[1 sc in next 2 sts, 2 sc in next st, sc in next st] 6 times - 30 sts.

Round 8-10 :

Sc around. Use contrasting st marker to mark post of first st of Rnd 8. This will help keep track of how many rnds have been worked even.

Round 11 :

[1 sc in next 4 sts, sc2tog] 6 times- 24 sts.

Round 12 :

Yo with A and pull up loop, pull on C yarn tail until last C loop disappears, ch 1 (does not count as a stitch), sc around, sl st in first sc to fasten off.

Info :

Weave in ends.

— Finishing :

Info :

Felt bowls in washing machine. Shape with hands and air dry after felting is complete. Add strands of yarn to bowls with needle felting tool to decorate.

Assembly Instructions

  • Felt the completed bowls in the washing machine until they reach the desired density, then shape each bowl with your hands while damp and allow to air dry.
  • Weave in and trim all ends securely before felting so loose tails do not show after felting.
  • Use a pen-style felting tool or needle felting to attach small decorative yarn strands or motifs to the felted surface after bowls are dry.
  • Mark the first stitch of the marking round with a contrasting stitch marker to keep track of rounds during construction, especially when working long sequences with no increases.
  • When adding color changes on the final round, gently pull the previous yarn tail until the last loop disappears, then finish the round and fasten off to create a clean rim.

Important Notes

  • 💡Use non-superwash 100% wool for best felting results—some white or off-white wool yarns will not felt well.
  • 💡Work the bowl in the round from the center-bottom outward; decreases at the top edge keep the bowl from stretching out of shape.
  • 💡Use a contrasting stitch marker to mark the post of the first stitch of the designated rounds so you can track how many rounds have been worked even.
  • 💡Weave in ends before felting and follow your washing machines instructions for hot water and agitation when felting to avoid unexpected results.

These nesting felted bowls make charming, handmade home accents that are both practical and beautiful. Add personalized needle-felted details to make each bowl unique and gift-ready. Enjoy the transformation from crocheted piece to felted bowl — its a cozy, satisfying craft project. 🧶✨

You ask,

we answer.

FAQs

What size will the finished piece be?

Bowls measure about 11 (18, 26) inches in circumference before felting and 9 (12.75, 17) inches after felting, depending on the size you make.

Can I use different yarn weights for this pattern?

You can experiment with different yarn weights but felting results and final size will vary; use an appropriate hook and test a swatch before making full bowls.

Do I need prior crochet experience for this pattern?

This pattern is rated beginner friendly; basic knowledge of single crochet and working in the round is helpful for the best results.

How long does this project typically take to complete?

Most crocheters complete the set in 5-7 hours, although felting and drying time may extend the total project duration.