🧢 Beautiful ✨ Detailed πŸ’ Adorable

Cute Plushies Ghost Amigurumi Pattern

Cute Plushies Ghost Amigurumi Pattern
4.9β˜… Rating
2-4 Hours Time Needed
3.5K Made This
βœ‚οΈ

Beginner Friendly Level

Perfect for those just starting their crochet journey, with clear instructions and simple techniques

⏱️

Bite-Sized Project

Finishes in 2-4 hoursβ€”perfect for an afternoon of creative relaxation.

🧸

Cute Companion

An adorable friend to cherish, handcrafted with love to bring comfort and joy for years to come.

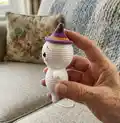
About This Cute Plushies Ghost Amigurumi Pattern

This pattern creates an adorable plush ghost with a little witch hat and embroidered face. It uses plush yarn for an ultra-soft, squishy finish and safety eyes for a clean look. You will crochet and assemble arms, body and head, then sew on the hat and add facial details.

Cute Plushies Ghost Amigurumi Pattern crochet pattern - detailed view of completed project

The finished toy measures about 25 cm (10") tall without the hat when using the recommended materials. The pattern uses US terminology and assumes basic crochet knowledge.

Why You'll Love This Cute Plushies Ghost Amigurumi Pattern

I absolutely love this pattern because it turns simple stitches into a charming character with a lot of personality. I enjoy how the plush yarn makes the ghost feel so cuddly and soft β€” it is perfect for gifting. I love the small creative details like the tiny witch hat and the embroidered expressions that bring each ghost to life. Making this pattern is relaxing and rewarding, and I find the step-by-step rounds easy to follow while still allowing room for personalization.

Cute Plushies Ghost Amigurumi Pattern step 1 - construction progress Cute Plushies Ghost Amigurumi Pattern step 2 - assembly progress Cute Plushies Ghost Amigurumi Pattern step 3 - details and accessories Cute Plushies Ghost Amigurumi Pattern step 4 - final assembly and finishing

Switch Things Up

I love experimenting with colors β€” try soft pastels for a sweet nursery friend or bold Halloween colors for a festive version.

To make a mini keychain, use thinner yarn and a smaller hook; for a larger cuddly toy, use bulkier plush yarn and a larger hook.

I often add felt accessories like tiny scarves or tiny felt stars glued to the hat for extra personality and texture.

Try embroidering different facial expressions by adjusting eye placement and mouth shape for happy, sleepy, or surprised looks.

Make the hat removable by sewing it with a few loose stitches or attaching it with a small snap if you want interchangeable hats.

Use safety joints or add wire inside the arms to create slight posability if you like shaping limbs for display.

Mix yarn textures β€” a fuzzy mohair for the body with plush for the hat β€” to create contrast and a more tactile piece.

Add a small bell or loop inside the hat for a hidden jingle, great for baby-safe sensory toys if you secure it safely.

Personalize with initials embroidered on the back or a tiny crocheted heart sewn to the chest as a signature touch.

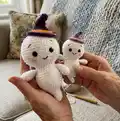
I also enjoy making a family set in graduated sizes: mini, small and medium ghosts to display together as a cute collection.

Common Mistakes & How to Fix Them

βœ— Skipping stuffing until the end can create lumps and uneven shaping; stuff gradually as you go to maintain smooth shaping and control. βœ— Forgetting to flatten and join the arm edges will make the arm look unfinished; flatten the arm and crochet 4 sc through both sides before fastening off. βœ— Not placing the safety eyes at the correct rounds will misplace facial features; insert the safety eyes between rounds 6 and 7 with 8 stitches between them (6 stitches visible) to match the pattern. βœ— Cutting the white yarn after joining the arms will disrupt continuity when continuing the head; do not cut the white yarn after round 24 β€” continue to the head as instructed. βœ— Overstuffing the head too early makes closing the opening difficult and may distort the head shape; stuff firmly but gradually and close the opening neatly to hide yarn ends.

Cute Plushies Ghost Amigurumi Pattern

Make a cuddly ghost plush with this friendly amigurumi pattern. You will crochet a soft body, attach arms, shape a round head, and add a whimsical witch hat and embroidered face. The pattern uses plush yarn for an ultra-soft finish and includes clear, step-by-step rounds you can follow. Perfect for handmade gifts, seasonal decor, or a cozy crafting treat.

Beginner Friendly 2-4 Hours

Materials Needed for Cute Plushies Ghost Amigurumi Pattern

β€” Main Fabric

  • 01
    Plush yarn (100g/120m) White - Himalaya Dolphin Baby 80301 (main color)
  • 02
    Plush yarn (100g/120m) Purple - Himalaya Dolphin Baby 80340 (hat)
  • 03
    Plush yarn (100g/120m) Orange - Himalaya Dolphin Baby 80316 (hat trim)
  • 04
    Black thread for embroidery - YarnArt Jeans 53 (eyebrows and mouth)
  • 05
    Safety eyes 14 mm (2 pieces)

β€” Tools Required

  • 01
    Crochet hook 4.00 mm
  • 02
    Black thread (YarnArt Jeans 53) for embroidering
  • 03
    Safety eyes 14 mm (2 pieces)
  • 04
    Polyester fiberfill stuffing
  • 05
    Scissors
  • 06
    Yarn needle for sewing and hiding ends
  • 07
    Pins for positioning (optional)

Progress Tracker

0% Complete

β€” Arms :

Info :

Crochet with the white yarn. Stuff only lower half of the arm.

Round 1 :

6 sc into a magic ring (6)

Round 2 :

6 inc (12)

Round 3-4 :

12 sc (2 rounds)

Round 5 :

(4 sc, dec)*2 (10)

Round 6 :

10 sc

Round 7 :

(3 sc, dec)*2 (8)

Round 8 :

8 sc

Round 9 :

Flatten the arm and crochet 4 sc through both sides.

Info :

Fasten off and cut the yarn.

β€” Body :

Info :

Crochet with the white yarn. Stuff as you go.

Round 1 :

6 sc into a magic ring (6)

Round 2 :

6 sc (6)

Round 3 :

(sc, inc)*3 (9)

Round 4 :

(2 sc, inc)*3 (12)

Round 5 :

4 inc, 4 dec (12)

Round 6 :

(sc, inc)*6 (18)

Round 7 :

3 sc, 4 inc, 3 sc, 4 dec (18)

Round 8 :

(2 sc, inc)*6 (24)

Round 9 :

6 sc, 4 inc, 6 sc, 4 dec (24)

Round 10 :

(3 sc, inc)*6 (30)

Round 11 :

9 sc, 4 inc, 9 sc, 4 dec (30)

Round 12 :

(4 sc, inc)*6 (36)

Round 13 :

12 sc, 4 inc, 12 sc, 4 dec (36)

Round 14 :

(11 sc, inc)*3 (39)

Round 15-18 :

39 sc (4 rounds)

Round 19 :

(11 sc, dec)*3 (36)

Round 20 :

36 sc

Round 21 :

(4 sc, dec)*6 (30)

Info :

Now we will join the arms:

Round 22 :

7 sc, 4 sc through the first arm and the body, 10 sc, 4 sc through the second arm and the body, 5 sc (30)

Round 23 :

(3 sc, dec)*6 (24)

Round 24 :

24 sc

Info :

Don't cut the white yarn, we will continue with the head.

β€” Head :

Info :

Continue crocheting with the white yarn. Stuff as you go.

Round 1 :

(sc, inc)*12 (36)

Round 2 :

(2 sc, inc)*12 (48)

Round 3 :

(7 sc, inc)*6 (54)

Round 4 :

4 sc, inc, (8 sc, inc)*5, 4 sc (60)

Round 5-7 :

60 sc (3 rounds)

Round 8 :

4 sc, dec, (8 sc, dec)*5, 4 sc (54)

Round 9-11 :

54 sc (3 rounds)

Info :

Insert the safety eyes between rounds 6 and 7 with 8 stitches between them (6 stitches visible). The marker is in the back of the head.

Round 12 :

(7 sc, dec)*6 (48)

Round 13 :

3 sc, dec, (6 sc, dec)*5, 3 sc (42)

Round 14 :

(5 sc, dec)*6 (36)

Round 15 :

2 sc, dec, (4 sc, dec)*5, 2 sc (30)

Round 16 :

(3 sc, dec)*6 (24)

Round 17 :

sc, dec, (2 sc, dec)*5, sc (18)

Round 18 :

(sc, dec)*6 (12)

Round 19 :

6 dec (6)

Info :

Make sure that the head is stuffed firmly. Close the opening and hide the yarn inside.

β€” Embroidering :

Infos :

With a black thread embroider the eyebrows in round 10. They are 2 st wide and with 8 st between them. Embroider the mouth in round 4. It's 3 st wide. Color the cheeks with pink blush.

β€” Hat :

Info :

Start crocheting with the purple yarn. Stuff lightly.

Round 1 :

6 sc into a magic ring (6)

Round 2-3 :

6 sc (2 rounds)

Round 4 :

(sc, inc)*3 (9)

Round 5-6 :

9 sc (2 rounds)

Round 7 :

6 sc, 3 inc (12)

Round 8 :

6 sc, (sc, inc)*3 (15)

Round 9 :

9 sc, (sc, inc)*3 (18)

Round 10 :

(2 sc, inc)*6 (24)

Info :

Change the yarn to orange color.

Round 11 :

(3 sc, inc)*6 (30)

Round 12 :

30 sc

Info :

Change the yarn to purple color.

Round 13 :

Front loops only: (sc, inc)*15 (45)

Round 14 :

45 sc

Info :

Make a sl st, fasten off and cut the yarn, leaving a tail for sewing.

Info :

Sew the hat to the top of the head in the back loops of round 13. I sew it tilted to one side.

Assembly Instructions

  • Insert safety eyes between rounds 6 and 7 of the head with 8 stitches between them (6 stitches visible); secure backs on the inside before stuffing further.
  • Position and sew the arms to the body during rounds 22-24 where the pattern instructs to join the arms; use the long tail and whipstitch to secure firmly.
  • Sew the hat to the top of the head in the back loops of round 13, tilting it slightly to one side as shown; leave a tail for sewing and hide the end inside the head.
  • Embroider the eyebrows on round 10 using black thread, spacing them 8 stitches apart and 2 stitches wide; embroider the mouth on round 4, 3 stitches wide, and add pink blush to the cheeks for a soft finish.

Important Notes

  • πŸ’‘Stuff the toy gradually as you crochet to maintain smooth, even shaping and avoid lumps.
  • πŸ’‘Do not cut the white yarn after round 24; continue crocheting into the head as instructed to keep the body and head joined.
  • πŸ’‘Insert safety eyes before closing the head opening to ensure secure placement and easy finishing.
  • πŸ’‘Flatten and join the arm edges and crochet through both layers when instructed to create a neat, sturdy arm finish.

This adorable plush ghost is ready to charm your home or become a special handmade gift. 🧢 It is soft, cuddly, and quick to make using plush yarn and simple crochet rounds. Follow the step-by-step instructions to create the body, head, arms, hat and embroidered face β€” and enjoy every stitch! ✨

You ask,

we answer.

FAQs

What size will the finished piece be?

The finished toy is around 25 cm (10") tall without the hat when using the recommended materials.

Can I use different yarn weights for this pattern?

Yes, you can use different yarn weights, but the final size will change; choose an appropriate hook for your yarn and adjust eye size accordingly.

Do I need prior crochet experience for this pattern?

This pattern is beginner friendly and assumes basic knowledge of single crochet, increases and decreases; beginners with basic stitch knowledge should be able to follow it.

How long does this project typically take to complete?

Most crocheters finish this project in 2-4 hours depending on experience and speed, though time may vary with customization and finishing details.