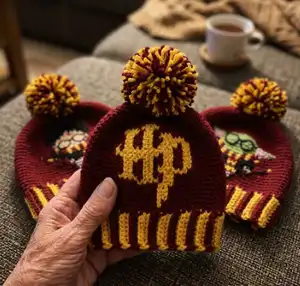
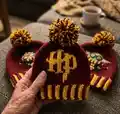
Make a cozy Gryffindor-inspired hat with this intermediate crochet pattern. Youll work waistcoat stitch colorwork following easy-to-read graphs to create the bold crest and character panels. The pattern includes two brim options, full graph placement, bobbin instructions, and step-by-step decrease rounds so you can finish a polished hat.
Progress Tracker
0% Complete
— Size :
Info :
Fits most. Teen-adult size hat measurements: 8 1/2" long x 10" wide at widest point.
Info :
Use the following hook size for the hat size you are making with the body of the hat directions: Child ages 6-10 or head circumference of 16"-20 1/2", I/9 (5.5mm). Ages 11 & up or head circumference of 20"-22", J/10 (6mm). Adult large or head circumference of 23"-24", K/10.5 (6.5mm).
— Gauge :
Info :
7 wcs x 8 rounds = 2" with 6mm hook
Info :
8 wcs x 8 rounds = 2" with 5.5mm hook
— Supplies :
Info :
Worsted medium weight yarn (#4) in desired colors. Yarns used: I Love This Yarn in Sungold (15 yards), Aubergine (106 yards), Mid Green (17 yards), Pink (2 yards), Black (14 yards), Light Peach (12 yards), Greybeard (2 yards). 145-160 total yards used.
Info :
Crochet hooks 7 (4.5mm), I/9 (5.5mm), J/10 (6mm), K/10.5 (6.5mm). Yarn needle for hiding threads. Scissors. Bobbins. Faux fur pompom for the top of the hat. Stitch marker.
— Stitch Guide :
Info :
Waistcoat stitch- (also known as center post stitch) The trick with this stitch is to insert your hook in the middle of the post, just under the inverted "v," pull up a loop, yarn over, and pull your hook through both loops.
Info :
Waistcoat stitch decrease- Insert your hook into the "v" of the first stitch, pull up a loop, insert your hook in the "v" of the second stitch, pull up a loop, yarn over and pull your hook through all three loops.
Info :
Backwards join- Remove hook and insert hook into the back of the beginning stitch. Turn work around backwards. Pull working loop through to the inside of the hat. Do not ch1. Instead, pull the yarn up a bit to loosen, making it easier to start the next stitch. Turn work around forwards.
— Abbreviations :
Infos :
ch = chain. st = stitch. sl st = slip stitch. sc = single crochet. blo = back loop only. bb = back bump. wcs = waistcoat stitch. wcsdec = waistcoat stitch decrease. FO = fasten off. ** = marks the repeats around. () = final stitch count.
— Pattern Notes :
Info :
Please read through the entirety of this pattern before starting. The techniques you need to know are: the waistcoat stitch, color change, backwards join, carry yarn, and follow a graph. I have added videos of these techniques on my Facebook page, "Jennifer's Stitched Up." Access my page with the hyperlink below.
Info :
I also have a Facebook Group that has many supportive crochet artists that offer help with questions you may have. Join my group, "Stitched Up Community," for access to free patterns and share your finished projects with us. Use the following tag @jennifersstitchedup
Info :
Waistcoat stitch along with the graph. Use loose tension when making the WCS. This helps with ease of insertion into the "v" of the stitch.
Info :
Using a pointed style crochet hook will help you grab the bar of the "v" portion of the stitch, then when pulling your hook to the right of the "v," or to the left when crocheting left-handed. This will help straighten the stitch.
Info :
You will automatically color change, carry yarn, if joining-backwards join, or move stitch marker up in every round. This is not stated after each set of directions.
Info :
You can use the backwards join (this join looks best with the waistcoat stitch) each round or continue around using a stitch marker to keep your place. The backwards join was added for those that like to join each round. I prefer to work without joining to keep the hat seamless.
Info :
Various yarns, even though worsted, and varied tensions can change the measurements of this pattern.
Info :
Do not pull carried yarn at a tight tension. This will cause the hat to not have any stretch. You can try the hat on to check and make sure you are not doing this or you will need to rip it out and start over.
Info :
It does not have to have a neat, clean look on the inside of the hat.
Info :
Rounds are numbered on the left & right of the graph. Stitches are numbered on the bottom of the graph, with the option of working the graph left to right or right to left.
Info :
Decrease rounds are highlighted with the stitch count next to the round.
— Bobbins :
Info :
How to use bobbins: Pick up bobbin when needed, adding that color. Drop after use. When needed again in the following round pick back up and pull across the stitches, working over the strand you just picked back up and pulled across.
Info :
Note: when picking it up and pulling it back across the stitches to use for the next round, you will need to make sure that it is not pulled tight by leaving some slack to work over. This will prevent it from puckering. Continue working in this fashion with each color, as it is not stated after each set of directions.
Info :
Make bobbins for the back side of either design you make. You can work from the skein on the front portion of the design. Use approximately 20" pieces of your scarf colors. Place each stripe of the scarf color in the first stitch added using this tail working upwards to complete that stripe. Do this for front and back design. You will use your bobbins at each place and just crochet along with the graph for this pattern.
— Brim: Options include Ribbed & Slip Stitch :
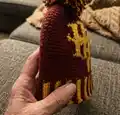
Two-toned ribbed brim (This brim is used for the cover photo) :
Fits most. For all sizes use a 4.5mm hook for brim. With brim color and 4.5mm hook ch 9, R1: sc in 2nd ch from the hook and in each ch across, ch1, turn (8) R2: sc, sc in BLO next 6, sc ending with a color change, with alternate color ch1, turn (8) R3: sc, sc in BLO next 6, sc (8) R4: sc, sc in BLO next 6, sc ending with a color change, with alternate color ch1, turn (8) R5-60: Repeat rows 3 and 4 Align the brim and slst into both back loops only from each brim side to seam shut. Adjustments can be made here. Try the brim on to check fit. If you need to take out rows or add rows this will change the directions up a bit. The end goal is to have the graph stitch count needed before working the hat design. Switch to hook size needed for hat. 5.5mm child, 6mm teen-adult, 6.5mm large adult. R61: * Sc next 9, scinc* around the brim. (66) Backwards join.
Info :
Picture shows color changes at the top. Each color is used for 2 rows.
Slip Stitch Brim :
Fits most. For all sizes use a 4.5mm hook for brim. With brim color and 4.5mm hook ch 9, R1: slst in bb of 2nd ch from the hook and in each ch across, ch1, turn. (8) R2: slst blo across, ch1, turn each row to desired length. (8) (13" for child, 14" for teen-adult, 15" for large adult.) I use 14 inches for myself. This style brim is very stretchy. R3: Align the brim and slst into both back loops only from each brim side. Switch to hook size needed for hat. 5.5mm child, 6mm teen-adult, 6.5mm large adult. R4: Sc around the brim, attempting to get to 66sts before you start the graph. (I usually sc next 2, scinc,) Backwards join, ch1. (66) The end goal is to get the stitch count needed for the graph. You can count your rows and figure out how many increases you will need to add, then make them accordingly. If you did not get the amount of stitches needed, this design allows you to easily add increases to the next round to obtain the 66 stitches used.
— Child-Adult :
Info :
child I/9 (5.5mm) teen-adult J/10 (6mm) large adult K/10.5 (6.5mm)
— Body of Hat :
Info :
Continue with hook needed for hat size you are making. Make color changes along with the graph. Crochet the wcs, using loose tension throughout. Work continuously without joining. Use a stitch marker to keep your place.
Round 1-17 :
With all colors, follow along with the graph, using the bobbin directions. (66)
Info :
Start of decreasing rounds Friendly reminder, keep the decreases loose. It is easy to tighten tension while decreasing.
Round 18 :
*wcs next 9, wcsdec* around (60)
Round 19 :
*wcs* around (60)
Round 20 :
*wcs next 4, wcsdec* around (50)
Round 21 :
*wcs* around (50)
Round 22 :
*wcs next 3, wcsdec*around (40)
Round 23 :
*wcs* around (40)
Round 24 :
*wcs next 2, wcsdec* around (30)
Round 25 :
*wcs*around (30)
Round 26 :
*wcs, wcsdec* around (20) Child size only FO, leaving a tail, cinch and sew closed.
Round 27 :
*wcs*around (20)
Round 28 :
*wcsdec* around (10)
Round 29 :
*wcs*around (10)
Round 30 :
*wcsdec* around (5) FO. Leave a long tail for cinching then sew closed.
— Detailing :
Info :
Using the graph for placement of details: Split a piece of black worsted, (or you can even use sport weight). Using only 3 strands of the worsted and a yarn needle sew on the glasses. Do the same with the scar, in red. Then black or brown for the wand, on both front and back sides. With gold add a spark onto the wand tip on both front and back sides.
— Graph Notes :
Info :
Decrease rounds are highlighted in yellow. The stitch count of the decrease rounds are next to the highlights. Follow the graph from either left or right side. Rounds are numbered on the left and right of the graph. Stitches are numbered at the bottom of the graph.
This Gryffindor-inspired hat pattern blends bold colorwork with a snug, wearable fit and two brim options for customization. It includes full graphs, bobbin guidance, and clear decrease rounds so you can make a polished hat with crisp motifs. Whether you choose the ribbed or slip-stitch brim, youll have a handmade piece ready for gifting or everyday wear. 🧶✨