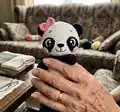
Make an adorable Yumi the Baby Panda with this detailed crochet pattern. You will get step-by-step instructions to crochet each part and assemble a cuddly plush panda with sweet facial details. The pattern uses plush yarn for a soft finish and includes tips for shaping and attaching parts so your panda looks polished. Perfect for gift making or a cozy handmade companion.
Progress Tracker
0% Complete
— Upper paws :
Info :
*black plush yarn, 3.75 mm hook. *stuff only bottom part of the paw
Round 3 :
(SC, INC)*6 (18)
Round 5 :
4 SC, (SC, DEC)*3, 5 SC (15)
Round 7 :
4 SC, 3 DEC, 5 SC (12)
Round 8-13 :
6 rounds 12 SC
Round 14 :
work an incomplete round, about 10-11 SC, so that when folding in half, DECs are on one side of the detail; - work a CH, fold in half and crochet the sides together with 6 SC; - fix and cut the thread.
— Bottom paws :
Info :
*black plush yarn, 3.75 mm hook. *stuff only bottom part of the paw
Round 3 :
(SC, INC)*6 (18)
Round 4 :
(2 SC, INC)*6 (24)
Round 6 :
6 SC, (2 SC, DEC)*3, 6 SC (21)
Round 8 :
6 SC, (SC, DEC)*3, 6 SC (18)
Round 10 :
6 SC, 3DEC, 6 SC (15)
Round 11-13 :
3 rounds 15 SC
Round 14 :
work an incomplete round, about 12-13 SC, so that when folding in half, DECs are on one side of the detail; - work a CH, fold in half and crochet the sides together with 7 SC; - fix and cut the thread.
— Head-Body :
Info :
*start with white/ivory plush yarn, 3.75 mm hook. *stuff in process, make sure the head shape is a bit flat, and the muzzle - convex (see photo in process)
Round 0 :
Chain 9; - work in spiral (without a turning CH and SS) as in all amigurumi toys (oval-shape detail);
Round 1 :
(start in the 2nd chain from the hook) 7 SC, 3 SC into the last chain from the hook, on the other side: 6 SC, INC (18)
Round 2 :
INC, 6 SC, 3 INC, 6 SC, 2 INC (24)
Round 3 :
SC, INC, 6 SC, (SC, INC)*3, 6 SC, (SC, INC)*2 (30)
Round 4 :
2 SC, INC, 6 SC, (2 SC, INC)*3, 6 SC, (2 SC, INC)*2 (36)
Round 5 :
3 SC, INC, 6 SC, (3 SC, INC)*3, 6 SC, (3 SC, INC)*2 (42)
Round 6 :
4 SC, INC, 6 SC, (4 SC, INC)*3, 6 SC, (4 SC, INC)*2 (48)
Round 7-8 :
2 rounds 48 SC
Round 9 :
5 SC, INC, 6 SC, (5 SC, INC)*3, 6 SC, (5 SC, INC)*2 (54)
Round 10-11 :
2 rounds 54 SC
Info :
*fold the detail in half, along the start chain; *shift stitch marker exactly on the side, on the bend (if necessary); *it is important, because INCs in Round 12 should be exactly in the middle of the front part of the detail.
Round 12 :
11 SC, 6 INC, 37 SC (60)
Round 13-15 :
3 rounds 60 SC
Info :
*shift stitch marker on the side (if necessary), so that DECs in Round 16 are under INCs in Round 12;
Round 16 :
11 SC, 6 DEC, 37 SC (54)
Round 17 :
5 SC, DEC, 6 SC, (5 SC, DEC)*3, 6 SC, (5 SC, DEC)*2 (48)
Round 18 :
4 SC, DEC, 6 SC, (4 SC, DEC)*3, 6 SC, (4 SC, DEC)*2 (42)
Round 19 :
3 SC, DEC, 6 SC, (3 SC, DEC)*3, 6 SC, (3 SC, DEC)*2 (36)
Round 20 :
2 SC, DEC, 6 SC, (2 SC, DEC)*3, 6 SC, (2 SC, DEC)*2 (30)
Round 21 :
SC, DEC, 6 SC, (SC, DEC)*3, 6 SC, (SC, DEC)*2 (24)
Info :
- change thread color to black;
Round 22 :
6 SC with the paw, 6 SC, 6 SC with the paw, 6 SC (24);
Info :
*mark the place of attaching upper paws: 6 SC on the sides at a distance of 6 SC in the front and on the back; *make sure, the paws are on the sides of the head; *a paw bend should be closer to the body; *in Round 22, please, be sure to check this area by markers, because the beginning of the round may shifts differently; *the place of attaching the first paw may goes on the previous/next Round (to do this, start attaching the paw earlier/later);
Round 23 :
(7 SC, INC)*3 (27);
Round 25 :
(8 SC, INC)*3 (30); - change thread color to white/ivory;
Round 27 :
(9 SC, INC)*3 (33);
Round 29 :
(10 SC, INC)*3 (36);
Info :
*in the next Round (Round 30) we are going to work INCs on the belly: mark the middle of the belly and count 6 INC on the left and on the right from the middle - that is the area, where we are going to work INCs ((SC, INC)*6); *please, be sure to check this area by markers, because the beginning of the round may shifts differently!
Round 30 :
8 SC, (SC, INC)*6, 16 SC (42);
Round 31-32 :
2 rounds 42 SC;
Info :
*mark the place of attaching bottom paws: 7 SC on the sides at a distance of 14 SC in the front and on the back; *a paw bend should be closer to the body; *in Round 33, please, be sure to check this area by markers, because the beginning of the round may shifts differently;
Round 33 :
2 SC, 7 SC with the paw, 14 SC, 7 SC with the paw, 12 SC (42);
Round 34 :
(5 SC, DEC)*6 (36);
Round 35 :
(4 SC, DEC)*6 (30);
Round 36 :
(3 SC, DEC)*6 (24);
Round 37 :
(2 SC, DEC)*6 (18);
Round 38 :
(SC, DEC)*6 (12);
Round 39 :
6 DEC; - tighten the hole, fix the thread and hide the end inside.
— Ears :
Info :
(2 details) *black plush yarn, 3.75 mm hook *don't stuff
Info :
- work a CH, fold in half and crochet the sides together with 6 SC; - fix the thread and leave a long ending for sewing.
— Tail :
Info :
*black plush yarn, 3.75 mm hook *stuff a bit
Round 4 :
6 DEC (6); - fix the thread and leave a long ending for sewing.
— Nose :
Info :
*black semi-cotton yarn, 2.25 mm hook
Round 0 :
Chain 6; - work in spiral (without a turning CH and SS);
Round 1 :
(start in the 2nd chain from the hook) INC, SC, 3 SC in one St, SC, 4 SC into the last chain from the hook, on the other side: 3 SC, INC (14); - fix the thread and leave a long ending for sewing.
— Blushes :
Info :
(2 details) *pink plush yarn, 3.75 mm hook
Round 1 :
6 SC in MR; - fix the thread and leave a long ending for sewing.
— Eye patches :
Info :
(2 details) *black plush yarn, 3.75 mm hook
Round 0 :
Chain 6; - work in spiral (without a turning CH and SS);
Round 1 :
(start in the 2nd chain from the hook) 3 SC, HDC, 5 HDC into the last chain from the hook, on the other side: HDC, 2 SC, INC (14);
Round 2 :
INC, 2 SC, HDC, 5 INC HDC, HDC, 2 SC, 2 INC (22); - fix the thread; - it is better to cut the thread, and then sew the detail with a black thin cotton thread.
— Eyes :
Info :
(2 details) *start with black semi-cotton yarn, 2.25 mm hook
Round 3 :
(SC, INC)*4, change color to white, back loops only: SC, 3 INC (20);
Round 4 :
back loops only: INC, SC, SS (4); - fix the thread and leave long ends of black and white yarn for sewing and embroidering the glare (leave more white thread); - work (blue) chain stitch under the white SC; - withdraw blue thread end on the wrong side, tie a knot and cut ends.
— Eye embroidery :
Info :
- fix the thread and leave long ends of black and white yarn for sewing and embroidering the glare (leave more white thread).
Instruction :
- work (blue) chain stitch under the white SC; - withdraw blue thread end on the wrong side, tie a knot and cut ends. - embroider the glare with white thread end.
— Final assembly :
Info :
- sew the ears between Rounds 5 and 10;
Instruction :
- do the muzzle tightening with strong synthetic thread: o mark 4 points: two at the bottom (on the color change line) and two at the top, between Rounds 11 and 12 between increases in Round12; o insert the needle in the lower point and withdraw it in the upper point; o insert the needle in the point from the other side and withdraw it at the bottom near the first point; o tighten the thread, tie endings and hide them inside the head.
Instruction :
- sew the nose in Round 13 under INCs from Round 12; - embroider the smile, stretching the thread under the pins and fixing the curve (2 bottom points) with thread;
Instruction :
- place eye patches so that the upper edges are 2 rounds higher than the INCs on the muzzle (see photo); - place eyes and blushes on eye patches and fix them with pins;
Instruction :
- take off eye patches together with fixed details and sew them: o sew the eyes with black and white thread endings; o sew the blushes with thin pink cotton thread;
Instruction :
- fix the eye patches on the head and sew them with thin black yarn; - fix the eye patches on the head and sew them with thin black yarn; - sew the ears between Rounds 5 and 10;
This sweet Yumi the Baby Panda pattern guides you through every step to make a cuddly plush toy with personality and charm.
Use plush yarn for a super-soft finish and semi-cotton for crisp facial details — perfect for gifting or keeping! 🧸
Happy crocheting and enjoy giving your panda a sweet smile and special finishing touches. ✨