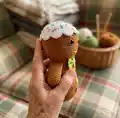
About This Gingerbread Amigurumi Pattern
This pattern teaches you how to crochet a sweet gingerbread amigurumi complete with a scalloped white icing hat and tiny sprinkles. You will follow round-by-round instructions for the body, arms and hat with clear shaping and finishing steps. The finished doll is compact and perfect for displays, gifts, or seasonal decor.

Step-by-step photos and full materials are included so you can replicate the look exactly. Embroidery and assembly tips help you finish polished facial features and secure accessories.
Why You'll Love This Gingerbread Amigurumi Pattern
I absolutely love this pattern because it brings a classic holiday favorite to life in crochet form with charming details. I enjoyed designing the scalloped icing hat and embroidered sprinkles for a playful finish. The shaping is satisfying and creates a neat, balanced body that feels great to stuff and hold. I find the pattern versatile — you can easily change colors or accessories to create different characters. Sharing this little gingerbread with friends always brings smiles and makes me want to design more seasonal amigurumi.
Switch Things Up
I love how easy it is to customize this gingerbread by switching yarn colors and accessories to create different personalities.
You can make a pastel version for a nursery or a bold, colorful set for festive displays by simply changing the hat and button colors.
If you want a bigger doll, use thicker yarn and a larger hook — this will give you a chunky, cuddly result perfect for hugging.
For a miniature keychain version, use thinner yarn and a smaller hook and add a keyring during assembly.
I often add embroidered eyebrows or freckles to change facial expressions and make each doll unique.
Try crocheting little outfits or scarves to swap on and off, turning the gingerbread into seasonal characters year-round.
Experiment with felt or tiny sewn accessories like hats, mittens, or a small candy cane prop for extra charm.
To make the limbs posable, consider adding a small length of wire inside the arms tied securely and wrapped with yarn before stuffing.
I recommend testing eye placement variations — moving them slightly closer or further apart totally changes the doll's personality.
Don't forget you can mix yarn brands and textures for interesting surface effects; a sparkly or boucle yarn for the hat gives a playful twist.
Common Mistakes & How to Fix Them
✗ Skipping stitch counts during increases can distort shaping; count stitches every round and mark the start with a stitch marker to avoid mistakes.
✗ Waiting to stuff until the end makes seams bulky and hard to shape; stuff gradually and evenly while you crochet for smooth results.
✗ Placing safety eyes without checking placement can look uneven; attach the eyes between the 43rd and 44th rows, nine stitches apart, and check symmetry before securing.
✗ Overtightening your tension will create stiff fabric and small gaps; use a consistent, slightly firm tension and the recommended hook size for the yarn to get the correct gauge.