๐Ÿงถ Beautiful โœจ Detailed ๐Ÿ’ Adorable

Sorting Hat Pattern

Sorting Hat Pattern
4.5โ˜… Rating
5-7 Hours Time Needed
3.1K Made This
โœ‚๏ธ

Intermediate Level

Ideal for those with basic crochet experience, featuring slightly more advanced stitches and techniques to expand your skills.

โฑ๏ธ

Weekend Treat

Takes 5-7 hours, making it an enjoyable project to finish over a couple of days.

๐Ÿ‘•

Casual Chic

Relaxed style with a modern twist, perfect for everyday wear while maintaining that handcrafted uniqueness.

About This Sorting Hat Pattern

This pattern teaches you how to crochet the iconic Sorting Hat with a pointed crown and wavy brim. It uses single crochet, half double, and triple crochet shaping worked in unjoined spirals. Optional felt and stuffing techniques help you stiffen the brim and shape the top for a characterful look. Perfect for costume accessories or playful home decor.

Sorting Hat Pattern crochet pattern - detailed view of completed project

Includes full materials, abbreviations, and finishing instructions to complete the hat. Step-by-step round counts are provided so you can follow along accurately.

Why You'll Love This Sorting Hat Pattern

I absolutely love this pattern because it captures so much character with simple shaping and texture. I enjoy how the crown grows round-by-round into that iconic pointed silhouette, and the wavy brim adds delightful movement. The finishing options with felt and padding let me customize stiffness and silhouette for different costumes. Making this hat feels nostalgic and playful every time, and I love gifting finished hats to fellow fans.

Sorting Hat Pattern step 1 - construction progress Sorting Hat Pattern step 2 - assembly progress Sorting Hat Pattern step 3 - details and accessories Sorting Hat Pattern step 4 - final assembly and finishing

Switch Things Up

I love customizing this hat by changing yarn color to create different characters or whimsical versions; try deep greens or burgundy for unique looks.

I sometimes make the hat larger or smaller by continuing increases or stopping earlier; adjusting the number of increasing rounds changes the crown diameter easily.

I often add a felt lining to the brim for a firmer shape and a cleaner edge; cut rounded felt strips and stitch them to the inside before final finishing.

Try varying yarn weight and hook size to change texture โ€” bulky yarn gives a chunky, cozy hat while finer yarn creates a more delicate prop.

I like to embroider additional details on the brim or add painted accents on felt pieces to personalize the hat further.

For a sturdier, display-ready hat, insert a felt circle under the crown and add a bit of polyester fiberfill to shape the point without making it too bulky.

You can make a mini keychain version by using fingering weight yarn and a much smaller hook, scaling down all rounds proportionally.

Try crocheting the brim with more ruffles by increasing the frequency of increases in the brim rounds to create dramatic waves.

I sometimes add wire into the brim edge or crown seam for posability and to keep the hat perched at a jaunty angle.

Consider mixing yarn textures โ€” a boucle or chenille body with a smooth felt brim looks great and adds rich contrast to the finished piece.

Common Mistakes & How to Fix Them

โœ— Skipping the locking stitch marker can cause you to lose track of rounds; place a marker at the end of each round and move it to the loop on your hook to stay oriented. โœ— Not working in the front loops (FLO) when instructed will change the brim shaping; follow the FLO and both-loops directions exactly to get the correct texture and brim fold. โœ— Overstuffing the top with polyester fiberfill can make the hat too stiff and misshapen; add small amounts gradually and check the fit on a head as you go. โœ— Attaching felt too low inside the brim will prevent the hat from fitting onto a head; pin and trim the felt so it sits just under the crocheted brim edge before stitching.

Sorting Hat Pattern

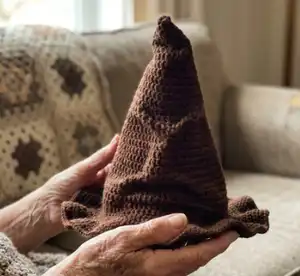
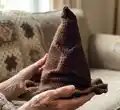
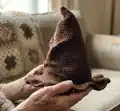
Crochet your own iconic Sorting Hat with this detailed pattern designed for intermediate crocheters. Follow clear, round-by-round instructions to shape the pointed crown and wavy brim. The pattern includes finishing tips for a firm brim, optional felt details, and ways to adjust size. Create a magical accessory perfect for costumes, decor, or gifting.

Intermediate 5-7 Hours

Materials Needed for Sorting Hat Pattern

โ€” Main Fabric

  • 01
    Brown yarn (chenille or double stranded worsted) - amount varies by hat size
  • 02
    Brown felt (optional) - rounded strips for brim and one circle for top reinforcement
  • 03
    Polyester fiberfill (optional) - small amount to stiffen the hat top if needed

โ€” Tools Required

  • 01
    Crochet hook size N
  • 02
    Yarn needle
  • 03
    Locking stitch marker
  • 04
    Needle and thread (optional) for attaching felt
  • 05
    Scissors (for trimming felt and yarn)

Progress Tracker

0% Complete

โ€” Materials :

Info :

Brown yarn (chenille or double stranded worsted). Size N crochet hook. Yarn needle. Brown felt (optional). Polyester fiberfill (optional). Needle and thread (optional).

โ€” Abbreviations :

Infos :

st - stitch. sc - single crochet. hdc - half double crochet. trc - triple crochet. sc2tog - single crochet 2 stitches together. FLO - crochet into the front loops only of each stitch.

โ€” Techniques :

Info :

Adjustable ring - Make a ring, insert hook into front of ring and pull up loop through to front of ring, chain one stitch, sc into ring as directed in pattern, pull tail gently to close ring.

โ€” Note :

Infos :

Numbers in () indicate number of stitches at the end of that round. Pattern is worked in unjoined spirals. Use a locking stitch marker to keep track of rounds. At the end of each round, move marker to loop on your hook.

โ€” Hat :

Round 1 :

Starting at top of hat with N hook, make an adjustable ring, ch 1, sc 3 into ring. Pull closed (3 sts)

Round 2 :

Work 2 sc into each st (6 sts)

Round 3-5 :

Sc in each st.

Round 6 :

2 Sc in next st, sc in each st around (7 sts)

Round 7 :

Sc in next 3 sts, 2 sc in next st, sc in next 3 sts (8 sts)

Round 8 :

*(2 Sc in next st, sc in next 3 sts), rep from * around (10 sts)

Round 9 :

*(Sc in next 2 sts, 2 sc in next st, sc in next 2 sts), rep from * around (12 sts)

Round 10 :

*(Sc in next st, 2 sc in next st), rep from * around (18 sts)

Round 11-12 :

Sc in each st.

Round 13 :

*(2 Sc in next st, sc in next 8 sts), rep from * around (20 sts)

Round 14 :

Sc in each st.

Round 15 :

*(Sc in next 4 sts, 2 sc in next st, sc in next 5 sts), rep from * around (22 sts)

Round 16 :

Sc in each st.

Round 17 :

*(2 Sc in next st, sc in next 10 sts), rep from * around (24 sts)

Round 18 :

Sc in next 8 sts, 2 trc in next 4 sts, hdc in next 4 sts, 2 trc in next 4 sts, sc in next 4 sts (32 sts)

Round 19 :

Sc in next 8 sts, sc2tog 4 times, sc in next 4 sts, sc2tog 4 times, sc in next 4 sts (24 sts)

Round 20 :

*(Sc in next 3 sts, 2 sc in next st, sc in next 4 sts), rep from * around (27 sts)

Round 21 :

*(Sc in next 8 sts, 2 sc in next st), rep from * around (30 sts)

Round 22 :

Sc in each st.

Round 23 :

Sc in next 14 sts, 2 hdc in next 10 sts, sc in next 6 sts (40 sts)

Round 24 :

Sc in next 14 sts, hdc in next 20 sts, sc in next 6 sts (40 sts)

Round 25 :

Sc in next 14 sts, sc2tog 10 times, sc in next 6 sts (30 sts)

Round 26 :

*(Sc in next 9 sts, 2 sc in next st), rep from * around (33 sts)

Round 27 :

*(Sc in next 5 sts, 2 sc in next st, sc in next 5 sts), rep from * around (36 sts)

Round 28 :

*(2 Sc in next st, sc in next 11 sts), rep from * around (39 sts)

Round 29 :

*(Sc in next 12 sts, 2 sc in next st), rep from * around (42 sts)

Round 30 :

Sc in each st.

Info :

* To make a larger hat, continue increasing by 3 sts per round until the hat reaches the size you want. Continue on as instructed below, adjusting stitch counts for each row.

Round 31 :

Working in FLO of each st, *(2 sc in next st, sc in next 6 sts), rep from * around (48)

Round 32 :

Working in both loops of each st, *(Sc in next 3 sts, 2 sc in next st, sc in next 4 sts), rep from * around (54 sts)

Round 33 :

*(Sc in next 8 sts, 2 sc in next st), rep from * around (60 sts)

Round 34 :

*(2 sc in next st, sc in next 9 sts), rep from * around (66 sts)

Round 35 :

*(Sc in next 3 sts, 2 sc in next st, sc in next 7 sts), rep from * around (72 sts)

Round 36 :

*(Sc in next 10 sts, 2 sc in next st, sc in next st), rep from * around (78 sts)

Round 37 :

*(2 sc in next st, sc in next 12 sts), rep from * around (84 sts)

Info :

Fasten off and weave in ends.

โ€” Finishing :

Infos :

Thread a yarn needle with a long strand of the brown yarn you are using. Knot the end. Push the mouth made in Rnds 23-25 to the inside. Weave the yarn from the bottom of the hat, up through the mouth, securing it to the inside. Stitch both sides of the mouth the same way so that it stays to the inside of the hat, then come up between the eyes created in Rnds 18-19, and back down towards the mouth, pulling tightly so that it makes the center of the eyes tilt downward slightly for the Sorting Hat's grumpy expression. Pull the yarn tightly and knot to the inside of the hat, and weave in end. For a stiffer brim, overlap rounded strips of brown felt over the inside of the brim and pin into place. Trim edges to line up with the crocheted edge of the brim. Use brown thread to stitch the felt into place on the edge and inner edge of the brim. If your hat is too floppy on top, insert polyester fiberfill. Cut a circle of felt to fit inside just underneath the eyes of the hat. Stitch into place with brown thread. Make sure not to put the felt circle too low or the hat won't fit onto a head.

Assembly Instructions

  • Push the mouth made in Rnds 23-25 to the inside of the hat, then weave a long strand of yarn from the bottom up through the mouth to secure it to the inside.
  • Stitch both sides of the mouth to the inside so it stays inverted, then come up between the eyes (created in Rnds 18-19) and back down toward the mouth, pulling tightly to create the grumpy expression.
  • For a stiffer brim, overlap rounded strips of brown felt on the inside of the brim, pin them in place, trim edges to align with the crocheted brim, then stitch the felt to the outer and inner edge with brown thread.
  • If the hat top is too floppy, insert polyester fiberfill under the top area and cut a felt circle to fit inside just under the eyes; stitch the felt circle into place with brown thread, taking care not to place it too low.
  • Fasten off and weave in all ends securely; tack any loose points with yarn needle and hide knots to the inside of the hat for a clean finish.

Important Notes

  • ๐Ÿ’กUse a locking stitch marker to keep track of rounds and move it to the loop on your hook at the end of each round to avoid losing your place.
  • ๐Ÿ’กWork the specified FLO (front loops only) rounds and the both-loops rounds exactly as instructed to get the intended brim fold and texture.
  • ๐Ÿ’กTrim and pin felt pieces before stitching to ensure the felt sits flush with the crocheted brim and does not interfere with the hat's fit.

This Sorting Hat pattern brings a beloved magical icon to life with crochet, shaping, and finishing techniques. Whether you want a floppy, whimsical hat or a firmer, display-ready piece, this pattern guides you through every step. Add felt, stuffing, and a bit of stitching to create the hat's signature personality. ๐Ÿง™โ€โ™‚๏ธ๐ŸŽฉ

You ask,

we answer.

FAQs

What size will the finished piece be?

The finished hat size will vary depending on yarn tension and how many increasing rounds you make; following the pattern as written yields an adult-sized hat after the full increase rounds, but you can stop increasing earlier for a smaller size.

Can I use a different yarn weight or hook size?

Yes, you can substitute yarn weight and adjust hook size, but this will change the final dimensions; use a larger hook and heavier yarn for a chunkier hat, or lighter yarn and smaller hook for a smaller, more delicate hat.

Do I need prior crochet experience for this pattern?

This pattern is rated intermediate and assumes familiarity with single crochet, half double crochet, triple crochet, working in spirals, and front loop only (FLO) techniques.

How long does this project typically take to complete?

Most crocheters complete this project in 5-7 hours, though time may vary based on experience level, number of finishing details, and how many increases you choose to make.