🧢 Beautiful ✨ Detailed πŸ’ Adorable

Pumpkin Amigurumi Pattern

Pumpkin Amigurumi Pattern
4.2β˜… Rating
5-7 Hours Time Needed
3.9K Made This
βœ‚οΈ

Intermediate Level

Ideal for those with basic crochet experience, featuring slightly more advanced stitches and techniques to expand your skills.

⏱️

Weekend Treat

Takes 5-7 hours, making it an enjoyable project to finish over a couple of days.

πŸ‚

Autumn Vibes

Earthy tones with cozy textures inspired by falling leaves and the rich, warm colors of harvest season.

About This Pumpkin Amigurumi Pattern

This pattern creates a stuffed crochet pumpkin with sculpted ribs, twirled moustaches, a curled stem and a textured leaf. It uses basic amigurumi techniques plus sculpting using a yarn needle to form the pumpkin segments. The pattern is photo-assisted and uses two yarn weights for contrast between pumpkin and leaves. You will finish with PVA-treated moustaches for a curled effect.

Pumpkin Amigurumi Pattern crochet pattern - detailed view of completed project

Detailed round-by-round instructions are provided along with leaf and tail patterns. The finished pumpkin measures about 12 cm when using the recommended yarn and hook.

Why You'll Love This Pumpkin Amigurumi Pattern

I absolutely love this pattern because it turns a simple crocheted ball into a realistic pumpkin with just a few sculpting stitches. I enjoy how the back-loop-only rounds create subtle ridges that look like pumpkin segments. The moustaches and curled tail add such playful, finished character that makes each pumpkin unique. I take pleasure in recommending small finishing tricks like PVA-curled moustaches which give professional looking results. This project is rewarding and fast enough to finish in a weekend, which I always find satisfying.

Pumpkin Amigurumi Pattern step 1 - construction progress Pumpkin Amigurumi Pattern step 2 - assembly progress Pumpkin Amigurumi Pattern step 3 - details and accessories Pumpkin Amigurumi Pattern step 4 - final assembly and finishing

Switch Things Up

I love how easy it is to customize this pumpkin by changing yarn color and weight; try soft pastels for a modern take or deep rusts for a vintage look.

I often make minis by using fingering yarn and a smaller hook to create keychain pumpkins that fit in the palm of your hand.

I sometimes swap the curled moustaches for a small crocheted vine in green to give a more botanical stem effect.

I like to embroider a tiny face on one side to make a whimsical Halloween characterβ€”just a few small stitches change the personality completely.

I recommend trying variegated yarn for the body to get subtle color shifts across the pumpkin ribs for a textured appearance.

I sometimes add a wrapped twine around the stem area or a tiny wooden bead as a rustic accent at the top of the pumpkin.

I experiment with different amounts of stuffing to make some pumpkins flatter and others plumper so you can display a set with varied shapes.

I also like to add wire inside the tail for a poseable stem that can curl and hold its shape over time.

If you want a stiffer nostache curl, use a thicker PVA mixture or let them dry longer on the pencil to hold a tighter spiral.

I encourage you to mix and match leaf shapes and sizes; making larger leaves in two layers gives a lush, layered look that stands out on a table display.

Common Mistakes & How to Fix Them

βœ— Skipping the back loops only instruction; ensure you consistently work in the back loops only to get the visible ridges on the pumpkin. βœ— Not stuffing evenly before sculpting; stuff gradually and evenly so the sculpting pulls create defined segments without flattening the shape. βœ— Forgetting to leave a long tail at the end; leave a long finishing tail at the FO to use for sculpting and closing the hole. βœ— Using the same yarn weight for leaves and pumpkin; use a yarn twice thinner for leaves as stated to get delicate, textured leaves. βœ— Overtightening sculpting stitches; tighten the sculpting yarn slightly and check symmetry, repeating only 1-2 times to avoid denting the pumpkin too much.

Pumpkin Amigurumi Pattern

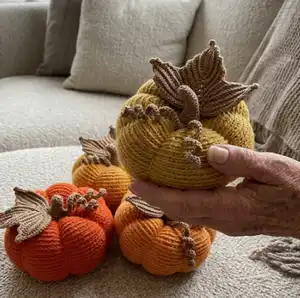
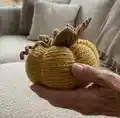
Create a charming crochet pumpkin that doubles as seasonal decor or a festive gift. This pattern guides you through shaping a round pumpkin, sculpting the ridges, and adding twirled moustaches, a stem tail and textured leaves. You will enjoy simple rounds with a little sculpting and finishing for a realistic look. Suitable for makers who want a cozy autumn project with clear step-by-step guidance.

Intermediate 5-7 Hours

Materials Needed for Pumpkin Amigurumi Pattern

β€” Main Fabric

  • 01
    Yarn GAZZAL BABY COTTON 50g/165m - Orange - approx 50g per pumpkin (main body)
  • 02
    Yarn ALIZE FOREVER 50g/300m - Brown - for leaves; this yarn should be twice thinner than the pumpkin yarn (approx 25g)
  • 03
    PVA glue - for setting moustaches (used in water solution 1:1)
  • 04
    Sewing thread of brown color - for finishing and attaching small parts
  • 05
    Filler (polyester stuffing) - enough to firmly fill a 12 cm pumpkin

β€” Tools Required

  • 01
    Crochet hook matching your yarn (check yarn label)
  • 02
    Yarn needle for sewing and sculpting
  • 03
    Scissors
  • 04
    Stitch markers (optional)
  • 05
    Pencil or similar for shaping moustaches
  • 06
    Small bowl and water to dilute PVA glue 1:1
  • 07
    Pins for assembly (optional)

Progress Tracker

0% Complete

β€” Pumpkin :

Info :

crochet in spiral rounds. work in back loops only.

Round 1 :

8 sc in a magic ring (8)

Round 2 :

inc*8 (16)

Round 3 :

(1 sc, inc)*8 (24)

Round 4 :

(2 sc, inc)*8 (32)

Round 5 :

(3 sc, inc)*8 (40)

Round 6 :

(4 sc, inc)*8 (48)

Round 7 :

(5 sc, inc)*8 (56)

Round 8 :

(6 sc, inc)*8 (64)

Round 9 :

(7 sc, inc)*8 (72)

Round 10 :

72 sc (72)

Round 11 :

(8 sc, inc)*8 (80)

Round 12 - 13 :

80 sc (80)

Round 14 :

(9 sc, inc)*8 (88)

Round 15 - 25 :

88 sc (11 rounds) (88)

Round 26 :

(dec, 9 sc)*8 (80)

Round 27 - 28 :

80 sc (80)

Round 29 :

(dec, 8 sc)*8 (72)

Round 30 :

72 sc (72)

Round 31 :

(dec, 7 sc)*8 (64)

Round 32 :

(dec, 6 sc)*8 (56)

Round 33 :

(dec, 5 sc)*8 (48)

Round 34 :

(dec, 4 sc)*8 (40)

Round 35 :

(dec, 3 sc)*8 (32)

Info :

Stuff the part well, but not firmly.

Round 36 :

(dec, 2 sc)*8 (24)

Round 37 :

(dec, 1 sc)*8 (16)

Round 38 :

dec*8 (8)

Info :

FO, cut the yarn, leave a long tail.

β€” Sculpting :

Info :

Make sculpting to turn this ball to a pumpkin. First make sculpting at the center: Step 1: use a yarn needle and the finishing tail. Insert your needle inside the ball through the finishing hole. Pull the needle out through the magic ring. Step 2: Insert the needle in the stitch close to the magic ring and pull it out through the stitch close to the finishing hole. Tighten the yarn slightly, repeat that process 1-2 times, fasten the sculpting yarn thread. See the result in the photo below (at the left).

Info :

Now make 8 sculptings around the ball in the same way, but do the 2nd step along the surface of the ball, passing the needle under the front loops of the rounds (see the right photo above). Don't try to get absolutely symmetrical part, so that your pumpkin will look as real one.

β€” Moustache (2 pcs) :

Round 1 :

Make a chain of 7 cm length. you can resize the chain fitting to your pumpkin size.

Round 2 :

Crochet sc-row along the chain.

Info :

Moisten the moustaches with water solution of PVA glue (in proportion 1:1). Wrap the mustaches on a pencil (for example) and let them dry completely.

β€” Tail :

Round 1 :

make 8 sc in a magic ring (8)

Round 2 - 5 :

8 sc (4 rounds) (8)

Round 6 :

3 sl st, 5 sc (8)

Round 7 :

8 sc (8)

Round 8 :

3 sl st, 5 sc (8)

Round 9 :

8 sc (8)

Round 10 :

3 sl st, 5 sc (8)

Round 11 :

8 sc (8)

Round 12 :

(3 sc, inc)*2 (10)

Round 13 - 14 :

10 sc (10)

Round 15 :

(4 sc, inc)*2 (12)

Round 16 :

12 sc (12)

Round 17 :

(2 sc, inc)*4 (16)

Round 18 :

(1 sc, inc)*8 (24)

Round 19 :

24 sc (24)

β€” Leef :

Round 1 :

make 16 ch.

Round 2 :

starting in the 3rd stitch from the hook: 14 sc (photo β„– 1), 4 ch (photo β„– 2), in the back direction 14 sc, 1 ch (photo β„– 3, β„– 4).

Info :

work in back-and-forth rows. work in the back loops only.

Round 3 :

skip 1 st, 13 sc (photo β„– 1); make in the arch of the chains (of the previous row): 2 sc+ 4 ch+ 2 sc (photo β„– 2, β„– 3); 11 sc, 1 ch (photo β„– 4, β„– 5).

Round 4 :

skip 1 st, 12 sc; in the arch of the chains: 2 sc+ 4 ch+ 2 sc; 12 sc, 1 ch.

Round 5 :

skip 1 st, 13 sc; in the arch of the chains: 2 sc+ 4 ch+ 2 sc; 11 sc, 1 ch.

Round 6 :

skip 1 st, 12 sc; in the arch of the chains: 2 sc+ 4 ch+ 2 sc; 12 sc, 1 ch.

Round 7 :

skip 1 st, 13 sc; in the arch of the chains: 2 sc+ 4 ch+ 2 sc; 12 sc, 1 ch.

Round 8 :

skip 1 st, 13 sc; in the arch of the chains: 2 sc+ 4 ch+ 2 sc; 12 sc, 1 ch.

Round 9 :

skip 1 st, 13 sc; in the arch of the chains: 2 sc+ 4 ch+ 2 sc; 12 sc, 1 ch.

Round 10 :

skip 1 st, 13 sc; in the arch of the chains: 5 sc; 12 sc.

Round 11 :

5 ch; starting in the 3rd from the hook (= skip 2 sts): 8 sc, 1 ch, skip 1 st, 1 sc in both loops of the next stitch, 1 ch.

Round 12 :

turn, 1 sc in the chain of the previous row, 9 sc.

Round 13 :

5 ch, skip 2 sts, 14 sc, 1 ch, skip 1 st, 1 sc in both loops of the next stitch, 1 ch.

Round 14 :

turn, 1 sc in the chain of the previous row, 15 sc.

Round 15 :

4 ch, skip 2 sts, 19 sc, 1 ch, skip 1 st, 1 sc in both loops of the next stitch, 1 ch.

Round 16 :

turn, 1 sc in the chain of the previous row, 17 sc, 1 ch.

Round 17 :

skip 1 st, 18 sc, 1 ch, skip 1 st, 1 sc in both loops of the next stitch, 1 ch.

Round 18 :

turn, 1 sc in the chain of the previous row, 15 sc, 1 ch.

Round 19 :

skip 1 st, 16 sc, skip 1 st, 3 sc in both loops of the next stitch, 14 sc.

Round 20 :

5 ch, skip 2 sts, 8 sc, 1 ch, skip 1 st, 1 sc in both loops of the next stitch, 1 ch.

Round 21 :

turn, 1 sc in the chain of the previous row, 9 sc.

Round 22 :

5 ch, skip 2 sts, 14 sc, 1 ch, skip 1 st, 1 sc in both loops of the next stitch, 1 ch.

Round 23 :

turn, 1 sc in the chain of the previous row, 15 sc.

Round 24 :

4 ch, skip 2 sts, 19 sc, 1 ch, skip 1 st, 1 sc in both loops of the next stitch, 1 ch.

Round 25 :

turn, 1 sc in the chain of the previous row, 17 sc, 1 ch.

Round 26 :

skip 1 st, 18 sc, 1 ch, skip 1 st, 1 sc in both loops of the next stitch, 1 ch.

Round 27 :

turn, 1 sc in the chain of the previous row, 15 sc, 1 ch.

Round 28 :

skip 1 st, 16 sc, 1 ch, skip 1 st, 1 sc in both loops of the next stitch, 1 sl st, FO.

β€” Assembling :

Step 1 :

Sew the moustaches at the center of the pumpkin.

Step 2 :

Stuff slightly the lower part of the tail and sew it to the pumpkin upon the point of sewing the moustaches.

Step 3 :

Sew the leef.

Step 4 :

Your pumpkin is ready to Helloween! (finish any loose ends and arrange parts.)

Assembly Instructions

  • Sew the moustaches at the center of the pumpkin.
  • Stuff slightly the lower part of the tail and sew it to the pumpkin upon the point of sewing the moustaches.
  • Sew the leef (leaf) in position above the moustaches and tail to form the stem area.
  • Finish by tucking and weaving in all yarn ends, checking attachments are secure, and shaping the moustaches and leaf for a natural look.

Important Notes

  • πŸ’‘Work in back loops only for the pumpkin body to create the ribbed segments that resemble a real pumpkin.
  • πŸ’‘Leave a long finishing tail at the end of the pumpkin rounds to use for sculpting the segments with a yarn needle.
  • πŸ’‘Moisten moustaches with a 1:1 water and PVA glue solution and wrap on a pencil to set the spiral shape before attaching.

This pumpkin pattern brings cozy autumn charm to your home with handmade texture and playful details. It is perfect as a seasonal gift or a table accent and is quick enough to finish over a weekend. Enjoy shaping, curling and assembling your own little harvest β€” happy crocheting! πŸŽƒπŸ

You ask,

we answer.

FAQs

What size will the finished piece be?

When using the recommended materials, the finished pumpkin measures approximately 12 cm in diameter.

Can I use different yarn weights for this pattern?

You can change yarn weight, but the pattern uses a thinner yarn for leaves; altering yarn weight will change final size so adjust your hook accordingly.

Do I need to sculpt the pumpkin?

Yes, sculpting with the finishing tail and yarn needle creates the characteristic pumpkin ribs and is essential for the final look.

How long does this project typically take to complete?

Most crocheters complete this pumpkin in 5-7 hours, depending on experience and finishing details like moustaches and leaves.