🧢 Beautiful ✨ Detailed πŸ’ Adorable

Nordic fox wall hanging Pattern

Nordic fox wall hanging Pattern
4.3β˜… Rating
12-15 Hours Time Needed
3.7K Made This
βœ‚οΈ

Intermediate Level

Ideal for those with basic crochet experience, featuring slightly more advanced stitches and techniques to expand your skills.

⏱️

Multi-Day Project

A rewarding 12+ hour journeyβ€”perfect for dedicated crafters who love detailed work.

🏑

Cozy Accent

A warm touch for your space that transforms ordinary corners into inviting nooks filled with handmade charm.

About This Nordic fox wall hanging Pattern

This pattern creates a whimsical Nordic fox wall hanging worked in rows with tapestry-style color changes and decorative trims. It combines single crochet, extended single crochet (spike stitches), simple embroidery and macrame feathers for texture and charm. The pattern includes full row-by-row instructions, two charts (guard and fox), and step-by-step photos to guide you through assembly.

Nordic fox wall hanging Pattern crochet pattern - detailed view of completed project

You'll make the base panel, then add the snout, ears, headband, tail curls and feathers before finishing the edges and tying the strip to a wooden rod. Suitable for intermediate crocheters who enjoy colorwork and surface texture techniques.

Why You'll Love This Nordic fox wall hanging Pattern

I absolutely love this pattern because it blends tapestry-style colorwork with playful textured trims to make a truly unique wall hanging. I enjoy how the extended single crochet (spike stitch) creates a rhythmic fringe that adds motion and interest. The macrame feathers are a fun, crafty touch that brings tactile contrast to the crocheted panel. I also love that the design can be customized in color and scale so every finished piece feels personal and special.

Nordic fox wall hanging Pattern step 1 - construction progress Nordic fox wall hanging Pattern step 2 - assembly progress Nordic fox wall hanging Pattern step 3 - details and accessories Nordic fox wall hanging Pattern step 4 - final assembly and finishing

Switch Things Up

I love how versatile this pattern is for customization; you can change the color palette to match any nursery or living room decor and create a completely different mood.

I often swap the aqua background for a neutral gray or pastel to make the fox pop with softer accents.

Want a smaller or larger version? Use a different yarn weight and adjust your hook size β€” bulky yarn with a larger hook gives a chunky, cozy statement piece, while fingering weight makes a delicate mini wall hanging.

I sometimes replace the macrame feathers with tassels or pom-poms for a different finish; mix and match textures for an eclectic look.

Try embroidering additional motifs on the guard area β€” small leaves or stars can add a seasonal touch.

I like adding beads or tiny mirrors to the headband for a folk-inspired accent; wooden beads add natural warmth while shiny beads bring sparkle.

If you want a reversible piece, plan your color changes with duplicate rows and avoid carrying yarn over long distances; this takes more time but looks amazing both sides.

For a child-friendly version, securely sew on plastic safety eyes or embroider eyes with black yarn for a softer, wash-safe finish.

Experiment with different edge finishes: a scalloped border or picot edge can change the overall aesthetic immediately.

I also enjoy making matching accessories β€” a small pillow or basket liner with the same guard motif ties a room together beautifully.

Common Mistakes & How to Fix Them

βœ— Skipping the instruction to use individual yarn balls for each color can cause tangled threads; start a new ball for each color section to avoid crossed strands behind the work. βœ— Neglecting to count stitches after each row leads to uneven shaping and misaligned charts; count regularly and ensure each row totals 40 stitches as specified. βœ— Pulling the extended single crochet (spike stitch) too tight will distort the edge; pull gently and keep consistent tension when creating extended stitches. βœ— Sewing pieces without pinning can produce asymmetry and misplacement; pin or baste the snout, ears and tail before sewing to check alignment and spacing. βœ— Forgetting to leave long tails for sewing makes finishing difficult; leave the recommended long threads when cutting off each accessory piece so you can sew securely.

Nordic fox wall hanging Pattern

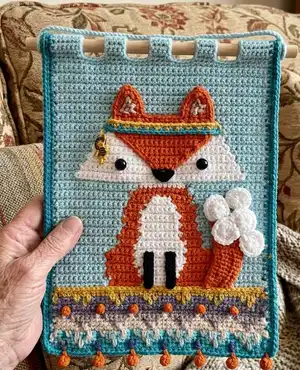
Create a charming Nordic fox wall hanging that adds cozy, handmade character to any room. This pattern guides you through a colorful tapestry-style panel, decorative trims, and macrame feathers so you can craft a complete statement piece. With clear charts, step-by-step photos, and assembly tips, you can make a beautiful wall hanging to gift or display. Perfect for makers who enjoy colorwork and mixed-texture finishes.

Intermediate 12-15 Hours

Materials Needed for Nordic fox wall hanging Pattern

β€” Main Fabric

  • 01
    Cotton yarn - Worsted weight (less than 100g total suggested)
  • 02
    Guard colors: Bluish green, Cream, Gray, Mustard, Tangerine (light orange) - small amounts each
  • 03
    Fox colors: Acqua, White, Orange - small amounts each
  • 04
    Details: Black, Orange, White and Navy blue - for eyes, nose and small details
  • 05
    Wooden rod 28 cm / 11 inches long (for hanging)
  • 06
    Wooden beads for headband detail

β€” Tools Required

  • 01
    Crochet hook 3.5mm (for Wall hanging base: Guard)
  • 02
    Crochet hook 3.0mm (for details and snout/ears)
  • 03
    Crochet hook 3mm (alternate sizes noted 3mm/3.5mm)
  • 04
    Needle
  • 05
    Yarn needle for sewing pieces
  • 06
    Scissors
  • 07
    2 safety eyes 12 mm
  • 08
    Wooden beads
  • 09
    Pins for assembly
  • 10
    Comb (for macrame feathers)

Progress Tracker

0% Complete

β€” Materials and supplies :

Info :

Crochet hook 3mm/3.5mm. Needle. Scissors. Cotton yarn –Worsted weight: Guard: bluish green, cream, gray, mustard y light orange (tangerine). Fox: Acqua, white y orange. Details: black, orange, white y navy blue. Wooden rod (28cm / 11 inches Long). 2 safety eyes 12 mm. Wooden beads. Size: Final size aprox. without feathers: Width: 24 cm / 9.44 inches Height: 34 cm / 13.38 inches. Gauge/tension: 2 stitches and 2 rows for 1cm2. Amount of yarn: less than 100gr.

β€” Wall hanging base: Guard :

Round 00 :

Row 00) 41 ch.

Round 01-06 :

Row 01-06) 40sc, 1ch.

Round 07 :

Row 07) *1sc, 1sc extending the strand to the previous row, 1sc extending the strand to 2 previous rows, 1sc extending the strand to 3 previous rows, 1sc extending the strand to 2 previous rows, 1sc extending the strand to the previous row* repeat until the end of the row, 1ch.

Round 08-10 :

Row 08-10) 40sc, 1ch.

Round 11 :

Row 11) *1sc, 1sc extending the strand to the previous row, 1sc extending the strand to 2 previous rows, 1sc extending the strand to 3 previous rows, 1sc extending the strand to 2 previous rows, 1sc extending the strand to the previous row* repeat until the end of the row, 1ch.

Round 12-14 :

Row 12-14) 40sc, 1ch.

Round 15 :

Row 15) *2sc, 1sc extending the strand to the previous row, 1sc extending the strand to 2 previous rows, 1sc extending the strand to the previous row, 1sc* repeat until the end of the row, 1ch.

Round 16 :

Row 16) 40sc, 1ch.

Info :

Advice: Each row must have 40 stitches.

β€” Wall hanging base: Fox :

Round 17-18 :

Row 17-18) 11sc, 6sc, 6sc, 6sc, 11sc, 1ch.

Round 19-20 :

Row 19-20) 10sc, 6sc, 8sc, 6sc, 10sc, 1ch.

Round 21-24 :

Row 21-24) 10sc, 5sc, 10sc, 5sc, 10sc, 1ch.

Round 25-26 :

Row 25-26) 12sc, 3sc, 10sc, 3sc, 12sc, 1ch.

Round 27-28 :

Row 27-28) 12sc, 4sc, 8sc, 4sc, 12sc, 1ch.

Round 29-33 :

Row 29-33) 13sc, 3sc, 8sc, 3sc, 13sc, 1ch.

Round 34-35 :

Row 34-35) 13sc, 4sc, 6sc, 4sc, 13sc, 1ch.

Round 36 :

Row 36) 14sc, 3sc, 6sc, 3sc, 14sc, 1ch.

Round 37 :

Row 37) 14sc, 4sc, 4sc, 4sc, 14sc, 1ch.

Round 38 :

Row 38) 14sc, 12sc, 14sc, 1ch.

Round 39 :

Row 39) 15sc, 10sc, 15sc, 1ch.

Round 40 :

Row 40) 15sc, 10sc, 15sc, 1ch.

Round 41-42 :

Row 41-42) 4sc, 32sc, 4sc, 1ch.

Round 43-44 :

Row 43-44) 5sc, 30sc, 5sc, 1ch.

Round 45-46 :

Row 45-46) 6sc, 28sc, 6sc, 1ch.

Round 47-48 :

Row 47-48) 7sc, 26sc, 7sc, 1ch.

Round 49-50 :

Row 49-50) 8sc, 24sc, 8sc, 1ch.

Round 51 :

Row 51) 9sc, 22sc, 9sc, 1ch.

Round 52-53 :

Row 52-53) 10sc, 20sc, 10sc, 1ch.

Round 54 :

Row 54) 12sc, 16sc, 12sc, 1ch.

Round 55-65 :

Row 55-65) 40sc, 1ch.

Info :

Important: When starting to crochet use individual yarn balls each time you start a color in the row, for more comfort and not having crossed threads behind the figure. Remember when making color changes, always leave the threads on the same side of the piece to use them on the next round.

β€” Important :

Infos :

I do not use the tapestry technique, although if you find it easier you can apply it. I use a yarn ball for each color that starts in the row, so on the next round, when turning the work, the thread is waiting to be use again. Example: To start the wall hanging I would use an acqua yarn ball, then an orange one and a white one, then a new orange one and an acqua one. As much as the color is repeated, it has its own ball of yarn.

β€” Process: Guard :

Info :

1) Row 1-6 single crochet back and forth in bluish green.

Info :

2) Row 7, sc extended in cream.

Info :

3) Link to video how to make the extended single crochet. (spike stitch)

Info :

4) Rows 8-9-10 in cream color.

Info :

5) Row 11, sc extended in gray.

Info :

6) Rows 12-13-14 single crochet in gray.

Info :

7) Row 15, single crochet extended in mustard.

Info :

8) Row 16, single crochet in mustard.

Info :

9) Turn over and on the other side of the starting chain sc extended in tangerine.

Info :

10) Single crochet in tangerine.

Info :

11) Embroidery dots. In color tangerine over the gray, and navy blue over the bluish green. Link to video.

Info :

12) From the mustard start to crochet the fox.

β€” Wall hanging details :

Snout :

Orange. Crochet back and forth. 1) 20ch. 2) 19sc. 3) 1dec, 15sc, 1dec (17). 4) 1dec, 13sc, 1dec (15). 5) 1dec, 11sc, 1dec (13). 6) 1dec, 9sc, 1dec (11). 7) 1dec, 7sc, 1dec (9). 8) 1dec, 5sc, 1dec (7). 9) 1dec, 3sc, 1dec (5). 10) 1dec, 1sc, 1dec (3). 11) 1dec (1). Finish with a complete round of sc all around.

PAW x 2 :

Black. 1) 8 ch. 2) From the 2nd ch. 7sc.

HEADBAND :

Bluish green. 1) 23ch. 2) From the 2nd ch. 22sc. Mustard: 3) *1sc, 1sc extending the strand to the previous row* rep.

EARS x 2 :

Orange. 1) 6sc in a magic ring. 2) *1sc, 1inc* rep (9). 3) 9sc (9). 4) *2sc, 1inc* rep (12). 5) *3sc, 1inc* rep (15). 6) Flatten the two sides and join with 8sc (8). Embroider with white the lines in the ears.

TAIL :

Curl 1: 1) Orange: 15ch. White: 16ch. 2) White: from the 2nd ch. 15inc, Orange: 15sc. Curl 2: 1) Orange: 12 ch. White: 16ch. 2) White: from the 2nd ch. 15inc, Orange: 12sc. Curl 3: 1) Orange: 9ch. White: 16ch. 2) White: from the 2nd ch. 15inc, Orange: 9sc. Curl 4 x 2: 1) White: 16ch. 2) White: from the 2nd ch. 15inc.

STRIP :

Acqua. 70 chains.

β€” Pieces :

Info :

Make the snout, ears, paws, headband, tail curls and strips as listed. Leave long threads for sewing each piece to the base. Add wooden beads to headband if desired.

β€” Assembly instructions and advices :

Item Name (P1) :

13) Sew the snout from row 55 down. Place safety eyes between row 44 and 45 16 stitches between both.

Item Name (P2) :

14) Sew the ears above the snout on both sides of the head.

Item Name (P3) :

15) Sew the headband.

Item Name (P4) :

16) Thread wooden beads and sew them to the side of the headband.

Item Name (P5) :

17) Embroider the nose with black yarn at the bottom of the Snout.

Item Name (P6) :

18) Sew the legs both sides of the white belly.

Item Name (P7) :

19) Sew the tail on the right side. Put the curl 1 first, 2 and 3 up to the edge.

Item Name (P8) :

20) Complete with the white curls. Sew or glue the white part making a roll.

Item Name (P9) :

21) Finish the bottom and laterals with a complete row of single crochet. After a complete row of crab stitch.

Item Name (P10) :

22) Sew the upper ends by wrapping the rod to hold the base.

Item Name (P11) :

23) Tie the feathers in the bottom of the wall hanging.

Item Name (P12) :

24) Tie the strip to the rod to hang the wall hanging.

β€” Macrame feathers :

Info :

25) Use double yarn as base.

Info :

26) Roll several turns of yarn in your fingers.

Info :

27) Cut one side.

Info :

28) To get yarns of the same large.

Info :

29) Use double yarns to make a thick feather.

Info :

30) Interlace the horizontal yarns, one above and one below the vertical thread. Then adjust.

Info :

31) Alternate the yarn that is above to generate inverted knots.

Info :

32) Make 5 knots in gray.

Info :

33) Make 2 knots in tangerine and 4 in cream.

Info :

34) Comb the yarns.

Info :

35) Cut the edges.

Info :

36) Feather done.

Info :

37) Twist the excess end that will then be tied to the tapestry and thread a wooden bead. The final size of the feather is approx. 9cm high x 6cm wide. You can apply hair spray to keep the feather form.

Assembly Instructions

  • Sew the snout from row 55 down and place the safety eyes between rows 44 and 45 with 16 stitches between them.
  • Sew the ears above the snout on both sides of the head and embroider the white lines inside the ears.
  • Attach and sew the headband across the forehead, adding wooden beads to the side as decorative details.
  • Sew the tail curls to the right side in order: curl 1, curl 2, curl 3 and secure up to the edge, then attach the white curls as rolls.
  • Finish the bottom and laterals with a complete row of single crochet and then a row of crab stitch to neaten edges.
  • Wrap and sew the upper ends around the wooden rod to hold the base securely and tie the aqua strip to the rod for hanging.
  • Tie the macrame feathers to the bottom of the wall hanging and secure with wooden beads at the top of each feather.

Important Notes

  • πŸ’‘Each row must have 40 stitches to keep the chart proportions correct and the fox centered.
  • πŸ’‘Use individual yarn balls for each color start to avoid carrying strands across the back, unless you prefer tapestry technique.
  • πŸ’‘Pin parts in place before sewing to ensure correct symmetry and spacing for snout, ears and tail.
  • πŸ’‘Finish edges with a complete row of single crochet then a row of crab stitch for a neat frame.
  • πŸ’‘Leave long thread tails on small pieces for sewing; these make assembly easier and more secure.

This adorable Nordic Fox wall hanging combines playful colorwork and tactile trims to brighten any wall. The pattern includes full row-by-row instructions, charts for the fox and guard, and step-by-step photos to guide you through assembly. Make it in your favorite palette for a custom, handmade accent. 🧢✨

You ask,

we answer.

FAQs

What size will the finished piece be?

The finished wall hanging measures approximately 24 cm wide by 34 cm high (without feathers) using the recommended yarn and hook sizes.

Can I use different yarn weights for this pattern?

Yes, you can change yarn weight but this will affect the final size and drape; adjust your hook size accordingly and make a gauge swatch before starting.

Do I need prior crochet experience for this pattern?

This pattern is rated intermediate, so a basic knowledge of single crochet and simple color changes is recommended to follow the charts and extended stitch techniques.

How long does this project typically take to complete?

Most crocheters complete this project over several sessions in about 12-15 hours, depending on experience and how much time is spent on the macrame feathers and assembly.