🧢 Beautiful ✨ Detailed πŸ’ Adorable

Hungry Hamsters Amigurumi Pattern

Hungry Hamsters Amigurumi Pattern
4.9β˜… Rating
2-4 Hours Time Needed
3.0K Made This
βœ‚οΈ

Intermediate Level

Ideal for those with basic crochet experience, featuring slightly more advanced stitches and techniques to expand your skills.

⏱️

Bite-Sized Project

Finishes in 2-4 hoursβ€”perfect for an afternoon of creative relaxation.

🧸

Cute Companion

An adorable friend to cherish, handcrafted with love to bring comfort and joy for years to come.

About This Hungry Hamsters Amigurumi Pattern

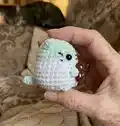
This pattern creates tiny, squishy Hungry Hamsters in two sizes: palm-sized and mini. You will make the head/body as one piece and add small ears, legs, a tail and tiny snacks that the hamsters can hold. Techniques include crocheting in continuous rounds, color changes, tiny sewn details, and micro-crochet for snacks.

Hungry Hamsters Amigurumi Pattern crochet pattern - detailed view of completed project

The pattern includes full round-by-round instructions for body, limbs, ears, tail and several snack options like cookies, pizza, watermelon and strawberries. Photos and assembly notes guide placement of eyes and features.

Why You'll Love This Hungry Hamsters Amigurumi Pattern

I absolutely love this pattern because it captures so much character in a very small package. I enjoy the challenge of micro-crochet and the satisfaction of tiny finished snacks that add personality. The pattern is flexible so I can make multiple color variations and gift little hamsters to friends. Making these hamsters is playful and quick, yet rewarding β€” I always smile when I see them sitting together.

Hungry Hamsters Amigurumi Pattern step 1 - construction progress Hungry Hamsters Amigurumi Pattern step 2 - assembly progress Hungry Hamsters Amigurumi Pattern step 3 - details and accessories Hungry Hamsters Amigurumi Pattern step 4 - final assembly and finishing

Switch Things Up

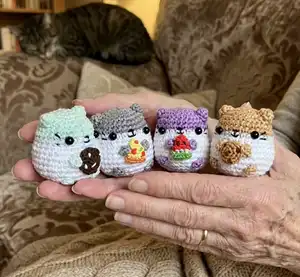
I love customizing these hamsters by changing the cap color and body color to create different characters β€” try pastel shades for a soft look or bold colors for playful hamsters.

I often change hook sizes and yarn weights to make a whole family: use thicker yarn and a larger hook for a chunky hamster, or very fine thread for micro collectibles.

I sometimes embroider different facial expressions β€” a small curved mouth or a surprised O-shaped mouth changes the personality completely.

Try making themed snack sets: chocolate cookies, tiny pizzas, miniature strawberries, or seasonal treats like tiny pumpkins or candy canes.

I add tiny accessories like felt scarves, mini bows, or tiny crocheted hats to make each hamster unique and gift-ready.

If you want posable limbs, I thread a thin wire into the legs and hands before stuffing, then cover and sew securely for gentle posing.

I switch safety eye sizes and placement to change the look β€” larger eyes give a cuter, more cartoonish face while smaller eyes look shy and realistic.

For a keychain or charm, attach a small jump ring to a securely sewn-in loop at the top and use an eyepin hidden under the top rounds.

I like to mix yarn types for texture: a furry or boucle yarn for the top cap gives a fuzzy look, while smooth cotton for the body keeps stitch definition crisp.

Finally, I make matching snack sets and assemble them in small gift boxes β€” it makes a delightful present when paired with a tiny handwritten tag.

Common Mistakes & How to Fix Them

βœ— Placing safety eyes too low can leave a white gap between the eyes and colored top; insert eyes between rounds 8 and 9 (about 6 stitches apart) or use larger eyes if needed. βœ— Not stuffing gradually will give a lumpy or misshapen body; stuff with small amounts of polyfill as you go and shape it until semi-firm before closing. βœ— Skipping stitch markers while working in continuous rounds makes counting difficult; use a stitch marker to mark the start of each round to avoid mistakes. βœ— Using the same hook for snacks as the body will make snacks too large; use a hook 3-4 sizes smaller for snacks or the recommended micro hooks to keep scale correct. βœ— Pulling stitches too tight on color changes can pucker the fabric; switch colors smoothly and keep tension relaxed for an even edge.

Hungry Hamsters Amigurumi Pattern

Make a set of adorable Hungry Hamsters β€” tiny amigurumi with tiny snacks to hold. This pattern guides you through creating palm-sized and mini hamsters with clear rounds, small accessories, and finishing tips so your hamsters turn out cuddly and full of personality. Perfect for gifting, collecting, or practicing tiny crochet techniques.

Intermediate 2-4 Hours

Materials Needed for Hungry Hamsters Amigurumi Pattern

β€” Main Fabric

  • 01
    Monaco Mercerized Cotton Thread for mini hamster (use with 1.10mm crochet hook)
  • 02
    Monaco Acrylic Yarn (3-ply) for palm-sized hamster (use with 2.25mm crochet hook)
  • 03
    DMC Embroidery threads for snacks (split strands as needed for micro-crochet)
  • 04
    Small amounts of contrasting colors for colored cap/top and snack details
  • 05
    Safety eyes: 3mm for mini hamster, 6mm for palm-sized hamster

β€” Tools Required

  • 01
    Crochet hook size 1.10mm (for mini hamster and many snacks)
  • 02
    Crochet hook size 2.25mm (for palm-sized hamster body)
  • 03
    Crochet hook size 0.75mm (for some snacks with DMC thread)
  • 04
    Safety eyes 3mm (2 pieces) for mini hamster
  • 05
    Safety eyes 6mm (2 pieces) for palm-sized hamster
  • 06
    Stitch marker
  • 07
    Black embroidery/sewing threads
  • 08
    Tapestry/sewing needle
  • 09
    Toy stuffing (polyfill)
  • 10
    Scissors
  • 11
    Pins for assembly

Progress Tracker

0% Complete

β€” Materials & Notes :

Info :

For Mini Hamster: Monaco Mercerized Cotton Thread. 1.10mm Crochet Hook. (2) Safety eyes 3mm. For snacks: DMC Embroidery threads. 0.75mm Crochet Hook. For Palm-sized Hamster: Monaco Acrylic Yarn (3-ply). 2.25mm Crochet Hook. (2) Safety eyes 6mm. For snacks: Monaco Mercerized Cotton Thread. 1.10mm Crochet Hook. General: Stitch Marker. Black embroidery/sewing threads. Tapestry/sewing needle. Toy stuffing. Scissors.

Info :

Gauge: When crocheting the pattern for the snacks, go for a hook that is 3-4 sizes smaller than the one you're using for the hamster's body. Terminology: This pattern uses US terminology and is worked in a continuous round. Finished size: Palm-sized hamsters ~6cm tall; mini hamsters ~3cm tall.

Infos :

Abbreviations: MR - Magic ring/circle. R - round. ch - chain. st - stitch. BLO - back loops only. sc - single crochet. inc - increase. dec - invisible decrease. (..) - number of stitches in the round. s2color - switch to *color*.

β€” Head/Body :

Round 1 :

6sc in MR (6)

Round 2 :

inc x6 (12)

Round 3 :

(inc, sc) x6 (18)

Round 4 :

(inc, 2sc) x6 (24)

Round 5 :

(inc, 3sc) x6 (30)

Round 6-7 :

sc around [2 rounds] (30)

Round 8-9 :

s2white sc around [2 rounds] (30)

Info :

Insert eyes between Rounds 8 & 9 (about 6 stitches apart). Note: the top of the safety eyes should slightly touch the colored portion. If there are white gaps between the eyes, use larger sized eyes or insert them higher up between rounds 7 & 8 instead.

Round 10 :

(inc, 4sc) x6 (36)

Round 11-12 :

sc around [2 rounds] (36)

Round 13 :

(inc, 5sc) x6 (42)

Round 14 :

(dec, 5sc) x6 (36)

Round 15 :

(dec, 4sc) x6 (30)

Round 16 :

(dec, 3sc) x6 (24)

Info :

Start filling with polyfill until semi-firm.

Round 17 :

(dec, 2sc) x6 (18)

Round 18 :

(dec, sc) x6 (12)

Round 19 :

dec x6 (6)

Info :

Finish off and add more stuffing until body is well-shaped. Sew close.

β€” Legs :

Info :

Using 2.25mm hook. Make 4 in beige. Leave some allowance before you start your chain.

Item Name (P1) :

Ch 2 and hdc in 2nd ch from hook. Finish off and leave long tail for sewing.

β€” Ears :

Info :

Make 2 in beige.

Round 1 :

Ch2, 4sc in 2nd ch from hook (4)

Round 2 :

(inc, sc) x2 (6)

Info :

Cut thread and leave long tail for sewing.

β€” Tail :

Round 1 :

Ch2, 4sc in 2nd ch from hook (4)

Info :

Cut thread and leave long tail for sewing.

β€” Cookie A (using 2.25mm hook) :

Round 1 :

In MR, ch2 then 8 hdc around (8)

Round 2 :

Sl st in each st around (8)

Info :

Leave long yarn tail for sewing. With brown yarn, sew on small chocolate chips.

β€” Cookie 2 (using smaller hook and yarn as hamster) :

Round 1 :

6sc in MR (6)

Round 2 :

inc x6 (12)

Round 3 :

(inc, sc) x6 (18)

Round 4 :

sc around BLO (18)

Round 5 :

(dec, sc) x6 (12)

Round 6 :

dec x6 (6)

Info :

Finish off and leave long tail for sewing. With dark brown thread/yarn, sew small triangles to make choco chips. Sew close.

β€” Mini Watermelon / Pizza :

Note :

Circle color indicates color change of round for Watermelon or Pizza. Flatten triangle, making sure yarn tail is situated on the side.

Round 1 :

4sc in MR (4)

Round 2 :

(inc, sc) x2 (6)

Round 3 :

(inc, 2sc) x2 (8)

Round 4 :

(inc, 3sc) x2 (10)

Round 5 :

(inc, 4sc) x2 (12)

Round 6 :

(inc, 5sc) x2 (14)

Info :

Finish off and leave long tail for sewing. For the watermelon slice, sew on some black thread to put watermelon seeds (optional). For the pizza slice, embroider 3-4 pepperoni slices with red thread by sewing 4-5 times over the same stitch (careful not to overlap). Embroider peppers with green thread 2-3 times diagonally random on the pizza. Sew close the pizza/watermelon by threading the yarn tail through the back loops of the last round.

β€” Mini Strawberry (using 1.10mm hook) :

Round 1 :

6sc in MR (6)

Round 2 :

sc around (6)

Round 3 :

inc x6 (12)

Round 4 :

(inc, 2sc) x4 (16)

Round 5 :

sc around (16)

Round 6 :

(dec, sc) x4 (12)

Round 7 :

dec x6 (6)

Info :

Stuff lightly and finish off with long tail for sewing. Embroider strawberry seeds with white yarn and sew close. Do not cut off yarn tail so you can use it to sew on to the hamster.

β€” Strawberry leaf :

Info :

Make in green: In a magic ring *ch 2 then sl st in the 2nd ch from hook. Sl st again into the magic ring*. Repeat ** 4 more times. Leave long tail for sewing and sew on top of strawberry.

β€” Mini Acorn (using 1.10mm hook) :

Round 1 :

6sc in MR (6)

Round 2 :

(inc, sc) x3 (9)

Round 3 :

(inc, 2sc) x3 (12)

Round 4 :

sc around (12)

Round 5 :

(inc, 3sc) x3 (15)

Round 6 :

sc around BLO (15)

Info :

Finish off. Do not sew close.

β€” Acorn cap (Make in dark brown) :

Round 1 :

6sc in MR (6)

Round 2 :

inc x6 (12)

Round 3 :

(inc, sc) x6 (18)

Round 4 :

sl st around (18)

Info :

Finish off with long thread for sewing and sew the front loops of the acorn cap to the edge of the acorn. Embroider a French knot to the top as the nub.

β€” Notes on Micro Crochet :

Info :

Note: for micro crocheting with a 0.75mm hook, using 3 strands of DMC embroidery thread is recommended. DMC embroidery threads have 6 strands so split as needed before crocheting.

β€” Assembly :

Info :

Attach the individual parts to the body with sewing pins first to make sure you're happy with the placement.

Mouth :

With black sewing thread or yarn, sew a small dash (-) between the eyes between R7 & R8. Sew a vertical line (|) from the center of the nose down. Sew on 2 diagonal lines (v) to give him a tiny smile.

Whiskers :

Sew two diagonal lines beside the eyes to make the whiskers.

Ears :

Sew the ears to the top of the head about 6 stitches apart.

Sew on the snack of choice :

Sew the snack on the center of the belly.

Sew the hands :

Sew the hands as if they are holding the snack. If you want your sewing to be extra unnoticeable you can use sewing thread in a similar shade to keep it securely in place.

Leg placement :

Count 2 rounds down from the hands and sew the legs horizontally facing towards the belly. They should align with the eyes.

Tail :

Sew the tail on the back of the hamster around R15.

Assembly Instructions

  • Attach the individual parts to the body with sewing pins first to make sure you're happy with the placement.
  • With black sewing thread or yarn, sew a small dash (-) for the mouth between the eyes between R7 & R8, then a vertical line down and two diagonal lines to form a tiny smile.
  • Sew the ears to the top of the head about 6 stitches apart and secure firmly with hidden stitches.
  • Sew the snack of choice to the center of the belly and position the hands to look like they are holding the snack, securing with matching thread.
  • Count 2 rounds down from the hands and sew the legs horizontally facing towards the belly so they align with the eyes.
  • Sew two diagonal whisker lines beside the eyes using black thread for facial detail.
  • Sew the tail to the back of the hamster around round 15 and hide ends neatly inside the body.

Important Notes

  • πŸ’‘Attach parts with sewing pins before stitching permanently to check placement and symmetry.
  • πŸ’‘Insert safety eyes between rounds 8 and 9 (about 6 stitches apart) or adjust placement to rounds 7 and 8 if needed for better fit.
  • πŸ’‘Work in continuous rounds and use a stitch marker to mark the first stitch of each round for accurate counting.
  • πŸ’‘Stuff gradually while shaping the body; overstuffing can distort the shape and under-stuffing will flatten details.

Create a tiny collection of Hungry Hamsters and tiny snacks to warm hearts and bring smiley moments to your day. These micro-amigurumi are perfect as thoughtful handmade gifts, pocket pals, or kawaii desk companions. Try different colors and snack combos to make each hamster uniquely yours. 🧢🐹

You ask,

we answer.

FAQs

What size will the finished piece be?

The palm-sized hamster measures approximately 6 cm tall and the mini hamster about 3 cm tall when using the recommended yarn and hook sizes.

Can I use different yarn weights for this pattern?

Yes, but changing yarn weight will affect final size; use an appropriate hook for your chosen yarn and adjust snack hook sizes (3-4 sizes smaller) to maintain scale.

Do I need prior crochet experience for this pattern?

This pattern is rated intermediate and assumes familiarity with single crochet, increases, decreases and working in continuous rounds.

How long does this project typically take to complete?

Most crafters finish a single hamster in about 2-4 hours depending on size and snack complexity; making multiple hamsters or many snacks will take longer.

What tools do I need for tiny snacks and micro crochet?

Use small hooks (1.10mm or 0.75mm) and DMC embroidery thread for tiny snacks; split embroidery thread into fewer strands for better handling.