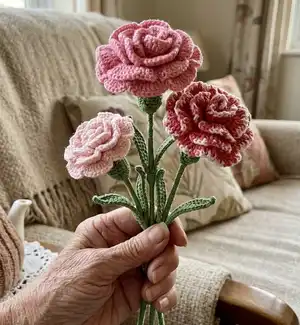
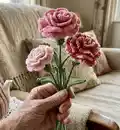
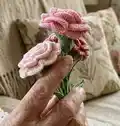
This booklet gathers a charming collection of crochet flower patterns you can make at home. You will find detailed, step-by-step instructions for calla lilies, poppies, tulips, roses, pansies and more, with wire and assembly tips included. Perfect for making long-lasting bouquets, hair accessories or decorative stems, these patterns bring realistic floral details to your crochet projects. Follow the diagrams and written rounds to craft beautiful flowers with ease.
Progress Tracker
0% Complete
— Calla Lily :
Info :
MATERIALS Cotton 8 White Soft Yellow Crochet hook size B (1.90 mm) Wire 0.8 mm Wire 0.6 mm Green floral tape
Round 1 :
Rnd 1: Begin with 5 ch. Join with 1 st to form ring. Work 2 sc together in each chain. Join with 1 st.
Round 2 :
Rnd 2: 3 ch + 1 dc together, 2 dc together in each stitch.
Round 3 :
Rnd 3: 3 ch + 1 dc together, 2 dc together in each stitch.
Round 4 :
Rnd 4: 3 ch + 1 dc together. *1 dc, 2 dc together*. Repeat**. Join with 1 st.
Round 5 :
Rnd 5: 3 ch + 1 dc together. *2 dc, 2 dc together*. Repeat**. Join with 1 st.
Info :
Prepare a 0.6 mm wire.
Round 6 :
Rnd 6: Make 39 sc, 3 dc together, 39 sc incorporating wire.
Round 7 :
Rnd 7: Work all around petal with sc. Break off yarn.
Info :
Alternatively, work final round in Crab Stitch.
PISTIL :
Begin with 5 ch. Join with 1 st to form ring. Work 2 sc together in each chain. Work 180 sc in a circle (about 6 cm wide). Join with 1 st. Break off yarn.
Info :
Insert a 0.8 mm wire into the base of pistil and twist the ends of wires. (FIG.1) Insert pistil in the base of petal. (FIG.2) Twist corresponding wires together. Bend base of petal towards the pistil. (FIG.3) Cover stem with green floral tape. See video tutorial.
— Poppy :
Info :
MATERIALS Cotton 8 Red Black Soft green Crochet hook size B (1.90 mm) Wire 0.6 mm Green floral tape
Round 1 :
Rnd 1: Begin with 4 ch. Work 7 dc in the first chain.
Round 2 :
Rnd 2: 3 ch, 1 dc, 2 dc together, 2 dc together, 2 dc together, 2 dc.
Round 3 :
Rnd 3: 3 ch, 2 dc, 2 dc together, 1 dc, 2 dc together, 2 dc together, 1 dc, 2 dc together, 3 dc.
Round 4 :
Rnd 4: 3 ch, 15 dc.
Round 5 :
Rnd 5: 1 ch, skip 1 stitch, 2 sc, 10 dc, 2 sc.
Round 6 :
Rnd 6: 1 ch, skip 1 stitch, 3 sc, 3 dc, 3 dc together, 3 dc, 3 sc. Break off yarn.
Info :
Prepare wire. Attach yarn in the base of petal.
Round 7 :
Rnd 7: Work all around the petal in sc, incorporating wire. Join with 1 st.
Round 8 :
Rnd 8: Work all around petal in Crab Stitch. Break off yarn.
COROLLA :
Chain 3 join with 1 st to form ring. Work 40 sc inside the ring. Break off yarn. Work 5 sc inside the ring. Work 5 times: 1 sc, 5 ch on outer rim of button. (FIG.1) Break off yarn.
Info :
Insert wire into the back of corolla and twist the ends of wire. (FIG.2) Attach petals to corolla. (FIG.3) Twist corresponding wires together. (FIG.4) Cover stem with green floral tape. See video tutorial.
— Tulip :
Info :
MATERIALS Cotton 8 Soft yellow Soft orange Crochet hook size B (1.90 mm) Wire 0.6 mm Wire 0.3 mm 3 red pearls Green floral tape
Info :
PETAL Begin with 15 ch.
Round 1 :
Rnd 1: 1 sc, 1 dc, 10 tc, 1 dc, 9 dc together, 1 dc, 10 tc, 1 dc, 1 sc. Break off yarn.
Info :
Prepare a 0.6 mm wire.
Round 2 :
Rnd 2: Work 15 sc, 1 dc, 3 dc together, 1 sc, 3 dc together, 1 dc, 15 sc, 1 st incorporating wire. Break off yarn.
PISTIL :
Insert a 0.3 mm wire into a pearl and twist the ends of wire. (FIG.1) Make 3 pistils and twist the ends of wires. (FIG.2)
Info :
Attach the petals at pistils. (FIG.3) Twist corresponding wires together. (FIG.4) Cover stem with green floral tape. See video tutorial.
— Rose Bud :
Info :
MATERIALS Cotton 8 Soft pink Pink Crochet hook size B (1.90 mm) Wire 0.8 mm Green floral tape
Round 1 :
Rnd 1: Begin with 4 ch and work 9 dc in the first chain. Join with 1 st.
Round 2 :
Rnd 2: 3 ch + 1 dc together, 2 dc together in each stitch. Join with 1 st.
Round 3 :
Rnd 3: 3 ch + 1 dc together, 2 dc together in each stitch. Join with 1 st. Break off yarn.
Round 4 :
Rnd 4: Work all around petal in Crab Stitch. Break off yarn.
Assembly :
Roll up 1 petal. (FIG.1) Join remaining 2 petals and attach them with wire. (FIG.2) Twist the ends of wire together. (FIG.3) Cover stem with green floral tape. See video tutorial.
— Little Rose :
Info :
MATERIALS Cotton 8 Pink Soft pink Crochet hook size B (1.90 mm) Wire 0.6 mm Green floral tape
Round 1 :
Rnd 1: Begin with 4 ch and work 9 dc in the first chain. Join with 1 st.
Round 2 :
Rnd 2: 3 ch + 1 dc together, 2 dc together in each stitch. Join with 1 st.
Round 3 :
Rnd 3: 3 ch + 1 dc together, 2 dc together in each stitch. Join with 1 st. Break off yarn.
Round 4 :
Rnd 4: Work all around petal in sc incorporating wire. Join with 1 st. Break off yarn.
Info :
Make 4 petals. Insert wire into 3 petals. Alternatively, work final round in Crab Stitch.
Assembly :
Join the first 3 petals at Rose Bud by twisting corresponding wire. (FIG.1) Join the last 3 petals. (FIG.2) Twist corresponding wires together. (FIG.3) Shape petals decoratively. Cover stem with green floral tape. See video tutorial.
— Big Rose :
Info :
MATERIALS Cotton 8 Red Crochet hook size B (1.90 mm) Wire 0.6 mm Green floral tape
Info :
Make a Rose Bud (see pattern page 8).
Round 1 :
Rnd 1: Begin with 4 ch and work 9 dc in the first chain. Join with 1 st.
Round 2 :
Rnd 2: 3 ch + 1 dc together, 2 dc together in each stitch. Join with 1 st.
Round 3 :
Rnd 3: 3 ch + 1 dc together, 2 dc together in each stitch. Join with 1 st. Prepare wire.
Round 4 :
Rnd 4: Work all around petal in sc incorporating wire. Join with 1 st.
Round 5 :
Rnd 5: Work all around petal in Crab Stitch. Break off yarn.
Assembly :
Join the first 3 petals at Rose Bud by twisting corresponding wire. (FIG.1) Join the last 3 petals. (FIG.2) Twist corresponding wires together. Shape petals decoratively. Cover stem with green floral tape.
— Pansy :
Info :
MATERIALS Cotton 8 Yellow Lilac Violet Crochet hook size B (1.90 mm) Wire 0.6 mm
Round 1 :
Rnd 1: Magic Ring. Work into the ring *1 sc, 3 ch, 3 dc, 3 ch*. Repeat** (4 petals). Pull loose yarn end to tighten circle. Break off yarn.
Round 2 :
Rnd 2: *1 sc in the centre of flower, 2 sc into 3 chains, 1 dc, 2 dc together, 1 dc, 2 sc into 3 chains*. Repeat**. Break off yarn.
Round 3 :
Rnd 3: 1 st, 2 sc, 2 dc together, 2 dc together, 2 dc together, 2 dc together, 5 sc, 2 dc together, 2 dc together, 2 dc together, 2 dc together, 2 sc, 1 st. Break off yarn.
Info :
Insert wire behind the flower. (FIG.1) Twist the ends. (FIG.2)
— Little Flower :
Info :
MATERIALS Cotton 8 White Soft orange Crochet hook size B (1.90 mm) Wire 0.8 mm Wire 0.3 mm 3 red pearls Green floral tape
RECEPTACLE :
Begin with 5 ch. Join with 1 st to form ring.
Round 1 :
Rnd 1: 1 ch, 2 sc together in each chain.
Round 3 :
Rnd 3: *2 sc together, 1 sc*. Repeat**.
Round 5 :
Rnd 5: 15 sc. Join with 1 st.
PETALS :
Rnd 6: *Begin 15 ch and work 14 sc in each chain across. Continue with 3 sc*. Repeat **. Break off yarn.
Round 7 :
Rnd 7: *5 sc, 7 dc, 4 sc, 7 dc, 5 sc. Skip 1 stitch, 1 sc, skip 1 stitch*. Repeat**. Join with 1 st. Break off yarn.
— Big Flower :
Info :
MATERIALS Cotton 8 White Soft yellow Soft green Crochet hook size B (1.90 mm) Wire 0.8 mm Wire 0.3 mm 3 red pearls Green floral tape
RECEPTACLE :
Begin with 5 ch. Join with 1 st to form ring.
Round 1 :
Rnd 1: 1 ch, 2 sc together in each chain.
Round 3 :
Rnd 3: *2 sc together, 1 sc*. Repeat**.
Round 6 :
Rnd 6: 15 sc. Join with 1 st.
PETALS :
Rnd 7: *Begin 19 ch and work 18 sc in each chain across. Continue with 3 sc*. Repeat**.
Round 8 :
Rnd 8: *5 sc, 10 dc, 6 sc, 10 dc, 5 sc. Continue with 3 sc*. Repeat**.
Round 9 :
Rnd 9: *5 sc, 10 hdc, 2 sc, 2 sc together, 2 sc together, 2 sc, 10 hdc, 5 sc. Skip 1 stitch, 1 sc, skip 1 stitch*. Repeat**. Join with 1 st. Break off yarn.
PISTIL :
Insert a 0.3 mm wire into a pearl and twist the ends. (FIG.1) Prepare 3 pistils and twist corresponding wires together. (FIG.2) Insert a 0.8 mm wire in the back of flower beginning from receptacle centre and reaching the edge of petal. Bend wire and twist the ends together. (FIG.3) Insert pistils into the centre of flower. (FIG.4) Cover stem with green floral tape. See video tutorial.
This booklet of crochet flower patterns brings a garden of lasting blooms to your home — from delicate calla lilies to full roses and playful pansies. Each pattern includes stitch-by-stitch rounds, wiring tips, and assembly figures so you can craft realistic stems that last forever. Create bouquets, hairpieces, or decor with these timeless patterns and brighten any room with handmade flowers. 🌸🌿