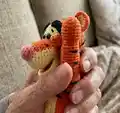
Make your own adorable Tigger amigurumi with clear, photo‑assisted instructions and full stitch-by-stitch rounds. This pattern guides you through each piece — head, jaw, ears, nose, arms, legs and finishing — so you can create a charming handmade tiger. Perfect as a gift or a playful collectible, it uses common materials and stepwise assembly tips to help you succeed.
Progress Tracker
0% Complete
— Lower Jaw :
Round 0 :
Chain 6; work in spiral (without a turning CH and SS) as in all amigurumi toys (oval-shape detail);
Round 1 :
start in the 2nd chain from the hook: 4 SC, 3 SC into the last chain from the hook, on the other side: 3 SC, INC (12);
Round 2 :
INC, 3 SC, 3 INC, 3 SC, 2 INC (18);
Round 3 :
SC, INC, 3 SC, (SC, INC)*3, 3 SC, (SC, INC)*2 (24);
Info :
fix and cut the thread;
— Outer part + assembly (Lower Jaw) :
Round 0 :
Chain 6; work in spiral (without a turning CH and SS);
Round 1 :
start in the 2nd chain from the hook: 4 SC, 3 SC into the last chain from the hook, on the other side: 3 SC, INC (12);
Round 2 :
INC, 3 SC, 3 INC, 3 SC, 2 INC (18);
Round 3 :
SC, INC, 3 SC, (SC, INC)*3, 3 SC, (SC, INC)*2 (24);
Info :
fix and cut the thread; mark 6 SC on the top of the oval; attach light yellow thread in the next stitch after stitch marker on the left and work 18 SC until the next stitch marker; attach the red inner part face up and work two parts together with 24 SC, stuff the detail a bit in the process; fix the thread and hide it inside;
— Ears :
Info :
Inner part: crochet 2 details with light yellow yarn;
Info :
fix and cut the thread.
Round 1 :
Outer part (orange yarn) 6 SC in MR;
Info :
don't fasten off, attach yellow inner part face up and work them together with 12 SC; work additional round of 12 SC; fold the detail in half and work the next and the previous stitches from the hook together with SC; fix the thread and leave a long end to fix/sew.
— Stripe on the Muzzle :
Info :
orange yarn; make a turn and work a turning CH at the end of each row;
Round 1 :
start in the 2nd chain from the hook: 4 SC;
Round 2 :
INC, 2 SC, INC (6);
Round 3 :
INC, 4 SC, INC (8);
Rounds 4-7 :
4 rows 8 SC; fix the thread and leave a long end to sew.
— Head :
Info :
start with light yellow yarn; stuff in a process;
Round 2 :
(SC, 3 SC in the same St)*3 (12);
Round 3 :
2 SC, (3 SC in the same St, 3 SC)*2, 3 SC in the same St, SC (18);
Round 4 :
3 SC, (3 SC in the same St, 5 SC)*2, 3 SC in the same St, 2 SC (24);
Rounds 5-10 :
6 rounds 24 SC; in the next round lower jaw and the stripe are attached to the muzzle; to do it mark the places of attachment: mark 8 SC on the top for the stripe and 6 SC at the bottom for the lower jaw (distance on the sides between the upper and lower attaching areas is 5 SC);
Round 11 :
change thread color to orange; 5 SC, 8 SC together with the stripe, 5 SC, 6 SC together with the lower jaw (24);
Round 12 :
9 SC, INC HDC, change thread color to light yellow, 4 INC HDC, change thread color to orange, INC HDC, 9 SC (30);
Round 13 :
9 SC, HDC, INC HDC, change thread color to light yellow, (HDC, INC HDC)*4, change thread color to orange, HDC, INC HDC, 9 SC (36);
Round 14 :
9 SC, 2 HDC, INC HDC, change thread color to light yellow, (2 HDC, INC HDC)*4, change thread color to orange, 2 HDC, INC HDC, 9 SC (42);
Info :
when changing the thread color, it is advisable to cut the thread each time and tie the thread ends into a knot; insert the eyes in Round 12 at a distance of 3-4 SC;
Rounds 15-20 :
6 rounds 42 SC; in Round 21 the ears are attached; mark a SC on the sides at a distance of 18 SC between them;
Round 21 :
11 SC, SC together with the ear, 18 SC, SC together with the ear, 11 SC (42); threads from the ears can be left on the front side to fix them additionally after the head crocheting is finished;
Round 22 :
(5 SC, DEC)*6 (36);
Round 23 :
(4 SC, DEC)*6 (30);
Round 24 :
(3 SC, DEC)*6 (24);
Round 25 :
(2 SC, DEC)*6 (18);
Round 26 :
(SC, DEC)*6 (12);
Info :
tighten the hole, fix the thread and hide it inside; sew the sides of the stripe to the middle of the muzzle and fix/sew the ears if required.
— Nose :
Round 1 :
6 SC in MR (pink yarn);
Round 2 :
(SC, 3 SC in the same St)*3 (12);
Round 3 :
2 SC, (INC, 3 SC)*2, INC, SC (15);
Round 4 :
15 SC; fix the thread and leave a long end to sew; sew on the tip of the muzzle so that it is raised up; it can be a bit stuffed (I do not stuff it).
— Eyebrows :
Info :
crochet 2 details with black yarn; leave a long thread end at the beginning;
Round 1 :
start in the 4th chain from the hook: DC, HDC, 5 SC; fix the thread and leave a long end to sew and embroider the stripes on the head;
Info :
place eyebrows as shown in the photo and sew them to the head at the opposite ends; embroider the eyelids; embroider stripes on the muzzle on the sides and stripes on the head.
— Arms :
Info :
crochet 2 details (left and right) with orange yarn; stuff in process;
Round 0 :
Chain 5; work in spiral (without a turning CH and SS);
Round 1 :
start in the 2nd chain from the hook: 3 SC, 3 SC into the last chain from the hook, on the other side: 2 SC, INC (10);
Round 2 :
INC, 2 SC, 3 INC, 2 SC, 2 INC (16);
Rounds 3-6 :
4 rounds 16 SC; place stitch marker exactly on the side;
Round 8 :
16 SC; place stitch marker exactly on the side if required;
Round 9 :
left arm: 4 DEC, 2 SC, 4 INC, 2 SC (16); right arm: 2 SC, 4 INC, 2 SC, 4 DEC (16);
Rounds 10-17 :
8 rounds 16 SC; fold the detail in half along the palm, place the stitch marker 2 SC to the left of the fold line (fold line is on the opposite side of the thumb);
Round 18 :
left arm: 12 SC, 4 INC (20); right arm: 4 INC, 12 SC (20);
Round 19 :
left arm: 12 SC, 4 DEC (16); right arm: 4 DEC, 12 SC (16);
Rounds 20-29 :
10 rounds 16 SC; stretch the elbow area to form a bend;
Round 30 :
(2 SC, DEC)*4 (12);
Round 31 :
(SC, DEC)*4 (8); if you use joints to mount the arms, insert them on one line with the thumb between Rounds 28 and 29; tighten the hole, fix the thread and hide the end inside; embroider stitches/stripes with black thread.
— Legs :
Round 0 :
Chain 8; work in spiral (without a turning CH and SS);
Round 1 :
start in the 2nd chain from the hook: 6 SC, 3 SC into the last chain from the hook, on the other side: 5 SC, INC (16);
Round 2 :
INC, 5 SC, 3 INC, 5 SC, 2 INC (22);
Round 3 :
SC, INC, 5 SC, (SC, INC)*3, 5 SC, (SC, INC)*2 (28);
Rounds 5-6 :
2 rounds 28 SC; align the stitch marker exactly in the middle of the heel;
Round 7 :
7 SC, 7 DEC, 7 SC (21);
Round 8 :
5 SC, 6 DEC, 4 SC (15);
Round 9 :
6 SC, 3 INC, 6 SC (18);
Round 10 :
DEC, 14 SC, DEC (16);
Round 11 :
5 SC, (INC, SC)*2, INC, 6 SC (19);
Round 13 :
6 SC, (INC, 2 SC)*2, INC, 6 SC (22);
Round 14 :
DEC, 18 SC, DEC (20);
Round 15 :
6 SC, (INC, 3 SC)*2, INC, 5 SC (23);
Round 16 :
2 INC, 19 SC, 2 INC (27);
Round 17 :
8 SC, (DEC, 3 SC)*2, DEC, 7 SC (24);
Round 18 :
INC, 22 SC, INC (26);
Round 19 :
8 SC, (DEC, 2 SC)*2, DEC, 8 SC (23);
Round 21 :
(2 SC, DEC)*5, 3 SC (18);
Round 22 :
(SC, DEC)*6 (12);
Info :
tighten the hole, fix the thread and hide the end inside; sew legs to the body evenly and embroider stripes as shown.
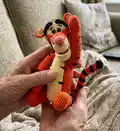
Make a lovable Tigger to brighten any shelf or nursery with this detailed amigurumi pattern. 🧶
This design combines classic amigurumi shaping with playful embroidered details to create a character full of personality. ✨
Whether you keep it for yourself or gift it to someone special, this cuddly tiger is sure to bring smiles. 🐯