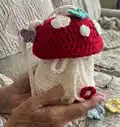
Create a whimsical mushroom drawstring bag perfect for kids or as a unique accessory. This pattern guides you through a textured body, a rounded mushroom top, spots, strap, drawstring, and little flower embellishments. You will enjoy working with two strands for a plush fabric and finishing touches for a polished look.
Progress Tracker
0% Complete
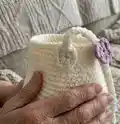
— Body :
Info :
BODY - use two strands together of color A, work in the round, join with a sl st into the first dc at the end of each round
Info :
Begin with a magic ring - ch 2, 12 dc in magic ring (12)
Round 1 :
ch 2, 2 dc in each st (24)
Round 2 :
ch 2, *1 dc, 2 dc, repeat from * to last st (36)
Round 3 :
ch 2, *1 dc, 1 dc, 2 dc, repeat from * to last st (48)
Info :
work should measure approximately 5 in. diameter (if you would like your bag to be bigger, add another increase round of *1 dc, 1 dc, 1 dc, 2 dc)
Round 4 :
ch 2, BLO dc in each st (48)
Round 5 :
ch 2, *FPdc in dc row below, dc in next st, repeat from * to last st (48)
Round 6-12 :
ch 2, dc in each st (48) (if you want your bag taller, add more rounds of dc)
Round 13 :
ch 2, *dc, ch 1, skip a stitch, repeat from * to last st (48)
Round 14 :
Round 14 - drop 1 strand, but do not cut - continue with other strand ch 2, 1 dc, 3 dc, *2 dc, 3 dc repeat from * to last st (120) (bag should measure approximately 7" tall)
STRAP :
grab the dropped strand of yarn and work two strands together ch until you reach your desired strap length (32" suggested for kid, 36" for adult) turn, sc into the back bump of each chain stitch, sl st to fasten (strap will only be attached to 1 side at this time)
— Top :
Info :
TOP - use 2 strands together with color B, work in the round, join with a sl st in first dc at the end of each round
Info :
Begin with a magic ring - ch 2, 10 dc in the magic ring (10)
Round 1 :
ch 2, 2 dc in each stitch (20)
Round 2 :
ch 2, *1 dc, 2 dc repeat from * to last st (30)
Round 3 :
ch 2, *1 dc, 1 dc, 2 dc repeat from * to last st (40)
Round 4 :
ch 2, *1 dc, 1 dc, 1 dc, 2 dc repeat from * to last st (50) (if you made your bag bigger than 5" diameter, add at least one more increase round - you'll want your top wider than the bag)
Round 5-6 :
ch 2, 1 hdc in each stitch (50)
Round 7 :
Round 7 - drop 1 strand of yarn, fasten off, and work with remaining strand only, ch 3, tr BLO in each stitch (50)
Round 8 :
ch 1, sl st each stitch, fasten off and weave in ends (50)
— Mushroom Spots, Finishing the Strap, Drawstring & Flowers :
Info :
Create as many small, medium, and large spots as you want in color A; leave enough of a tail so you can use it to attach to the mushroom top. Switch to a 4 mm hook.
Small Spot :
magic ring - ch 1, 5-6 sc, sl st to join
Medium Spot :
magic ring - ch 2, 8-10 hdc, sl st to join
Large Spot :
magic ring - ch 2, 10-12 dc, sl st to join
Info :
Note: Before attaching your spots, place a marker between the stitches in either the 3rd or 4th row from the center on opposite sides for your straps.
Info :
Use your darning needle to attach spots to the top.
Info :
Starting under the mushroom top, thread your strap up between your marked stitches and back down through the other marked stitches.
Info :
Attach the strap to the bag securely on the opposite side.
DRAWSTRING :
Using the 5.5 mm hook and 2 strands of color A yarn, chain until desired length (about 30") and tie off. Leave 4" on each end of the drawstring for flower embellishments. Thread the finished drawstring through every other skipped stitch opening (round 13 of body).
Flower Embellishments :
For flower embellishments, use 4 mm hook: With color A - Start with a magic ring, ch 2 - 5 hdc in the ring, sl st to join and fasten off. With color B - Pull up a loop and *ch 1, (hdc, dc, hdc, sl st), repeat from * 4 more times and sl st to join and fasten off. Use your darning needle to sew flowers to drawstring ends.
This whimsical Mushroom Bag is a delightful mix of texture and playful details, perfect for gifting or everyday use. The doubled-strand body gives a sturdy, plush fabric while the mushroom top and spots add charm and personality. Have fun customizing colors and embellishments to make it truly your own. 🧶🍄✨