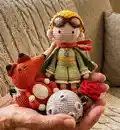
Make your own Little Prince amigurumi with this complete crochet pattern. You will get step-by-step rounds for the head, hair, body, limbs, fox, planet rings and rose so you can create a charming set. The pattern includes materials, abbreviations, and detailed assembly photos and notes to guide you. Perfect for creating a handmade gift or a treasured collectible.
Progress Tracker
0% Complete
— Prince's Hair (yarn E) :
Round 1 :
sc 6 into a magic loop (6)
Round 2 :
(sc 1, Double Tr) 6x (pic 1&2) (12)
Round 3 :
inc 12 (pic 3) (24)
Round 4 :
[sc 1, Double Tr] 12x (use your middle finger to push the Double Tr to the front - pic 4. However if you crochet the V-shape st, the Double Tr could be pushed to the back - pic 5, simply use your finger to push it to the front) (24)
Round 5 :
[sc 1, inc] 12x (36)
Round 6 :
[sc 1, Double Tr] 18x (36)
Round 7 :
[sc 2, inc] 12x (48)
Round 8 :
[sc 1, Double Tr] 24x (48)
Round 10 :
[Double Tr, sc 1] 24x (48)
Round 12-15 :
Repeat rnd 8-11 (4 rnds) (48)
Round 16-18 :
Repeat rnd 8-10 (3 rnds)-you can crochet the head first, if the hair is too big for the head, do not need to crochet rnd 17-18 or 15-18 (depend on your hands) (48)
Info :
Break the yarn, leave a long thread to sew later.
— Prince's Head (yarn D) :
Round 1 :
sc 6 into a magic loop (6)
Round 3 :
[sc 1, inc] 6x (18)
Round 4 :
sc 1, inc, [sc 2, inc] 5x, sc 1 (24)
Round 5 :
[sc 3, inc] 6x (30)
Round 6 :
sc 2, inc, [sc 4, inc] 5x, sc 2 (36)
Round 7 :
[sc 5, inc] 6x (42)
Round 8 :
sc 3, inc, [sc 6, inc] 5x, sc 3 (48)
Round 9 :
[sc 7, inc] 6x (54)
Round 10-21 :
sc 54 (12 rnds), insert eyes between rnd 17&18, you can add/deduct 1 rnd to fit the hair (54)
Round 22 :
[sc 7, dec] 6x (48)
Round 23 :
[sc 6, dec] 6x (42)
Round 24 :
[sc 5, dec] 6x (36)
Round 25 :
[sc 4, dec] 6x (30)
Round 26 :
[sc 3, dec] 6x, stuff firmly (24)
Round 27 :
[sc 2, dec] 6x (18)
Info :
Break the yarn, leave a long thread to sew later.
— Prince's Arms (yarn D, X2) :
Round 1 :
sc 6 in a magic loop (6)
Round 2 :
[sc 1, inc] 3x (9)
Round 3 :
sc 4, Bobble, sc 4 (9)
Round 4-5 :
sc 9 (2 rnds), change to yarn A (9)
Round 6 :
(blo) inc 9 (18)
Round 7-8 :
sc 18 (2 rnds) (18)
Round 10-23 :
sc 9 (14 rnds) (9)
Info :
Break the yarn with a long rest, stuff slightly, use the tapestry needle to sew 2 edges together. Join yarn B on rnd 6, crochet (sc 1, ch 2, sc 1) 9x, break the yarn, hide the remaining yarn.
— Pants (yarn A) :
Round 1 :
ch 30, slst on the 1st ch to form a ring, sc 30 (30)
Round 2-3 :
sc 30 (2 rnds) (pic 7) (30)
Round 4 :
sc 15, slst on the 1st sc (pic 8) (15)
Round 5 :
[sc 2, inc] 5x (20)
Round 6-7 :
sc 20 (2 rnds) (20)
Round 8 :
[sc 3, inc] 5x (25)
Round 9-10 :
sc 25 (2 rnds) (25)
Round 11 :
[sc 4, inc] 5x (30)
Round 12-13 :
sc 30 (2 rnds) (30)
Round 14 :
dec 15, break yarn A, change to yarn B (15)
Round 15 :
(blo) (sc 1, ch 2, sc 1) 15x (pic 10) (60)
Info :
Break the yarn, hide the remaining yarn. Join yarn A on rnd 3, repeat rnd 4-15 to make the second pant's leg (pic 11).
— Prince's Legs (yarn C, X2) :
Round 1 :
ch 6, start on the 2nd stitch from the hook, sc 4, (sc 3), continue to crochet on the other side of the foundation chain, sc 3, inc 1 (12)
Round 2 :
inc 1, sc 3, inc 3, sc 3, inc 2 (18)
Round 3-4 :
sc 18 (2 rnds) (18)
Round 5 :
sc 5, dec 4, sc 5, start stuffing (14)
Round 6 :
sc 3, dec 4, sc 3, change to yarn D (10)
Round 7-21 :
sc 10 (15 rnds), stuff firmly (10)
Info :
Break the yarn for the 1st leg, crochet the 2nd leg the same way but do not break the yarn, continue to crochet sc 5, join with the last st of the 1st leg with slst 1 (pic 12), and continue to crochet the body.
Round 22 :
sc 10 (on the 1st leg), sc 10 (on the 2nd leg) (pic 13) (20)
Round 23 :
[sc 3, inc] 5x (25)
Round 24 :
[sc 4, inc] 5x (30)
Info :
Break the yarn, we will crochet the body and the pants together from this rnd.
Round 25 :
sc 30, change to yarn E (pic 17) (30)
Round 26-27 :
sc 30 (2 rnds), break yarn E, change to yarn A (30)
Round 28-31 :
sc 30 (4 rnds) (30)
Round 32 :
[sc 3, dec] 6x (24)
Round 33 :
sc 24, stuff firmly (24)
Round 34 :
[sc 2, dec] 6x (18)
Info :
Break the yarn, leave a long thread to sew later.
— Aviator Goggles (yarn F) :
Round 1 :
ch 4, start on the 2nd stitch from the hook, sc 2, (sc 3), continue to crochet on the other side of the foundation chain, sc 1, inc (8)
Round 2 :
inc, sc 1, inc 3, sc 1, inc 2, break yarn F, change to yarn G (14)
Round 3 :
hdc 1, hdc inc, hdc 1, [hdc 1, hdc inc] 3x, hdc 1, [hdc 1, hdc inc] 2x (20)
Info :
Break the yarn, make the 2nd piece the same way but do not break the yarn, continue to crochet 3 ch, and join with the 1st piece with slst 1 (pic 18). Break the yarn, hide the remaining yarn.
— Ears (yarn D, X2) :
Round 1 :
sc 6 into a magic loop (6)
Info :
Break the yarn, leave a long thread to sew later, use tapestry needle to sew 2 edges together.
— Scarf (yarn C) :
Round 1 :
ch 63, start on the 3rd stitch from the hook, *sc 1, ch 1, skip 1 st*, repeat ** until 1 remaining st, sc on this last st, turn (60)
Round 2 :
ch 1, *sc 1 into the chain-space, ch 1, skip 1 st*, repeat ** until 1 remaining st, sc on this last st (60)
Info :
Break the yarn, hide the remaining yarn.
— Cape (yarn H) :
Round 1 :
ch 27, start on the 2nd ch from the hook, sc 8, hdc 9, dc 9, turn (26)
Round 2 :
ch 1, slst 26, turn (26)
Round 3 :
ch 1, sc 8, hdc 9, dc 9, turn (26)
Round 4-27 :
Repeat [rnd 2-3] 12 more times (24 rnds) (26)
Round 28 :
ch 1, slst 26 (26)
Info :
Do not break the yarn, continue to crochet 15 chs, break the yarn. Join yarn H on the opposite side, continue to crochet 15 chs, break the yarn.
— Planet (yarn J) :
Round 1-9 :
Repeat rnd 1-9 of the Prince's Head (54)
Round 10 :
sc 4, inc, [sc 8, inc] 5x, sc 4 (60)
Round 11 :
[sc 9, inc] 6x (66)
Round 12-24 :
sc 66 (13 rnds) (66)
Round 25 :
[sc 9, dec] 6x (60)
Round 26 :
[sc 8, dec] 6x (54)
Round 27-32 :
Repeat rnd 20-25 of the Prince's Head, stuff firmly (18)
Round 33 :
[sc 1, dec] 6x (12)
Info :
Break the yarn, weave in the last 6 sts, hide the remaining yarn.
— Rings on Planet: Size S (yarn J, X3) :
Round 1 :
ch 12, slst on the 1st ch to form a ring, sc 12, slst on the 1st sc (12)
Info :
Break the yarn, leave a long thread to sew later.
— Rings on Planet: Size M (yarn J, X2) :
Round 1 :
ch 16, slst on the 1st ch to form a ring, sc 16, slst on the 1st sc (16)
Info :
Break the yarn, leave a long thread to sew later.
— Rings on Planet: Size L (yarn J) :
Round 1 :
ch 20, slst on the 1st ch to form a ring, sc 20, slst on the 1st sc (20)
Info :
Break the yarn, leave a long thread to sew later. Use tapestry needle to sew the rings to the planet (pic 21&22). Sew the rings as pic 23.
— Fox's Head (yarn I) :
Round 1 :
sc 4 into a magic loop (4)
Round 2 :
sc 1, inc 2, sc 1 (6)
Round 3 :
sc 2, inc 2, sc 2, change to yarn C (8)
Round 4 :
sc 3, inc 2, sc 3 (10)
Round 5 :
sc 4, inc 2, sc 4 (12)
Round 6 :
sc 5, inc 2, sc 5 (14)
Round 7 :
sc 6, inc 2, sc 6 (16)
Round 8 :
sc 7, inc 2, sc 7 (18)
Round 9 :
sc 8, inc 2, sc 8 (20)
Round 10 :
sc 9, inc 2, sc 9 (22)
Round 11 :
sc 10, inc 2, sc 10 (24)
Round 12 :
sc 11, inc 2, sc 11 (26)
Round 13 :
sc 12, inc 2, sc 12 (28)
Round 14 :
sc 13, inc 2, sc 13 (30)
Round 15 :
sc 14, inc 2, sc 14 (32)
Round 16 :
sc 15, inc 2, sc 15 (34)
Round 17 :
sc 16, inc 2, sc 16 (36)
Round 18 :
sc 17, inc 2, sc 17 (38)
Round 19 :
sc 18, inc 2, sc 18 (40)
Round 20 :
sc 19, inc 2, sc 19 (42)
Round 21-26 :
sc 42 (6 rnds), insert the 1st eye between rnd 19&20, the 2nd eye between rnd 22&23 (42)
Round 27 :
[sc 5, dec] 6x (36)
Round 28 :
[sc 4, dec] 6x (30)
Round 29 :
[sc 3, dec] 6x, stuff firmly (24)
Round 30 :
[sc 2, dec] 6x (18)
Round 31 :
[sc 1, dec] 6x (12)
Info :
Break the yarn, hide the remaining yarn.
— Fox's Ears (yarn I, X2) :
Round 1 :
sc 3 into a magic loop (3)
Round 3 :
[sc 1, inc] 3x, change to yarn C (9)
Round 4 :
[sc 2, inc] 3x (12)
Round 5 :
[sc 3, inc] 3x (15)
Round 6 :
[sc 4, inc] 3x (18)
Round 7 :
[sc 5, inc] 3x (21)
Info :
Break the yarn with a long rest, use the tapestry needle to sew 2 edges together.
— Fox's Body (yarn C) :
Round 1 :
sc 6 into a magic loop (6)
Round 3 :
[sc 1, inc] 6x (18)
Round 4 :
[sc 2, inc] 6x (24)
Round 5 :
[sc 3, inc] 6x (30)
Round 6 :
[sc 4, inc] 6x (36)
Round 7-11 :
sc 36 (5 rnds) (36)
Round 12 :
[sc 4, dec] 6x (30)
Round 13-14 :
sc 30 (2 rnds) (30)
Round 15 :
[sc 3, dec] 6x (24)
Round 16-17 :
sc 24 (2 rnds) (24)
Round 18 :
[sc 2, dec] 6x (18)
Round 19-20 :
sc 18 (2 rnds) (18)
Info :
Break the yarn, weave in the last 6 sts, leave a long thread to sew later.
— Fox's Belly (yarn B) :
Round 1 :
ch 6, start on the 2nd stitch from the hook, sc 4, (sc 3), continue to crochet on the other side of the foundation chain, sc 3, inc 1 (12)
Round 2 :
inc 1, sc 3, inc 3, sc 3, inc 2 (18)
Round 3 :
sc 1, inc, sc 3, [sc 1, inc] 3x, sc 3, [sc 1, inc] 2x (24)
Round 4 :
sc 2, inc, sc 3, [sc 2, inc] 3x, sc 3, [sc 2, inc] 2x, slst on the 1st sc (30)
Info :
Break the yarn, leave a long thread to sew later.
— Leaves (yarn H) :
Round 1 :
[ch 8, start on the 2nd st from the hook, sc 7] 3x, slst on the 1st ch (pic 24&25) (21)
Round 2 :
[sc 1, hdc 1, dc 3, hdc 1, inc on the last ch, continue to crochet on the other side, hdc 1, dc 3, hdc 1, sc 1] 3x (pic 26&27) (42)
Info :
Break the yarn, leave a long thread (50cm) to sew later.
— Fox's Arms (yarn B, X2) :
Round 1 :
sc 6 into a magic loop (6)
Round 4 :
dec 6, change to yarn C (6)
Round 5-10 :
sc 6 (6 rnds) (6)
Info :
Break the yarn, leave a long thread to sew later, do not stuff, sew 2 edges together.
— Fox's Legs (yarn B, X2) :
Round 1 :
ch 4, start on the 2nd stitch from the hook, sc 2, (sc 3), continue to crochet on the other side of the foundation chain, sc 1, inc 1 (8)
Round 2 :
inc 1, sc 1, inc 3, sc 1, inc 2 (14)
Round 4 :
sc 3, dec 4, sc 3 (10)
Round 5 :
sc 3, dec 2, sc 3, change to yarn C (8)
Round 6 :
sc 3, inc 2, sc 3 (10)
Round 7 :
sc 4, inc 2, sc 4 (12)
Round 8-11 :
sc 12 (4 rnds), stuff firmly (12)
Info :
Break the yarn, leave a long thread to sew later.
— Rose (yarn K) :
Round 1 :
ch 28, start on the 4th st from the hook, (dc 2), ch 1, skip 1 st, *(dc 3), ch 1, skip 1 st*, repeat ** till the end, turn (52)
Round 2 :
*ch 2, dc 1, (dc 2), dc 1, ch 2, sc 1*, repeat ** till the end (117)
Info :
Break the yarn, leave a long thread to sew later.
— Assembling :
Item :
Fold the rose, sew the rose onto the leaves, wrap the remaining yarn around a piece of wire for the stem and hide the yarn with a small tapestry needle.
Item :
Sew the buttons on the body, sew the arms on the body, sew the ears on the head.
Item :
Wear the hair on the head, sew the head to the body, wear the aviator goggles on the head.
Item :
This is the finished scarf & cape as instructed, wear the scarf & cape on the body, sew the ears on the fox's head, sew the body to the head, sew the arms to the body, sew the belly on the body.
Item :
Sew the legs on the body, sew the tail on the body, use black thread to embroider the eyebrows.
Create a timeless Little Prince amigurumi to cherish or gift — full of whimsical details and handmade charm. Follow the complete rounds and assembly guide to bring the character, fox, planet and rose to life. Make one as a special keepsake or a heartfelt present for someone who loves storybook magic. 🧶✨