🧢 Beautiful ✨ Detailed πŸ’ Adorable

Crazy deer Amigurumi Pattern

Crazy deer Amigurumi Pattern
4.1β˜… Rating
8-10 Hours Time Needed
4.0K Made This
βœ‚οΈ

Intermediate Level

Ideal for those with basic crochet experience, featuring slightly more advanced stitches and techniques to expand your skills.

⏱️

All-Day Adventure

Requires 8-10 hours, ideal for a full day of immersive crocheting.

🧸

Cute Companion

An adorable friend to cherish, handcrafted with love to bring comfort and joy for years to come.

About This Crazy deer Amigurumi Pattern

This pattern creates a playful crazy deer slipper with a sculpted muzzle, plush nose, and decorative eyes and ears. You will crochet a reinforced sole, add a trim, and build cute facial features to sew on for character. The instructions include step-by-step photo guidance and clear shaping rounds for reliable results.

Crazy deer Amigurumi Pattern crochet pattern - detailed view of completed project

Works best with chunky cords and plush yarn for a soft, sturdy finish. Techniques include crochet in holes on a wooden sole, clusters, and shaping for an expressive snout.

Why You'll Love This Crazy deer Amigurumi Pattern

I absolutely love this pattern because it brings so much personality to a practical itemβ€”cozy slippers with a silly deer face always make me smile. I enjoy the mix of construction techniques, from crocheting into a perforated wooden sole to shaping the muzzle with clusters and decreases. The small finishing steps like rolling T-shirt yarn for eyes and steam-shaping the muzzle add charming handmade details. Making one feels like a fun, rewarding craft session that ends with a delightful, usable result.

Crazy deer Amigurumi Pattern step 1 - construction progress Crazy deer Amigurumi Pattern step 2 - assembly progress Crazy deer Amigurumi Pattern step 3 - details and accessories Crazy deer Amigurumi Pattern step 4 - final assembly and finishing

Switch Things Up

I love how easy it is to customize this pattern by changing colors and materials to suit your style.

You can switch the beige and brown cords for bolder or pastel tones to create a modern or whimsical deer slipper.

Want a smaller keychain version? Use thinner cord and a smaller hook to scale down the pattern proportionally.

Try substituting the wooden sole with a foam insole for a quieter, softer house slipper if you prefer not to work with wood.

I often replace the rolled T-shirt yarn eyes with safety eyes for sturdier toys intended for older children (avoid for small children).

For a textured muzzle, experiment with different cluster patterns or an extra round of decreases to make a pointier or flatter snout.

If you want a washable version, use washable cotton or T-shirt yarn and hand-sew decorations instead of glueing so they withstand laundering.

I sometimes add small crocheted scarves, hats, or embroidered details to personalize each deer for gifting or seasonal themes.

To make them extra durable, reinforce the nose and eyes attachment with additional stitching from the wrong side after gluing.

I recommend testing different stuffing amounts and steam shaping to create the exact firmness and profile you prefer for the muzzle.

Finally, don’t be afraid to add small accessories like bells, buttons, or tiny crocheted mitts to give your deer even more personality.

Common Mistakes & How to Fix Them

βœ— Not checking gauge before starting the sole can result in a slipper that is too small or too large; make a small swatch and compare to the specified gauge before crocheting the sole. βœ— Skipping stitch markers while shaping the muzzle makes it hard to find increases and decreases; place markers at the indicated loops and move them as instructed to keep track of placement. βœ— Pulling your crochet tension too tight when working into the wooden sole holes can warp the sole and make sewing difficult; maintain a relaxed even tension and test placement as you go. βœ— Overstuffing the nose and muzzle will create an overly firm, distorted shape; add small amounts of stuffing gradually until you achieve a soft rounded look. βœ— Forgetting to leave long tails for sewing details like the nose and trim can make finishing messy; cut and leave the specified lengths (for example 27 inches for the nose) to ease assembly. βœ— Using the wrong hook size for plush yarn or cord can change the finished size and texture; use the recommended 5.5 mm for cords and 4 mm for plush yarn details to match the pattern.

Crazy deer Amigurumi Pattern

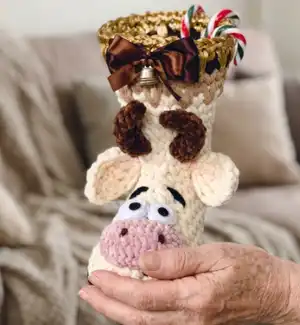
Make a charming Crazy Deer amigurumi slipper that combines playful character details with cozy construction. This pattern guides you step-by-step through crocheting horns, ears, a plush nose, and a shaped muzzle to attach to a lined sole. Perfect for gifting or decorating your home with a handmade whimsical touch.

Intermediate 8-10 Hours

Materials Needed for Crazy deer Amigurumi Pattern

β€” Main Fabric

  • 01
    Any cord, 4-5 mm: 77 yards (70 m) beige color and 55 yards (50 m) brown color (example used: velvet cord Shikimiki AVE)
  • 02
    T-shirt metallic yarn, 4-5 mm, about 4.4 yards (4 m)
  • 03
    Any fur yarn white color, 3.3 yards (3 m) (example: YarnArt mink)
  • 04
    T-shirt yarn white color for eyes: 24 inches (60 cm)
  • 05
    Piece of felt or leather for pupil: 10 x 20 mm
  • 06
    Plush yarn pink color for nose: 120 m / 100 g, about 3.3 yards (3 m) (examples: Himalaya Dolphin Baby, YarnArt Dolce Baby)
  • 07
    Little soft stuffing (for nose)
  • 08
    Wooden bottom with 37 holes, 8 inches (20 cm)

β€” Tools Required

  • 01
    Crochet hook size 5.5 mm
  • 02
    Crochet hook size 4 mm
  • 03
    Glue gun
  • 04
    Plastic with large eyelet (for eyes assembly)
  • 05
    Scissors
  • 06
    2 stitch markers
  • 07
    Yarn needle / plastic needle for sewing
  • 08
    Small towel for shaping muzzle
  • 09
    Iron for steam shaping
  • 10
    Pins for assembly (optional)

Progress Tracker

0% Complete

β€” Crochet the horns (*2) :

Info :

Take the brown cord and 5.5 mm hook.

Round 1 :

Crochet 12 CH.

Round 2 :

5 SlSt from the 2nd loop from the hook.

Round 3 :

6 CH, 5 SlSt from the 2nd loop from the hook.

Round 4 :

6 YO SlSt, cut the thread, pull out the end.

Info :

Similarly crochet the 2nd horn.

β€” Crochet the ears(*2) :

Info :

Take the beige cord and 5.5 mm hook.

Info :

Leave the end of the thread 16 inches (40 cm) long. Crochet the chain of 6 CH with two threads. For that: chain knot, yarn over with end, yarn over, pull through all 2; yarn over with end, yarn over, pull through all 2, continue so on...

Round 1 :

Next crochet from the 2nd loop from the hook: SC, HDC, DC, HDC, (SC, 3 CH, SC) in 1, HDC, DC, HDC, SC, SlSt in the 1st loop. Cut the thread, pull out the end.

Info :

Similarly crochet the 2nd ear.

β€” Crochet the nose :

Info :

Take the pink plush yarn and 4 mm hook.

Round 1 :

Crochet 2 CH.

Round 2 :

1 row. 6 SC in the 2nd loop from the hook, SlSt, CH.

Round 3 :

2 row. 6 Inc (=12), SlSt, CH.

Round 4 :

3 row. (SC, 1 Inc)*6 (=18), SlSt, CH.

Round 5 :

4 row. 18 SC, SlSt. Leave the end for sewing the nose 27 inches (70 cm) long. Cut the thread, pull out the end.

Info :

Add little soft stuffing.

β€” Crochet the trim of the bottom :

Info :

Take the brown cord and 5.5 mm hook. Leave the end of the thread 8 inches (20 cm) long.

Round 1 :

Insert the hook in the hole, pull the loop, CH.

Round 2 :

Crochet SC in the each hole. Make increases in the holes marked on the picture.

Round 3 :

Crochet the last SC with the end of the thread, pull out the end, close the row with the end (=46).

Round 4 :

1 row. Insert the hook on the back loop and the jumper only. Pull the loop, CH. 45 SC on the back loop and the jumper only. Cut the thread, pull out the end, close the row (=46). Tie the knot and hide the ends on the wrong side.

Info :

You may have a different number of the loops, depending on the size of the bottom. Crochet similarly, making the necessary number of increases and decreases in the places indicated in this pattern.

β€” Crochet the muzzle :

Info :

Take the beige cord and 5.5 mm hook. Leave the end of the thread 39 inches (1 m) long.

Round 1 :

2 row. Insert the hook under the last SC of the previous row. Pull the loop, CH.

Round 2 :

45 SC, crochet the last SC with the end of the thread, and the each subsequent row. Pull out the end, close the row with the end (=46).

Round 3 :

3 row. Insert the hook under the last SC of the previous row. Pull the loop, CH, 45 SC, close the row with the end (=46).

Info :

Count 16 loops in the middle of the toe. Place the markers in the 1st and the 16th loops.

Round 4 :

4 row. Insert the hook under the last SC of the previous row. Pull the loop, CH, 22 SC to the 1st marker, 8 DC together (clusters), 7 SC, close the row with the end (=38).

Info :

Rearrange the markers in the 1st and the 8th clusters.

Round 5 :

5 row. Insert the hook under the last SC of the previous row. Pull the loop, CH, 22 SC to the 1st marker, 4 clusters with 2 DC together (insert the hook from front to back to front around the cluster of the previous row), 7 SC, close the row with the end (=34).

Info :

Rearrange the markers in the 1st and the 4th clusters.

Round 6 :

6 row. Insert the hook under the last SC of the previous row. Pull the loop, CH, 6 SC, Dec, 14 SC to the 1st marker, 2 clusters with 2 DC together (insert the hook from front to back to front around the cluster of the previous row), 7 SC, close the row with the end (=31).

Info :

Rearrange the markers in the 1st and the 2nd clusters.

Round 7 :

7 row. Insert the hook under the last SC of the previous row. Pull the loop, CH, 6 SC, Dec, 10 SC, 4 Dec three loops before the 1st marker, 4 SC, close the row with the end (=26).

Info :

Rearrange the markers in the 2nd and the 3rd decreases.

Round 8 :

8 row. Insert the hook under the last SC of the previous row. Pull the loop, CH, 18 SC to the 1st marker, Dec, 5 SC, close the row with the end (=25).

Info :

Steam the muzzle with an iron through a damp cloth. Put a small towel in the middle to add volume.

β€” Decorate the muzzle :

Info :

Sew on the nose with the plastic needle above the 3rd row in the middle of the toe.

Info :

Take two pieces of the white T-shirt yarn 12 inches (30 cm) long. Roll into a roller, glue with the glue gun.

Info :

Cut off two circles (pupils) with a diameter 7-8 mm and glue on in the middle of the eyes. Glue on the eyes above the nose.

Info :

Embroidery the eyebrows with the brown cord.

Info :

Fasten the ears in the 8th row at a distance of 6 SC from each other. Strengthen and hide the ends on the wrong side.

β€” Final shaping and finishing rows :

Round 9 :

9 row. Insert the hook under the last SC of the previous row. Pull the loop, CH, 24 SC, close the row with the end (=25).

Round 10 :

10 row. Insert the hook under the last SC of the previous row. Pull the loop, CH, 24 SC, close the row with the end (=25).

Round 11 :

11 row. Insert the hook under the last SC of the previous row. Pull the loop, CH, 6 SC, Inc, 17 SC, close the row with the end (=26).

Assembly Instructions

  • Sew the nose onto the muzzle with the plastic needle above the 3rd row in the middle of the toe, using the long tail left (about 27 inches / 70 cm) and reinforce with hidden stitches.
  • Glue the rolled T-shirt yarn eyes above the nose and attach the small felt or leather pupils (7-8 mm) in the center using a glue gun, then reinforce with a few stitches if desired.
  • Fasten the ears into the 8th row at a distance of 6 SC from each other, strengthen with extra stitching and hide all thread ends on the wrong side.
  • Attach the trim to the wooden sole by crocheting SC into each hole and then working the back-loop round; tie knots and hide ends on the underside to secure.
  • Place markers and follow cluster and decrease rounds on the muzzle to shape the toe area; rearrange markers as instructed to maintain symmetry.
  • Steam-shape the muzzle through a damp cloth and place a small towel inside to add and fix volume before the final assembly.

Important Notes

  • πŸ’‘Use stitch markers to mark the first and important loops before shaping to keep track of increases, clusters, and decreases.
  • πŸ’‘Stuff the nose and muzzle gradually and evenly; overstuffing will distort the shape and make sewing difficult.
  • πŸ’‘Work with consistent tension, especially when crocheting into the wooden sole holes, to avoid stretching or shrinking the sole.
  • πŸ’‘Leave the specified long yarn tails for sewing parts (for example 27 inches for the nose and 39 inches for the muzzle) to simplify assembly and secure attachment.

This Crazy Deer slipper pattern brings a playful handmade character to your cozy routines, perfect for gifting or styling your home with personality. Follow the step-by-step photos and clear shaping instructions to create a plush nose, expressive eyes, and a structured sole for durability. Happy crochetingβ€”may your slippers bring smiles and warm toes! 🧢🧡

You ask,

we answer.

FAQs

What size will the finished piece be?

The finished boot from the specified materials measures approximately 8 1/2 inches (21 cm) in height for the example shown; foot size will vary depending on cord thickness and gauge.

Can I use different yarn weights for this pattern?

Yes, you can use different cord thicknesses or yarn weights, but this will affect the final size. Adjust hook size accordingly and test a small swatch to check gauge against the pattern.

Do I need prior crochet experience for this pattern?

This pattern is rated intermediate; basic knowledge of single crochet, increases, decreases, clusters, and working into back loops is recommended for best results.

How long does this project typically take to complete?

Most crocheters complete this project in 8-10 hours as an all-day project, though time may vary based on experience, materials, and the number of decorative steps you include.