🧢 Beautiful ✨ Detailed πŸ’ Adorable

Mr. Buckwheat Amigurumi Pattern

Mr. Buckwheat Amigurumi Pattern
4.8β˜… Rating
5-7 Hours Time Needed
2.6K Made This
βœ‚οΈ

Intermediate Level

Ideal for those with basic crochet experience, featuring slightly more advanced stitches and techniques to expand your skills.

⏱️

Weekend Treat

Takes 5-7 hours, making it an enjoyable project to finish over a couple of days.

🧸

Cute Companion

An adorable friend to cherish, handcrafted with love to bring comfort and joy for years to come.

About This Mr. Buckwheat Amigurumi Pattern

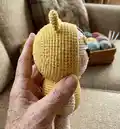
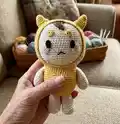
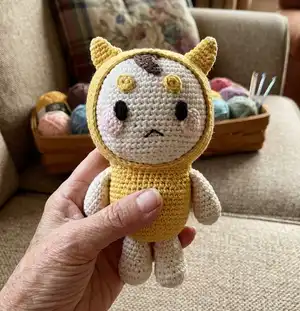
This pattern creates a small cuddly amigurumi called Mr. Buckwheat with a removable hood, horns, and embroidered facial details. It uses 12-ply cotton yarn and a 3.0 mm hook to achieve tidy, defined stitches. The design includes separate small pieces (hair, eyebrows, cheeks, horns, arms, legs) for a charming handmade finish. Clear round-by-round instructions make shaping and assembly straightforward for intermediate crocheters.

Mr. Buckwheat Amigurumi Pattern crochet pattern - detailed view of completed project

You will crochet the head, hood, body, arms, legs, and small accessories then sew them together. The pattern includes placement notes for eyes, eyebrows, cheeks, and hair to help you position features accurately.

Why You'll Love This Mr. Buckwheat Amigurumi Pattern

I absolutely love this pattern because it blends simple amigurumi techniques with sweet character details that bring Mr. Buckwheat to life. I enjoy how the separate hood and horns add personality without complex construction. The rounds and repeats are predictable yet allow small customization like color swaps and facial expression changes. Seeing each small piece come together into a finished toy always feels rewarding and delightful.

Mr. Buckwheat Amigurumi Pattern step 1 - construction progress Mr. Buckwheat Amigurumi Pattern step 2 - assembly progress Mr. Buckwheat Amigurumi Pattern step 3 - details and accessories Mr. Buckwheat Amigurumi Pattern step 4 - final assembly and finishing

Switch Things Up

I love how easy it is to customize Mr. Buckwheat by changing colors β€” try pastel shades for a softer nursery look or vibrant hues for a playful character.

I often swap the cotton yarn for a thicker weight and a larger hook to make a chunky version that works great as a plush for younger children.

I sometimes replace the glued felt eyes with safety eyes or small embroidered eyes depending on the intended recipient and safety needs.

I like to experiment with facial expressions by changing eyebrow placement, mouth shape, or adding tiny embroidered freckles for personality.

You can create clothing or tiny accessories like a scarf, tiny hat, or a backpack by crocheting simple tubes or rectangles and sewing them on.

I also enjoy making coordinated sets β€” for example, a matching mini friend using the same pattern reduced with finer yarn for a keychain version.

If you want posability, try adding thin wire inside the limbs before stuffing, or create a felt joint at the attachment point for a different movement style.

I recommend trying different yarn textures (soft acrylic, bamboo blends) to see how the stitch definition and drape change the finished look.

For a seasonal twist, change colors and add small holiday accessories to create Mr. Buckwheat for different celebrations.

When gifting, I sometimes add a small sewn tag or a crocheted heart to personalize the toy and make it extra special.

Common Mistakes & How to Fix Them

βœ— Skipping stuffing the head as you crochet will leave gaps and lumps; stuff gradually as you work to achieve an even, round shape. βœ— Forgetting to leave long tails when fastening off small pieces will make sewing them difficult; always leave a long tail for neat attachment. βœ— Not counting stitches after increases or decreases results in uneven shaping; count after each round or use stitch markers to stay accurate. βœ— Gluing felt eyes before confirming placement can look off-center; pin and check eye placement between the indicated rounds before gluing. βœ— Overstuffing limbs and body will distort the toy and make sewing awkward; use moderate stuffing and adjust gradually to keep proportions correct.

Mr. Buckwheat Amigurumi Pattern

Make a charming Mr. Buckwheat amigurumi with this detailed crochet pattern. You'll work simple rounds and assemble small pieces to create a cuddly character with a removable hood and sweet facial details. The pattern uses cotton yarn and clear step-by-step rounds so you can follow along easily. Perfect as a handmade gift or collectible for your craft shelf.

Intermediate 5-7 Hours

Materials Needed for Mr. Buckwheat Amigurumi Pattern

β€” Main Fabric

  • 01
    Cotton yarn 12 ply (main material as listed)
  • 02
    Color A: Cream / Off-white (face, arms, legs)
  • 03
    Color B: Mustard / Yellow (hood and body)
  • 04
    Color C: Light Pink (cheeks)
  • 05
    Color D: Brown (hair detail)
  • 06
    Color E: Black (felt for eyes and embroidered mouth)
  • 07
    Yarn quantities: Use small amounts of each color as needed to complete a single toy (quantities not specified in original pattern)

β€” Tools Required

  • 01
    Crochet hook US C/2 UK 11 (3.00 mm)
  • 02
    Fiberfill stuffing
  • 03
    Yarn needle
  • 04
    Scissors
  • 05
    Pin
  • 06
    Glue
  • 07
    Black felt

Progress Tracker

0% Complete

β€” Head :

Info :

Make sure to stuff the head as you crochet.

Round 1 :

6 sc in mr (6)

Round 2 :

1 inc in each st around (12)

Round 3 :

*1 sc, 1 inc* (18)

Round 4 :

*2 sc, 1 inc* (24)

Round 5 :

*3 sc, 1 inc* (30)

Round 6 :

*4 sc, 1 inc* (36)

Round 7 :

*5 sc, 1 inc* (42)

Round 8 :

*6 sc, 1 inc* (48)

Round 9 :

*7 sc, 1 inc* (54)

Round 10 :

4 sc, 1 inc, (8 sc, 1 inc) x 5, 4 sc (60)

Round 11 :

*9 sc, 1 inc* (66)

Round 12-25 :

1 sc in each st around (66)

Round 26 :

*9 sc, 1 dec* (60)

Round 27 :

*8 sc, 1 dec* (54)

Round 28 :

1 sc in each st around (54)

Round 29 :

*7 sc, 1 dec* (45)

Round 30 :

*6 sc, 1 dec* (42)

Round 31 :

*5 sc, 1 dec* (36)

Round 32 :

2 sc, 1 dec, (4 sc, 1 dec) x 5, 2 sc (30)

Round 33 :

*3 sc, 1 dec* (24)

Round 34 :

*2 sc, 1 dec* (18)

Round 35 :

*1 sc, 1 dec* (12)

Round 36 :

6 dec (6)

Info :

Finish off.

β€” Hair :

Round 1 :

Ch 10. Start from the 2nd ch from hook: 9 sc. On the other side of the ch: 3 slst, 2 sc, 2 hdc, 2 dc (9)

Info :

Fasten off and leave a long tail for sewing the hair to the head. Sew the hair between round 5 and 12 of the head.

β€” Hood :

Round 1 :

6 sc in mr (6)

Round 2 :

1 inc in each st around (12)

Round 3 :

*1 sc, 1 inc* (18)

Round 4 :

*2 sc, 1 inc* (24)

Round 5 :

*3 sc, 1 inc* (30)

Round 6 :

*4 sc, 1 inc* (36)

Round 7 :

*5 sc, 1 inc* (42)

Round 8 :

*6 sc, 1 inc* (48)

Round 9 :

*7 sc, 1 inc* (54)

Round 10 :

*8 sc, 1 inc* (60)

Round 11 :

*9 sc, 1 inc* (66)

Round 12 :

*10 sc, 1 inc* (72)

Round 13-21 :

1 sc in each st around (72)

Round 22 :

*10 sc, 1 dec* (66)

Round 23 :

1 sc in each st around (66)

Round 24 :

*9 sc, 1 dec* (60)

Round 25 :

1 sc in each st around (60)

Info :

Put the head inside the hood and crochet:

Round 26 :

*8 sc, 1 dec* (54)

Info :

Finish with an invisible fasten off.

β€” Eyebrows x 2 :

Round 1 :

6 sc in mr (6)

Info :

Fasten off and leave a long tail to sew the eyebrows to the head. Sew between rounds 12 and 15 of the head.

β€” Cheeks x 2 :

Round 1 :

5 sc in mr (5)

Round 2 :

1 inc in each st around (10)

Info :

Fasten off and leave a long tail for sewing the cheeks to the head. Sew between rounds 18 and 23 of the head.

β€” Eyes x 2 :

Info :

Cut out two ovals of black felt and glue on between rounds 16 and 20 of the head.

β€” Horns x 2 :

Round 1 :

6 sc in mr (6)

Round 2 :

*1 sc, 1 inc* (9)

Round 3 :

1 sc in each st around (9)

Round 4 :

5 sc, 4 inc (13)

Round 5 :

7 sc, 3 dec (10)

Round 6 :

1 sc, 3 inc, 6 sc (13)

Round 7 :

1 sc in each st around (13)

Info :

Fasten off and leave a long tail to sew the horn to the head. Don't stuff. Sew the horns in round 17 of the hood with 11 stitches apart.

β€” Body :

Info :

Make sure to stuff the body as you crochet.

Round 1 :

6 sc in mr (6)

Round 2 :

1 inc in each st around (12)

Round 3 :

*1 sc, 1 inc* (18)

Round 4 :

*2 sc, 1 inc* (24)

Round 5 :

*3 sc, 1 inc* (30)

Round 6 :

*4 sc, 1 inc* (36)

Round 7 :

*5 sc, 1 inc* (42)

Round 8 :

1 sc in each st around (42)

Round 9 :

*6 sc, 1 inc* (48)

Round 10-17 :

1 sc in each st around (48)

Round 18 :

*6 sc, 1 dec* (42)

Round 19-20 :

1 sc in each st around (42)

Info :

Sew between rounds 11 and 24 of the Hood.

β€” Arms x 2 :

Round 1 :

6 sc in mr (6)

Round 2 :

1 inc in each st around (12)

Round 3 :

*1 sc, 1 inc* (18)

Round 4-11 :

1 sc in each st around (18)

Round 12 :

*1 sc, 1 dec* (12)

Round 13 :

1 sc in each st around (12)

Info :

Fasten off and leave a long tail to sew the arm to the body. Stuff with fiberfill. Sew in round 19 of the body.

β€” Legs x 2 :

Round 1 :

6 sc in mr (6)

Round 2 :

1 inc in each st around (12)

Round 3 :

*1 sc, 1 inc* (18)

Round 4 :

*2 sc, 1 inc* (24)

Round 5 :

6 sc, (1 sc, 1 dec) x 4, 6 sc (20)

Round 6 :

1 sc in each st around (20)

Round 7 :

6 sc, 4 dec, 6 sc (16)

Round 8-10 :

1 sc in each st around (16)

Round 11 :

*6 sc, 1 dec* (14)

Info :

Stuff with fiberfill. Fasten off and leave a long tail for sewing the leg to the body. Sew between rounds 1 and 5 of the body.

Assembly Instructions

  • Put the head inside the hood and join as instructed around the hood opening; position the hood so the facial features are centered and sew securely.
  • Sew the hair between rounds 5 and 12 of the head using the long tail left after fastening off; secure tightly so it lays flat.
  • Attach eyebrows between rounds 12 and 15 of the head and cheeks between rounds 18 and 23 using the long tails for sewing, checking symmetry as you go.
  • Glue the cut black felt eyes between rounds 16 and 20 of the head or stitch small felt ovals in place for durability.
  • Sew the arms to round 19 of the body and the legs between rounds 1 and 5 of the body, spacing evenly and reinforcing stitches for stability.

Important Notes

  • πŸ’‘Use stitch markers to mark the beginning of rounds to prevent unintentional increases or decreases.
  • πŸ’‘Stuff parts gradually while crocheting to maintain smooth, even shaping and avoid lumps.
  • πŸ’‘Leave long tails when fastening off small pieces to make sewing them to the head and body easier and tidier.
  • πŸ’‘Pin pieces in place before sewing to check position and symmetry, especially for eyes, cheeks, and horns.

This sweet Mr. Buckwheat amigurumi is a delightful little companion to make and gift. The pattern combines easy rounds with small accessory pieces for a charming finished look. Have fun personalizing colors and facial expressions to make your own special buddy! 🧢😊

You ask,

we answer.

FAQs

What size will the finished piece be?

The finished amigurumi measures approximately 7.87 inches when made with the indicated 12-ply cotton yarn and 3.0 mm hook.

Can I use different yarn weights for this pattern?

Yes, you can use different yarn weights, but the final size will change. Use an appropriate hook for the yarn and adjust stuffing for proper shape.

Do I need prior crochet experience for this pattern?

This pattern is rated intermediate, so basic knowledge of single crochet, increases, and decreases is recommended for best results.

How long does this project typically take to complete?

Most crocheters complete this project in 5-7 hours, though time may vary depending on experience and how much finishing and assembly you do.