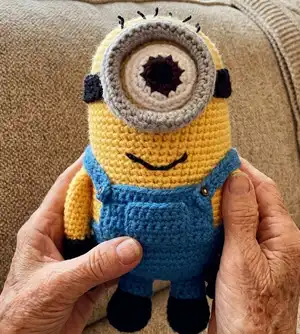
Make your very own cuddly Minion with this detailed amigurumi crochet pattern. You will enjoy step-by-step rounds, clear materials lists, and helpful how-to photos. This pattern includes everything you need to crochet, stuff and assemble a 12-inch tall Minion companion.
Progress Tracker
0% Complete
— How To: Working into the back loop only :
Info :
All stitches are worked in both loops of the stitch, unless otherwise directed. 1. Look for the V's across the top of the stitches. 2. Insert the hook underneath the back loop of each V, and make a simple crochet. 3. This way your Minion will stand upright better.
— How To: Picking up stitches :
Infos :
1. Insert the hook into the stitch hole you want to start with, and take it out to the next left hole. 2. Using blue yarn, make a slip knot and place it on your hook. 3. Draw the yarn through the piece you already have on your hook. 4. Insert the yarn tail into the back of your work. 5. Attach the yarn tail into the back of your work. 6. Insert the hook into the hole you already have your work yarn to, and take it out to the next left hole. 7. Make a simple crochet. 8. Continue repeating the steps 6 and 7. 9. This is the result!
— Legs :
Info :
Make 2. Starting at the bottom of the foot, using J hook and black yarn.
Round 1 :
Ch 6, sc 5 starting in second chain from hook, then work 5 sc on opposite side of chain. (10 sts)
Round 2 :
2 sc in first stitch, sc 2, sc 2 in each of the next 4 sts, sc 2, 2 sc in last stitch. (16 sts)
Round 3 :
Sc 1, 2 sc in next st, sc 5, 2 sc in next st, sc 1, 2 sc in next st, sc 5, 2 sc in last st. (20 sts)
Info :
Working into the back loop only (if you need help see page 3)
Info :
Working in both loops
Round 6 :
Sc 1, dec 1, sc 5, dec 1, sc 1, dec 1, sc 5, dec 1. (16 sts)
Round 7 :
Sc 4, dec 4 times, sc 4. (12 sts)
Info :
Change to blue yarn
Info :
Fasten off, leaving long tail for sewing.
Info :
Using J hook and blue yarn, picking up stitches at round 7 (on the color change) sc all around leg (if you need help see page 4). Fasten off. Stuff and set aside.
— Eye :
Info :
Working in rounds, using J hook and black yarn.
Round 1 :
Ch 2, 6 sc in second ch from hook, change color to brown before joining to the first sc, ch 1. (6 sts)
Round 2 :
Sc 2 in each sc around, change color to white before joining, ch 1. (12 sts)
Info :
Working in continuous round
Round 3 :
*Sc 1, 2 sc in next sc*, rep 6 times. (18 sts)
Round 4 :
*Sc 2, 2 sc in next sc*, rep 6 times. (24 sts)
Round 5 :
*Sc 3, 2 sc in next sc*, rep 6 times. (30 sts)
Info :
Change to yellow yarn
Info :
Fasten off, leaving long tail for sewing. Using J hook and yellow yarn, picking up stitches at round 5 (on the color change) sc all around eye (if you need help see page 4). Fasten off and set aside.
— Fingers :
Info :
Make 6. Using J hook and black yarn.
Round 1 :
Ch 2, 4 sc in second ch from hook.
Info :
Fasten off, leaving long tail for sewing, and set aside.
— Hands and Arms :
Info :
Make 2. Using J hook and black yarn.
Round 1 :
Ch 2, 4 sc in second ch from hook.
Round 2 :
Sc 2 in each sc around. (8 sts)
Round 3 :
*Sc 1, 2 sc in next sc*, rep 4 times. (12 sts)
Info :
Remove hook, but do not fasten off. Sew 3 fingers on the hand, one on top and the others next to it.
Info :
Continue crocheting.
Round 5 :
*Sc 1, dec 1*, rep 4 times. (8 sts)
Info :
Mark round 5 with a locking st marker; you'll come back to it later to finish the glove. Change to yellow yarn. Working into the back loop only (if you need help see page 3).
Info :
Slightly stuff hand, and continue crocheting. Working in both loops
Info :
Fasten off, leaving long tail for sewing.
Info :
Complete the glove: Using J hook and black yarn, holding arm (hand down), join yarn to one of front loops you left in round 5 when making hand (the round you marked with a locking st marker). Working through the front loops all around hand, R1: Sc 8. Working in both loops, R2: *Sc 1, 2 sc in next sc*, rep 4 times. (12 sts) R3: Sc 12. Fasten off, weave in ends and set aside.
— Body :
Info :
Using J hook and yellow yarn.
Round 1 :
Ch 2, 6 sc in second ch from hook.
Round 2 :
Sc 2 in each sc around. (12 sts)
Round 3 :
*Sc 1, 2 sc in next sc*, rep 6 times. (18 sts)
Round 4 :
*Sc 2, 2 sc in next sc*, rep 6 times. (24 sts)
Round 5 :
*Sc 3, 2 sc in next sc*, rep 6 times. (30 sts)
Round 6 :
*Sc 4, 2 sc in next sc*, rep 6 times. (36 sts)
Round 7 :
*Sc 5, 2 sc in next sc*, rep 6 times. (42 sts)
Round 8 :
*Sc 6, 2 sc in next sc*, rep 6 times. (48 sts)
Round 9 :
*Sc 7, 2 sc in next sc*, rep 6 times. (54 sts)
Info :
Remove hook, but do not fasten off. Work on hair: secure, on the wrong side of your work, about 14 pieces of black yarn around the top of the head. Take one end of each yarn piece to the right side and cut them into desired length.
Round 10-36 :
Sc 54. Mark round 36 with a locking st marker; you'll come back to it later to finish the dungaree. Change to blue yarn.
Round 37 :
Sc 54. Remove hook, but do not fasten off.
Info :
Work on face: sew the eye to the head, stuffing it lightly as you go. Embroider mouth with a piece of black yarn. Flatten arms, and attach to body.
Round 42 :
*Sc 7, dec 1*, rep 6 times. (48 sts)
Round 43 :
*Sc 6, dec 1*, rep 6 times. (42 sts)
Round 44 :
*Sc 5, dec 1*, rep 6 times. (36 sts)
Info :
Stuff body, and continue crocheting.
Round 45 :
*Sc 4, dec 1*, rep 6 times. (30 sts)
Round 46 :
*Sc 3, dec 1*, rep 6 times. (24 sts)
Round 47 :
*Sc 2, dec 1*, rep 6 times. (18 sts)
Info :
Stuff body a little more and continue crocheting.
Round 48 :
*Sc 1, dec 1*, rep 6 times. (12 sts)
Round 49 :
*dec 1*, rep 6 times. (6 sts)
Round 50 :
Sc next and 4th st together. Fasten off, pulling knot to center. Sew legs to body.
— Dungaree :
Info :
Go to minion's body round 36 (the one you marked with a locking st marker, on the color change) and mark 13 stitches centered into the front of the body. Using J hook, join blue yarn at the first stitch you marked on your right.
Round 1 :
Picking up stitches sc in each of the 13 sts you marked (if you need help see page 4). (13 sts)
Round 2-8 :
Ch 1, turn, sc 13. (13 sts)
Info :
Fasten off and weave in ends.
Info :
Go to minion's body round 36 (the one you marked with a locking st marker, on the color change), and mark 15 stitches centered into the back of the body. Using J hook, join blue yarn at the first stitch you marked on your right.
Round 1 :
Picking up stitches sc in each of the 15 sts you marked (if you need help see page 4). (15 sts)
Round 2-9 :
Ch 1, turn, sc 15. (15 sts)
Info :
Do not fasten off, continue sc around the dungaree: sc down the dungaree back part, sc picking up stitches on round 36 until you find the dungaree front part and sc around it (up, straight and down), sc picking up stitches on round 36 until you find the dungaree back part and sc up of it.
Info :
Fasten off and weave in ends.
Info :
Dungaree straps (make 2): Using J hook and blue yarn.
Round 1 :
Ch 3, starting in second chain from hook sc 2. (2 sts)
Round 2-22 :
Ch 1, turn, sc 2. (2 sts)
Info :
Fasten off and weave in ends. Sew dungaree straps in place, with a button on every strap end. Use the template to cut Gru's logo from black felt and sew it in place.
— Minion Goggles :
Info :
Using J hook and grey yarn.
Round 1 :
Ch 36, sc into the first chain you made (the chain farthest from your hook) to join the foundation chain into a ring. Then continue to sc into each ch stitch around the ring.
Round 2-6 :
Sc 36. (36 sts)
Info :
Fold the piece so the foundation chain is touching round 6. Continue crocheting through round 6 and the respective stitch on the foundation chain at the same time.
Info :
Fasten off, weave in ends and set aside.
Info :
Goggles strap: Using J hook and black yarn.
Round 1 :
Ch 4, starting in second chain from hook sc 3. (3 sts)
Round 2-40 :
Ch 1, turn, sc 3. (3 sts)
Info :
Fasten off leaving long tail for sewing. Sew strap to goggles.
Info :
Congratulations! I wish you keep enjoying it.
This adorable Minion amigurumi pattern is full of charm and personality, perfect for gifts or playtime. The pattern includes detailed rounds, helpful how-to sections and assembly tips to guide you from first stitch to finished toy. Make one for yourself or create a whole crew of Minions to spread handmade smiles. 🧶😊🎀