🧢 Beautiful ✨ Detailed πŸ’ Adorable

Drooping Leave Crochet Pattern

Drooping Leave Crochet Pattern
4.3β˜… Rating
5-7 Hours Time Needed
2.5K Made This
βœ‚οΈ

Intermediate Level

Ideal for those with basic crochet experience, featuring slightly more advanced stitches and techniques to expand your skills.

⏱️

Weekend Treat

Takes 5-7 hours, making it an enjoyable project to finish over a couple of days.

🏑

Cozy Accent

A warm touch for your space that transforms ordinary corners into inviting nooks filled with handmade charm.

About This Drooping Leave Crochet Pattern

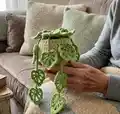
This pattern shows you how to crochet a hanging pot with a soil insert and many drooping leaves to create a Monstera-inspired hanging plant. It uses common crochet stitches and clear row-by-row instructions for each piece. You will finish with a lovely hanging decoration perfect for small spaces, car decor, or gifts.

Drooping Leave Crochet Pattern crochet pattern - detailed view of completed project

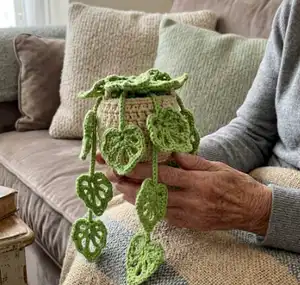
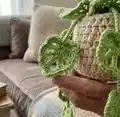
Includes instructions for the pot, soil insert, individual leaves, hanging ropes, and final assembly. Photos and tips throughout help you position and sew leaves for a natural drape.

Why You'll Love This Drooping Leave Crochet Pattern

I absolutely love this pattern because it turns simple stitches into a lush, trailing plant that brings life to any small space. I enjoy the mix of small pieces and repetitive leaf-making β€” it feels meditative and rewarding. Sewing the leaves into the soil and arranging them is where the piece really comes to life, and I always feel proud of the final drape. The pattern is versatile, letting me play with colors and lengths to make unique hanging plants for friends.

Drooping Leave Crochet Pattern step 1 - construction progress Drooping Leave Crochet Pattern step 2 - assembly progress Drooping Leave Crochet Pattern step 3 - details and accessories Drooping Leave Crochet Pattern step 4 - final assembly and finishing

Switch Things Up

I love how easy it is to customize this pattern by changing yarn color and weight; try darker greens for a realistic look or bright pastels for a whimsical planter.

You can make the piece larger by using a thicker yarn and a larger hook; this will create a chunkier pot and larger leaves for a bold statement piece.

I often alter the number and length of chains between leaves to create different droop effects; longer chains give you longer trailing vines while shorter chains look bushier.

Try adding tiny embroidered veins on the leaves with contrasting thread for extra detail and texture; I find it really makes the leaves pop.

For a more structured look you can insert a thin floral wire inside longer leaf chains to pose and shape the leaves exactly how you want them.

I sometimes add a small button or bead to the center of some leaves for a decorative focal point, which gives the plant a unique handmade accent.

If you want a hanging mobile version, make many mini leaves and string them on a ring; this pattern adapts well to keychains and car charms.

Try mixing yarn fibers β€” cotton gives crisp leaves while acrylic has a softer drape; I choose based on how stiff or floppy I want the leaves to be.

I also enjoy making clusters of leaves in graduated sizes so the largest leaves sit near the pot and the smallest hang at the tips, creating a natural fall.

Finally, experiment with different pot stitch textures (front post, back loop) to create contrasting rims and body textures β€” I often combine BLO rounds with DC rounds for a decorative rim.

Common Mistakes & How to Fix Them

βœ— Skipping the slip stitch at the end of rows can misalign your stitches; always slip stitch into the first stitch when a row ends to maintain even edges. βœ— Not counting increases correctly will change the pot circumference; count stitches after each increase round and mark the start of the round with a stitch marker. βœ— Overstuffing the soil insert can distort the pot shape; stuff gradually and check fit inside the pot frequently so the soil sits naturally. βœ— Attaching leaves without pinning first results in uneven placement; pin or loosely place several leaves before sewing to balance the droop and symmetry. βœ— Using a hook that is too large will make holes and floppy leaves; use the recommended 2.5-3.0 mm hook for crisp stitches and defined leaf shapes.

Drooping Leave Crochet Pattern

Make a charming drooping Monstera-style hanging plant with this detailed crochet pattern. You will create a small hanging pot, soil insert, and many delicate drooping leaves to assemble into a realistic trailing plant. The pattern includes step-by-step rows, leaf instructions, and assembly guidance so you can finish a beautiful hanging piece for home or car decor. Perfect for gifting or brightening up any small space.

Intermediate 5-7 Hours

Materials Needed for Drooping Leave Crochet Pattern

β€” Main Fabric

  • 01
    Super fine yarn, 1.8 oz (50 g) per skein, main colors green, beige and brown - quantities as desired (approx 50 g each color)
  • 02
    Green yarn - required for leaves, approximately 50 g
  • 03
    Beige yarn - for pot exterior, approximately 50 g
  • 04
    Brown yarn - for soil insert, approximately 25-50 g
  • 05
    Cotton filling (polyester stuffing) for soil insert, small amount

β€” Tools Required

  • 01
    Crochet hook size 2.5-3.0 mm
  • 02
    Stitch marker
  • 03
    Sewing needle
  • 04
    Scissors
  • 05
    Polyester stuffing (cotton filling)
  • 06
    Pins for assembly (optional)

Progress Tracker

0% Complete

β€” Pots :

Info :

Note: for newbie. Slip stitch in the first stitch in every time a row ends and begin a chain in every time a new row starts. example: single crochet begin 1 chain 1, double crochet begin chain 2

Row 1 :

MR, chain 1, 8SC (8 sts)

Row 2 :

chain 1, 8SC inc (16 sts)

Row 3 :

chain 1, (1SC, 1 inc) 8 time (24 sts)

Row 4 :

chain 1, (2SC, 1inc) 8 time (32 sts)

Row 5 :

(3 SC, 1 inc) 8 time (40 sts)

Row 6 :

(BLO) 40 SC (40 sts)

Row 7 :

40 DC (40 sts)

Row 8 :

40 SC (40 sts)

Row 9 :

40 DC (40 sts)

Row 10 :

40 SC (40 sts)

Row 11 :

40 SC (40 sts)

Hanging Ropes (P1) :

For the hanging pot, continue crocheting chain 30 (make 3) and tie it to the rim of the pot plant. The distance of each hanging rope is 12-13 sts

β€” The Soil :

Row 1 :

mr 8SC (8sts)

Row 2 :

8 SC inc (16sts)

Row 3 :

(1 SC + 1 inc) 8 times (24sts)

Row 4 :

(2SC + 1inc) 8 times (32sts)

Row 5-8 :

SC in each st to end

Row 9 :

(2 SC + 1 dec) 8 times (24sts)

Row 10 :

(1 SC + 1 dec) 8 times (16sts) (stuffing)

Row 11 :

8 dec (8sts)

Info :

Cut yarn and leave a long tail for sew, close off the hole.

β€” Leaves :

ROW 1 :

Chain 4, slip stitch in the first chain from the hook to make an MR.

ROW 1 continued :

All st crochet of row 1 into the MR: Chain 3, 1DC + 3 Chain, 1HDC + 3 Chain, 1DC + 3 Chain

ROW 1 repeat :

1DC + 3 Chain, 1HDC + 3 Chain, 1DC + 3 Chain

ROW 2 :

Now we have total 7 spaces

ROW 2 details :

1st - 3rd space: 3SC, 1 slip st

ROW 2 details :

4th space: 1SC, 1 picot, 1SC, 1 slip st

ROW 2 details :

5-7th space: 3SC, 1 slip st

Info :

When you're done with the leaf, chain 10 and again slip st in the 4th chain from the hook to make an MR, and begin making the next leaf.

β€” Assembly :

Time to attach them onto the stem :

Sew every drooping leaves into the soil.

Info :

Put the soil inside the pot.

Assembly Instructions

  • Sew every drooping leaf into the soil insert, arranging them around the top edge so they droop naturally over the pot rim.
  • Put the stuffed soil insert into the crocheted pot and position it so the sewn leaves fall outward; adjust placement before finishing stitches.
  • Make three hanging ropes by chaining 30 each and tie them evenly to the pot rim, spacing each rope about 12-13 stitches apart.
  • Cut yarn and leave a long tail on the soil insert to sew it securely into the pot, then weave the tail through the pot edge and fasten off.
  • Pin leaves temporarily to check balance and symmetry, then secure each leaf with small stitches so the drooping clusters look natural.

Important Notes

  • πŸ’‘Use a stitch marker to mark the start of each round to maintain accurate stitch counts and consistent rows.
  • πŸ’‘Slip stitch into the first stitch when a row ends and begin a chain when a new row starts to keep row edges tidy.
  • πŸ’‘Stuff the soil insert gradually and check fit inside the pot frequently to avoid overfilling or distorting the pot shape.
  • πŸ’‘Pin parts and leaves in place before sewing for best placement and even drooping across the pot.
  • πŸ’‘Weave in ends and leave long tails where indicated for sewing pieces together securely.

Thank you for trying this drooping leaf hanging plant pattern β€” I hope it fills your space with handmade charm and green vibes. Whether you hang it in your car, by a window, or gift it to a friend, it adds a small touch of nature to everyday life. Happy crocheting and enjoy arranging those lovely drooping leaves! 🧢🌿

You ask,

we answer.

FAQs

What size will the finished piece be?

The finished hanging pot measures approximately 8-12 cm tall (not including hanging rope) when using the recommended yarn and a 2.5-3.0 mm hook; leaf lengths vary depending on chain length.

Can I use different yarn weights for this pattern?

Yes, you can use different yarn weights, but this will change the final size and drape; adjust your hook size accordingly and make test leaves to check proportions.

Do I need prior crochet experience for this pattern?

This pattern is rated intermediate because it uses increases, decreases, BLO rounds and small motif assembly; basic knowledge of SC, DC, HDC, and reading rounds is recommended.

How long does this project typically take to complete?

Most crocheters complete this project in 5-7 hours, though time will vary based on how many leaves you make and the time spent on assembly and sewing.

How many leaves should I make?

Make as many leaves as you like for the drape you want; the sample uses multiple repeating leaf motifs β€” make a few extra to ensure good coverage when arranging them onto the soil.