🧢 Beautiful ✨ Detailed πŸ’ Adorable

Low Sew Spider Amigurumi Pattern

Low Sew Spider Amigurumi Pattern
4.8β˜… Rating
5-7 Hours Time Needed
1.7K Made This
βœ‚οΈ

Intermediate Level

Ideal for those with basic crochet experience, featuring slightly more advanced stitches and techniques to expand your skills.

⏱️

Weekend Treat

Takes 5-7 hours, making it an enjoyable project to finish over a couple of days.

🧸

Cute Companion

An adorable friend to cherish, handcrafted with love to bring comfort and joy for years to come.

About This Low Sew Spider Amigurumi Pattern

This pattern creates a soft, plush Low Sew Spider using plush or chunky yarn for a cuddly finish. The design minimizes sewing while still offering clear attachment points for legs, eyes, and fuzzy fangs. You will work mostly in continuous rounds and stuff as you go for smooth shaping.

Low Sew Spider Amigurumi Pattern crochet pattern - detailed view of completed project

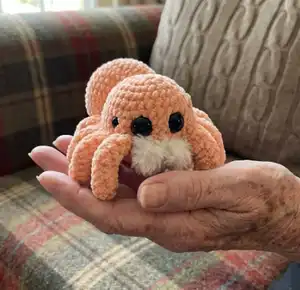
Perfect for gifting or keeping, the spider measures approximately 8" when made with the recommended yarn and hooks. The pattern includes complete supplies, abbreviations, and step-by-step rounds for each piece.

Why You'll Love This Low Sew Spider Amigurumi Pattern

I absolutely love this pattern because it transforms simple plush yarn into a characterful, squeezable spider with very little sewing. I enjoy how quickly each leg comes together and how stuffing as you go makes shaping easy and predictable. The fuzzy yarn fangs add a playful texture contrast that I always get compliments on. Making this pattern feels relaxing and rewarding, and I hope you feel the same joy when you finish yours.

Low Sew Spider Amigurumi Pattern step 1 - construction progress Low Sew Spider Amigurumi Pattern step 2 - assembly progress Low Sew Spider Amigurumi Pattern step 3 - details and accessories Low Sew Spider Amigurumi Pattern step 4 - final assembly and finishing

Switch Things Up

I love swapping yarn colors to create unique personalities for this spider, like pastel shades for a softer look or bright colors for a playful companion.

Try changing your yarn weight and hook to make different sizes: bulky yarn with a larger hook gives a chunky plush, while thinner yarn creates a dainty mini version.

I often add embroidered markings or tiny crocheted accessories to give each spider its own style and character.

Experiment with eye sizes and placements to alter expression β€” larger eyes make a cuter look, and tighter spacing gives a more curious face.

Use wire inside the legs for posability if you want a poseable pet; secure the wire ends safely inside the stuffing.

Swap fuzzy yarn types for the fangs to create different textures β€” faux fur, eyelash yarn, or a small pom can all work beautifully.

Turn the spider into a keychain by making a mini version and attaching a keyring to the body before closing.

I sometimes make a matching set in varying sizes to give as a gift bundle or display on shelves.

If you prefer fewer seams, try crocheting the legs slightly shorter or closing them with the optional 3 sc to change stiffness and movement.

For seasonal themes, adjust colors and add small crocheted accessories like bows or tiny hats to make holiday-ready friends.

Common Mistakes & How to Fix Them

βœ— Skipping a stitch marker while working in continuous rounds leads to losing track of the beginning of the round; place a marker at the first stitch and move it each round. βœ— Forgetting to stuff the legs as you go will make them difficult to fill later and may create lumps; stuff each leg gradually while crocheting to keep even shaping. βœ— Not counting stitches after increases or decreases causes uneven shaping and makes attaching legs hard; count your stitches after each round to ensure accuracy. βœ— Closing legs completely without testing poseability can make them too floppy or too stiff; try the optional 3 sc closure and decide whether you prefer stiffer or floppier legs. βœ— Using the wrong hook size for your chosen plush yarn will change the finished size and tension; use the recommended hook (5 mm for Parfait or 6 mm for Sweet Snuggles Lite) or adjust accordingly.

Low Sew Spider Amigurumi Pattern

Make a cuddly, low-sew plush spider using soft, plush yarn and minimal assembly. This pattern focuses on working in rounds with clear step-by-step instructions so you can create an adorable, poseable spider with fuzzy fangs. Suitable for crafters who enjoy quick, tactile projects with cute results.

Intermediate 5-7 Hours

Materials Needed for Low Sew Spider Amigurumi Pattern

β€” Main Fabric

  • 01
    Plush yarn (Parfait Chunky) - approximately 75 grams (main body)
  • 02
    Sweet Snuggles Lite (alternate plush yarn option) - use 6 mm hook if chosen
  • 03
    Small amount of fuzzy yarn or accent yarn for fangs (small quantity)

β€” Tools Required

  • 01
    Crochet hook size 5.0 mm (for Parfait chunky)
  • 02
    Crochet hook size 6.0 mm (for Sweet Snuggles Lite alternative)
  • 03
    Polyfil stuffing
  • 04
    Darning needle (yarn needle) for sewing and finishing
  • 05
    Safety eyes 20 mm (pair)
  • 06
    Safety eyes 12 mm (pair, smaller outer eyes if desired)
  • 07
    Scissors
  • 08
    Stitch marker (recommended to mark beginning of rounds)
  • 09
    Pins for positioning parts (optional)

Progress Tracker

0% Complete

β€” Legs :

Round 1 :

4 sc in mc (4)

Round 2 :

sc, (inc x3) (7)

Round 3-7 :

sc around (7)

Info :

Start Stuffing and continue as you go.

Round 8 :

2 sc, inc, 2 sc, dec (7)

Round 9-10 :

repeat round 8 (7)

Round 11 :

sc around (7)

Round 12 :

2 sc. (5 sts left unworked)

Info :

sl st, FO

Info :

*Note: if you would like floppy legs that can be easily posed. You can close the legs with 3 sc. This is an option and will make them move more. I like stiffer legs so I leave mine open.

β€” Fangs :

Info :

Make 2 using fuzzy yarn. Leave a yarn tail on both ends because we tie them on later.

Instruction :

Chain 5, starting in second chain from hook sc 4.

β€” Head :

Info :

we will be working from the top of the head down.

Round 1 :

9 sc in mc (9)

Round 2 :

inc x 9 (18)

Round 3 :

(2 sc, inc) x 6 (24)

Round 4 :

(3 sc, inc) x 6 (30)

Round 5 :

(4 sc, inc) x 6 (36)

Round 6 :

(5 sc, inc) x 6 (42)

Round 7-8 :

sc around (42)

Info :

The next round we will attach the legs. Refer to the photos to make sure they are attached correctly so when you flip it over they point down.

Round 9 :

3 sc with first leg, go through the front and back sts of the leg then through the body as shown (3 sts per leg). Repeat till you have attached 4 legs, 7 sc (this is the front where the eyes will be placed), 3 sc with leg x4, sc 11. (42)

Round 10 :

sc around (42)

Info :

Stop and secure the leg tails with knots.

Info :

Attach eyes between row 7-8 above legs in the 7 st space. 3 sts between the center eyes. Smaller outer eyes are placed 2-3 sts back. Some testers liked to place the smaller eyes between rows 6-7.

Round 11 :

(5 sc, dec) x 6 (36)

Info :

Attach the fangs on row 8 below the eyes, 1-2 sts apart. Note they have a natural curve. Place them so they curve into the head. I just slip my yarn tail through and tie a knot on the inside.

Round 12 :

(4 sc, dec) x 6 (30)

Round 13 :

(3 sc, dec) x 6 (24)

Round 14 :

(2 sc, dec) x 6 (18)

Info :

STUFF

Round 15 :

dec x 9 (9)

Info :

sl st, FO close.

β€” Body :

Round 1 :

6 sc in mc (6)

Round 2 :

inc x 6 (12)

Round 3 :

sc around (12)

Round 4 :

(sc, inc) x 6 (18)

Round 5 :

(2 sc, inc) x 6 (24)

Round 6 :

sc around (24)

Round 7 :

(3 sc, inc) x 6 (30)

Round 8 :

(4 sc, inc) x 6 (36)

Round 9 :

(5 sc, inc) x 6 (42)

Round 10-13 :

sc around (42)

Round 14 :

(5 sc, dec) x 6 (36)

Round 15 :

sc around (36)

Round 16 :

(4 sc, dec) x 6 (30)

Round 17 :

sc around (30)

Round 18 :

(3 sc dec) x 6 (24)

Info :

sl st & FO. Leave a long yarn tail for attaching.

Info :

STUFF

Info :

Attach the body 4 rounds from the center of head and 4 rounds from the bottom of the head. I attach my body right up against the legs.

Assembly Instructions

  • Attach each leg to the head during Round 9: 3 sc with first leg, go through the front and back sts of the leg then through the body (3 sts per leg). Repeat for 4 legs on the front, then complete the round as written.
  • Stop and secure the leg tails with knots after Round 10 so the legs stay firmly attached and tidy the ends.
  • Attach safety eyes between rows 7-8 above the legs in the 7-st space with 3 sts between the center eyes; place smaller outer eyes 2-3 sts back or between rows 6-7 if desired.
  • Attach the fuzzy fangs on row 8 below the eyes, spacing them 1-2 sts apart and positioning them so they curve into the head; slip the yarn tail through and tie a knot on the inside.
  • Sew the body to the head using the long yarn tail left at the body: position the body 4 rounds from the center of the head and 4 rounds from the bottom, aligning it close to the legs and stitch securely.

Important Notes

  • πŸ’‘This pattern is written in continuous rounds unless otherwise specified, so use a stitch marker to mark the start of each round.
  • πŸ’‘Stuff the legs as you go to maintain smooth, even shaping and to avoid lumps in the finished legs.
  • πŸ’‘Leave long yarn tails where indicated for attaching parts; this makes assembly faster and neater.
  • πŸ’‘Secure leg tails with knots when instructed to prevent the legs from loosening after attachment.
  • πŸ’‘Place safety eyes before final stuffing when instructed to ensure correct placement and secure fastening.

This Low Sew Spider pattern makes a delightful plush companion with minimal sewing required and maximum cuddle appeal. The soft plush yarn and fluffy fangs give it a charming personality that everyone will love. Perfect as a gift or a cozy handmade keepsake to brighten any shelf. πŸ§ΆπŸ•·οΈ

You ask,

we answer.

FAQs

What size will the finished piece be?

The finished spider measures approximately 8" when made with the recommended Parfait chunky yarn and specified hook sizes.

Can I use different yarn weights for this pattern?

Yes, you can substitute yarns but the finished size and texture will change; use an appropriate hook size (5 mm for Parfait, 6 mm for Sweet Snuggles Lite) for best results.

Do I need prior crochet experience for this pattern?

This pattern is rated intermediate, so basic knowledge of single crochet, increases, decreases, magic circle, and working in rounds is recommended.

How long does this project typically take to complete?

Most crocheters complete this project in 5-7 hours, depending on experience level, speed, and time spent on assembly and finishing.