🧶 Beautiful ✨ Detailed 💝 Adorable

Nina the Plush Elephant Amigurumi Pattern

Nina the Plush Elephant Amigurumi Pattern
4.2★ Rating
5-7 Hours Time Needed
2.8K Made This
✂️

Intermediate Level

Ideal for those with basic crochet experience, featuring slightly more advanced stitches and techniques to expand your skills.

⏱️

Weekend Treat

Takes 5-7 hours, making it an enjoyable project to finish over a couple of days.

🧸

Cute Companion

An adorable friend to cherish, handcrafted with love to bring comfort and joy for years to come.

About This Nina the Plush Elephant Amigurumi Pattern

This pattern creates Nina, a plush amigurumi elephant with a removable dress and floral accents. It uses plush yarn for a soft, cuddly finish and includes step-by-step shaping and assembly instructions. You will work the parts mostly in continuous rounds and join pieces as instructed to create a stable, well-shaped toy.

Nina the Plush Elephant Amigurumi Pattern crochet pattern - detailed view of completed project

The pattern assumes basic crochet knowledge (US terms) and covers finishing touches like head sculpting and embroidered details. Make it in the original pastel palette or customize colors to suit your style.

Why You'll Love This Nina the Plush Elephant Amigurumi Pattern

I absolutely love this pattern because it combines the irresistible softness of plush yarn with thoughtful shaping to create a lovable elephant. I enjoy how the dress and flower details make each finished piece feel unique and gift-ready. The head sculpting technique gives the face so much personality with a few simple steps. Working this pattern always feels rewarding because the toy comes together quickly and hugs amazingly well.

Nina the Plush Elephant Amigurumi Pattern step 1 - construction progress Nina the Plush Elephant Amigurumi Pattern step 2 - assembly progress Nina the Plush Elephant Amigurumi Pattern step 3 - details and accessories Nina the Plush Elephant Amigurumi Pattern step 4 - final assembly and finishing

Switch Things Up

I love how easy it is to customize Nina by changing colors — try soft neutrals for a modern nursery or bright colors for a playful look.

You can make a mini keychain version by using thinner yarn and a smaller hook to shrink the pattern proportionally.

Want a more posable toy? Add wire to the arm and leg cores before final stuffing to give gentle posability.

Replace safety eyes with embroidered eyes for a fully baby-safe version suitable for very young children.

Experiment with different trims on the dress: a scalloped edge, contrasting single crochet row, or a tiny ribbon to change the style.

I often add tiny crocheted accessories like a hat or a little bag to create themed sets or seasonal gifts.

For a different texture, try using boucle or chenille yarn for the dress while keeping the body in plush yarn for contrast.

Embroider small details like eyelashes or a heart on the dress to personalize the elephant for the recipient.

If you prefer a firmer toy, use a slightly smaller hook to tighten stitches and reduce stuffing visibility.

Try adding a scent sachet or a soft bell inside the body for a sensory version that engages babies safely.

Common Mistakes & How to Fix Them

✗ Not stuffing as you go can make shaping difficult later; stuff small amounts regularly, especially in narrow sections like the trunk and neck. ✗ Forgetting to place stitch markers when joining legs and starting the body can rotate your joins; mark the first stitch and the back so pieces align correctly. ✗ Pulling stitches too tight when using plush yarn will make it hard to insert the hook; use slightly looser tension to preserve the plush texture and maintain stitch definition. ✗ Skipping the head sculpting steps will leave the face flat and less expressive; follow the threading and pinning instructions to achieve proper indentations and eye placement. ✗ Cutting yarn too early on the right leg before joining the body will force you to rejoin awkwardly; leave the yarn attached to the right leg when instructed until the legs are joined.

Nina the Plush Elephant Amigurumi Pattern

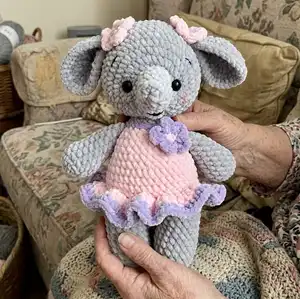
Create a cuddly Nina the Plush Elephant using soft plush yarn and simple amigurumi techniques. This pattern walks you through each part — arms, legs, body, head, ears, dress, flowers and tail — with clear round-by-round instructions. You will love the soft textures and sweet details that make this elephant a perfect gift or nursery companion. Finished toy measures approximately 26-30 cm tall when using the recommended materials.

Intermediate 5-7 Hours

Materials Needed for Nina the Plush Elephant Amigurumi Pattern

— Main Fabric

  • 01
    Plush yarn 100g/120m - Grey (Himalaya Dolphin Baby 80325 or 80347) - quantity: as needed for body, head, limbs
  • 02
    Plush yarn 100g/120m - Pink (Himalaya Dolphin Baby 80319) - quantity: small amount for dress
  • 03
    Plush yarn 100g/120m - Purple (Himalaya Dolphin Baby 80305) - quantity: small amount for trim and flower
  • 04
    Black thread - small amount to embroider eyebrows and mouth
  • 05
    Polyester fiber fill (stuffing) - enough to firmly stuff head, body, limbs

— Tools Required

  • 01
    Crochet hook 4.00 mm
  • 02
    Safety eyes 12 mm (2 pcs)
  • 03
    Scissors
  • 04
    Yarn needle for sewing and embroidering
  • 05
    Stitch markers
  • 06
    Pins for head sculpting
  • 07
    Black embroidery thread for eyebrows and mouth
  • 08
    Pink blush or fabric-safe marker for cheeks (optional)

Progress Tracker

0% Complete

— Arms :

Info :

Crochet with the grey yarn. Stuff only 2/3 of the arm.

Round 1 :

7 sc into a magic ring (7)

Round 2 :

7 inc (14)

Round 3 :

Back loops only: 14 sc

Round 4-5 :

14 sc (2 rounds)

Round 6 :

(5 sc, dec)*2 (12)

Round 7-9 :

12 sc (3 rounds)

Round 10 :

(2 sc, dec)*3 (9)

Round 11 :

9 sc

Round 12 :

Crochet only 4 sc. Fold the arm in half and crochet 4 sc through both sides.

Info :

Fasten off and cut the yarn.

— Legs :

Info :

Crochet with the grey yarn. Stuff as you go.

Round 1 :

8 sc into a magic ring (8)

Round 2 :

8 inc (16)

Round 3 :

Back loops only: 16 sc

Round 4 :

3 sc, inc, 7 sc, inc, 4 sc (18)

Round 5-8 :

18 sc (4 rounds)

Round 9 :

For the left leg: Crochet only 15 sc. Fasten off and cut the yarn, leaving a tail for sewing.

Round 9 :

For the right leg: 18 sc. Don't cut the yarn, we will continue with the body.

— Body :

Info :

Continue crocheting with the grey yarn. Stuff as you go.

Round 1 :

Crochet 5 sc more on the right leg, make chain 2 and attach the yarn to the left leg where you stopped crocheting it. Crochet 18 sc on the left leg, 2 inc on the chain, 18 sc on the right leg, 2 sc on the chain, put the marker here (42) (The marker should be on the back)

Info :

If there is a hole between the legs, take the thread that is left from the left leg and sew the gap.

Round 2-4 :

42 sc (3 rounds)

Info :

Change the yarn to pink color.

Round 5 :

42 sc

Round 6 :

Back loops only: 42 sc

Round 7-9 :

42 sc (3 rounds)

Round 10 :

(5 sc, dec)*6 (36)

Round 11 :

36 sc

Round 12 :

2 sc, dec, (4 sc, dec)*5, 2 sc (30)

Round 13 :

30 sc

Round 14 :

(3 sc, dec)*6 (24)

Info :

Crochet 1-2 sc more, so that the marker is exactly in the middle of the back.

Round 15 :

4 sc, 4 sc through the first arm and the body, 8 sc, 4 sc through the second arm and the body, 4 sc (24)

Info :

Check if the arms are symmetrical to the legs. If not, correct the stitches.

Info :

Change the yarn to grey color.

Round 16 :

Back loops only: (2 sc, dec)*6 (18)

Round 17 :

18 sc

Info :

Cut the grey yarn, leaving a long tail for sewing.

Info :

Stuff the body firmly, especially in the neck.

— Dress :

Info :

Attach the pink yarn to the middle of the back into the front loops of round 6. Crochet with the body turned upside down (look at the picture):

Round 1 :

ch 2, 42 dc inc, sl st (84)

Info :

Change the yarn to purple color.

Round 2 :

ch 2, (2 hdc inc, 3 hdc in one st)*28, sl st (196)

Info :

Fasten off and cut the yarn. Hide it inside the dress.

Info :

Now take the purple yarn and crochet 24 sl st into the front loops of round 16.

Info :

Fasten off and cut the purple yarn. Hide the thread inside.

— Head :

Info :

Crochet with the grey yarn. Stuff as you go. We start with the trunk:

Round 1 :

7 sc into a magic ring (7)

Round 2 :

Back loops only: 7 sc

Round 3 :

2 sc, inc, 2 sc, 2 sl st (8)

Round 4 :

6 sc, 2 sl st (8)

Round 5 :

3 sc, inc, 2 sc, 2 sl st (9)

Round 6 :

8 sc, inc (10)

Round 7 :

4 sc, 3 sl st, 3 sc (10)

Round 8 :

4 sc, 3 sl st, 2 sc, inc (11)

Round 9 :

4 sc, 3 sl st, 4 sc (11)

Round 10 :

10 sc, inc (12)

Round 11 :

12 sc

Info :

Stuff the trunk, so it holds its shape.

Info :

Now continue with the head:

Round 12 :

2 sc, 8 inc, 2 sc (20)

Round 13 :

2 sc, (sc, inc)*2, place a marker for the first eye, (sc, inc)*4, sc, place a marker for the second eye, (inc, sc)*2, sc (28)

Round 14 :

3 sc, inc, (2 sc, inc)*7, 3 sc (36)

Round 15 :

(5 sc, inc)*6 (42)

Round 16 :

3 sc, inc, (6 sc, inc)*5, 3 sc (48)

Round 17-22 :

48 sc (6 rounds)

Info :

Insert the safety eyes into the marked points.

Round 23 :

3 sc, dec, (6 sc, dec)*5, 3 sc (42)

Round 24 :

(5 sc, dec)*6 (36)

Round 25 :

2 sc, dec, (4 sc, dec)*5, 2 sc (30)

Round 26 :

(3 sc, dec)*6 (24)

Round 27 :

sc, dec, (2 sc, dec)*5, sc (18)

Round 28 :

(sc, dec)*6 (12)

Round 29 :

6 dec (6)

Info :

Make sure that the head is stuffed firmly. Close the opening and hide the yarn inside.

— Head Sculpting :

Info :

Mark points 1-6 with pins, as it's shown in the photo. Points 1 and 2 should be in round 17. Points 3-6 are between rounds 13 and 14. Insert a long threaded needle into point 1 and pull it out at point 3. Then insert into point 4 and pull out at point 2. Now insert the needle through point 1 and pull it out at point 5. Insert it into point 6 and pull out at point 2. The thread should be under the eyes. Pull the thread ends tight until the desired indentation is reached and tie a knot. Hide the thread inside the head.

— Ears :

Info :

Crochet with the grey yarn.

Round 1 :

6 sc into a magic ring (6)

Round 2 :

6 inc (12)

Round 3 :

(sc, inc)*6 (18)

Round 4 :

sc, inc, (2 sc, inc)*5, sc (24)

Round 5 :

(3 sc, inc)*6 (30)

Round 6 :

30 sc

Info :

Fold the ear in half and crochet 2 sc through both sides.

Info :

Fasten off and cut the yarn, leaving a tail for sewing.

Info :

Sew the ears to the sides of the head in round 20.

— Assembling :

Info :

For the mouth crochet chain 4 with the grey yarn. Fasten off and cut the yarn, leaving a long tail for sewing. Sew it in round 13.

Info :

You can paint the middle of the mouth with a black marker or embroider it with a black thread.

Info :

Using a black thread embroider the eyebrows between rounds 16 and 17. Color the cheeks with a pink blush.

Info :

Sew the head to the body in head rounds 16-20. While sewing and there is a little hole left, stuff with more fiberfill so that the neck is more stable.

— Flowers :

Info :

Crochet two pink flowers and one purple flower.

Round 1 :

Start crocheting with the second color. 5 sc into a magic ring

Round 2 :

Change the yarn to base color. (ch 2, dc, ch 2, sl st)*5

Info :

Fasten off and cut the yarn, leaving a tail for sewing.

Info :

Sew the pink flowers near the ears and the purple one on the dress.

— Tail :

Info :

Crochet with the grey yarn:

Round 1 :

Make chain 11 and crochet in it 10 inc.

Info :

Fasten off and cut the yarn leaving a tail for sewing.

Info :

Sew the tail on the back in round 5.

Assembly Instructions

  • Sew the head to the body aligning head rounds 16-20 to the neck opening and secure with a ladder stitch, stuffing more fiberfill if a small gap remains to stabilize the neck.
  • Sew the ears to the sides of the head at round 20, positioning each ear symmetrically and securing with small whipstitches.
  • Attach the flowers by sewing two pink flowers near the ears and the purple flower to the front of the dress using the leftover tails.
  • Embroider the eyebrows between head rounds 16 and 17 with black thread, and sew the crocheted mouth chain into round 13 using the long tail.
  • Sew the tail onto the back of the body at round 5, making sure it is centered and firmly attached.

Important Notes

  • 💡Use stitch markers to mark the start of rounds and key positions like the back and eye placement to keep pieces aligned.
  • 💡Stuff firmly as you go, especially the trunk, head and neck, to maintain shape and make assembly easier.
  • 💡Do not cut the right leg yarn before joining the legs to the body; leave it attached until you connect both legs to avoid rejoining issues.
  • 💡Hide and secure all yarn ends inside pieces to prevent unraveling and to keep the plush surface neat.

This sweet Nina the Plush Elephant pattern makes a soft, huggable companion that is perfect for nurseries and gift-giving. 🧸 The plush texture and delicate dress details add instant charm to any handmade collection. 🌸 Happy crocheting and enjoy every stitch as you bring Nina to life! 🧶

You ask,

we answer.

FAQs

What size will the finished piece be?

The finished toy is around 26-30 cm tall when using the recommended plush yarn and a 4.00 mm hook.

Can I use different yarn weights for this pattern?

Yes, but changing yarn weight will affect the final size and texture; use an appropriate hook for your chosen yarn and expect size differences.

Do I need prior crochet experience for this pattern?

This pattern is rated intermediate, so basic knowledge of single crochet, increases, decreases, and working in rounds is recommended.

How long does this project typically take to complete?

Most crocheters finish this project in 5-7 hours, though time may vary depending on experience and customization.

Are the instructions US or UK terminology?

This pattern uses US terminology throughout.