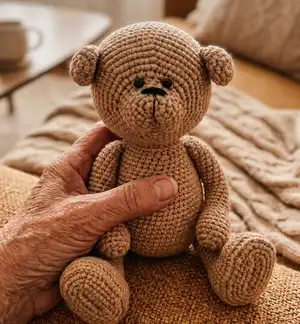
Make a soft, cuddly little teddy bear with this detailed amigurumi pattern. You will be guided step-by-step through head, body, arms, legs and finishing touches so your toy looks neat and durable. The pattern includes materials, abbreviations, and helpful assembly notes so you can complete a charming handmade gift. Perfect for gifting or keeping as a cozy handmade companion.
Progress Tracker
0% Complete
— Head :
Info :
I work with X-shaped stitches, very tight. If you crochet with V-shaped stitches, then your teddy bear size will be much bigger.
Round 1 :
1 rnd- inc *6= 12
Round 2 :
2 rnd-(sc, inc)*6 = 18
Round 3 :
3 rnd - sc into every st = 18
Round 4 :
4 rnd-(2 sc, inc)*6 = 24
Round 5 :
5 rnd-sc into every st = 24
Round 6 :
6 rnd-(3 sc, inc)*6 = 30
Round 7 :
7 rnd-inc *15, 5 sc, dec *3, 4 sc = 42
Round 8 :
8 rnd-(6 sc, inc)*6 = 48
Round 9 :
9 rnd-(7 sc, inc)*6 = 54
Round 10 :
10 rnd-(8 sc, inc)*6 = 60
Round 11 :
11 rnd-(9 sc, inc)*6 = 66
Round 12-22 :
12-22 rnds (11 rnds) - sc into every st = 66
Info :
If you use plastic safety eyes, you should insert them between rounds 6 and 7, skipping 4 or 5 sts apart.
Round 23 :
23 rnd-(9 sc, dec)*6=60
Round 24 :
24 rnd-(8 sc, dec)*6=54
Round 25 :
25 rnd-(7 sc, dec)*6=48
Round 26 :
26 rnd-(6 sc ,dec)*6=42
Round 27 :
27 rnd-(5 sc, dec)*6=36
Round 28 :
28 rnd-(4 sc, dec)*6=30
Info :
We put the head aside for now.
— Arms-make 2 :
Round 1 :
1 rnd - inc *6 = 12
Round 2 :
2 rnd - (2 sc, inc)*4 = 16
Round 3-7 :
3-7 rnds (5 rounds) - sc into every st = 16
Round 8 :
8 rnd-(2 sc, dec)*4 = 12
Round 9-27 :
9-27 rnds (19 rnds) - sc into every st = 12
Info :
You may insert the WIRE (any kind of it) into the arm, just do not forget to wrap the ends of the wire with a medical plaster so that it does not pierce the fabric of the arm. Stuff the arms tightly, do not stuff only the upper 3 rnds to attach them to the body later. Fold the arm in half.
Info :
IMPORTANT. you should work the two folded edges of the arm together as follows: dec*3 into both folded edges of the arm (i.e. stretch with your hook 1 loop out ( working into both folded edges, do not finish the sc; you now have 2 loops on your hook ) , then stretch 1 more loop out from the next st of the two folded edges - and now you have 3 loops on your hook -then crochet the two incomplete sc (all the 3 loops on your hook) together with one top and repeat 2 more times). You should have worked the 3 sts now (and we will attach arms as we crochet into these 3 sts). Break yarn. Wok the second arm the same way.
— Ears-make 2 :
Round 1 :
1 rnd - inc *6 = 12
Round 2 :
2 rnd - (sc, inc)*6 = 18
Round 3 :
3 rnd - sc into every st = 18
Round 4 :
4 rnd - (2 sc, inc)*6 = 24
Round 5 :
5 rnd - (2 sc, dec)*6 = 18
Round 6 :
6 rnd - sc into every st = 18
Info :
Cut off the yarn, leaving a long tail for sewing the ears to the head. Work the second ear the same way.
— Body :
Round 2 :
2 rnd - (sc, inc)*6 = 18
Round 3 :
3 rnd - (2 sc, sc)*6 = 24
Round 4 :
4 rnd - (3 sc, inc)*6 = 30
Info :
If you have some plastic, you may make the attachment discs yourself. Put the circle you have now to the plastic, circle it and cut out the two pieces (these will be required discs).
Round 5 :
5 rnd- BLO sc into every st = 30
Round 6 :
6 rnd- sc into every st = 30
Round 7 :
7 rnd - (4 sc, inc)*6 = 36
Round 8 :
8 rnd - 15 sc , 3 sc together with sts of the first arm, 15 sc, 3 sc together with sts of the second arm = 36
Round 9 :
9 rnd -(5 sc, inc)*6 = 42
Round 10 :
10 rnd - sc into every st = 42
Round 11 :
11 rnd - (6 sc, inc)*6 = 48
Round 12 :
12 rnd - sc into every st = 48
Round 13 :
13 rnd - (7 sc , inc)* 6 = 54
Round 14 :
14 rnd - sc into every st = 54
Round 15 :
15 rnd - (8 sc , inc)*6 = 60
Round 16 :
16 rnd - sc into every st = 60
Round 17-30 :
17-30 rnds (19 rnds) - sc into every st = 60
Info :
ATTACH ARMS: The arms are attached in round 8 by working 3 sc together with the arm sts at the indicated positions (see round 8 text for exact placement).
— Insert the attachment discs and the cotter pin into the head and attach it to the body :
Info :
Put the attachment disc into the head (inside) between rounds 15 and 16 and insert a T-shaped cotter pin into it.
Round 29 :
29 rnd-(3 sc, dec)*6 = 24
Round 30 :
30 rnd - (2 sc ,dec)*6 = 18
Info :
Stuff the head tight.
Info :
Do needle sculpting of the muzzle. Do NEEDLE SCULPTING for the eyes between rnds 6 and 7, skipping 4 or 5 sts apart between them. Use the needle with the same thread that we use for crocheting the bear. At the end of the nose (between rnds 6 and 7 of the head), we insert the needle and bring it out in the point of the first eye, skip 1 st (towards the second eye) and insert the needle again. There turned out a small stitch. Bring it out in the point of the second eye, and again skip the 1 sc sts on the fabric and bring the needle out in the stitch on the nose, next to the point we have inserted it the very first time. The eyes should be located in 4 or 5 sts apart.
Info :
Now there is a VERY IMPORTANT thing. It's better if someone helps you. One person should press on the place of the eyes and slightly squeezes the nose (on the point we have the two yarn tails), the second person pulls the threads well and tie them tight together. The left yarn ends you should weave into the head. We sew or glue the eyes to the points where we've done the needle sculpting. If you use SAFETY eyes, then you do the needle sculpting the same way with the sculpting stitches over the eyes, and when you pull the yarn ends tight, the eyes should become drowned into the fabric. We attach the head with a cotter pin to the body.
— Embroider the nose :
Info :
Use fine black thread and the needle. We start inserting it through the hole in the head, and leaving a long tail. We bring it out in the point where the nose will be located (between rnds 2 and 3 of the head) and embroider the nose with simple stitches back and forth (I use the sewing thread). With the same strong fine black thread and the needle, through the hole in the head, we bring the needle out at the end of the nose center, do a wide stitch over the 3 rows down, and bring it out back in the hole in the head. Next, we do the small stitch at the bottom of the division line of the muzzle. Insert the needle into the hole in the head, bring it out in the end of the division line, stitch over 1 or 2 sc sts of the fabric and go back to the hole in the head. We tie the thread ends together very tightly, pulling on the nose with a finger so that it is slightly flattened and the thread ends are tightly stretched.
— Embroider the live eyes :
Info :
Use white thread and needle. Insert the needle into the hole in the head, leaving a long tail out, and bring it out close to an eye, we skip half of the eye and bring the needle back into the hole in the head. Do the same for the second eye. With the fine black thread we insert the needle through the hole in the head and make the first eyebrow. Skip 2 rows up from an eye , the width of an eyebrow is 2 or 3 sc sts to the side. Bring the needle back into the hole in the head and tie the thread ends together. Eyebrows can be done anywhere you like. You may not do them at all to your taste.
— Sew the ears on the head :
Info :
SEW THE EARS ON THE HEAD: Fold ears in half. Pin them to the required position on the head. Sew them on along the rows 14, 15 of the head, skip 18 sc sts between the ears. First we sew from the side of the muzzle (the first part of the ear). KEEP IN MIND: When we sew the first part of the ear, we pick up the whole sc stitch on the ear and the sc stitch on teddy's head. Skip 1 row up on the head to sew the second part of the ear , i.e. not in the same place, but in the next row. Now you should sew through the FRONT LOOPS ONLY of the sts on the ear. Bring the thread out into the hole on the head, when the second ear is sewn, fasten off the thread ends and tie them together.
— Close the hole on the head :
Round 31 :
31 rnd - (sc,dec)*6 = 12
Round 32 :
32 rnd - 6*dec = 6
Round 33 :
33 rnd- using needle, close the hole, or you may decrease sts before the hole is closed. Break yarn and weave in the yarn tail.
— Legs-make 2 :
Info :
Chain 8, work into the 2nd st from the hook around the chain foundation. Do (slst, ch1)* in the end of each row, but it's not obligatory. You may just continue crocheting in amigurumi rounds, if this more suitable for you.
Round 1 :
1 rnd - inc, 5 sc, [5 sc into one st], to the other side of the chain foundation 5 sc, inc = 18
Round 2 :
2 rnd - inc, 6 sc, inc*4, 6 sc, inc = 24
Round 3 :
3 rnd - inc, 9 sc, inc, 2 sc, inc, 9 sc, inc = 28
Round 4 :
4 rnd - (3 sc, inc)*7 = 35
Round 5 :
5 rnd - sc into every st = 35
Round 6 :
6 rnd- (4 sc, inc)*7 = 42
Info :
The sole is ready. We circle the sole on plastic and cut the insole out of the plastic piece. I use plastic from containers, but you may use any kind of the firm material. Cut out 2 pcs.
Round 7-9 :
7-9 rnds (3 rounds)-sc into every st = 42
Round 10 :
10 rnd - (4 sc, dec )*7 = 35
Round 11 :
11 rnd - sc into every st = 35
Round 12 :
12 rnd - (3 sc, dec)*7 = 28
Info :
Insert the insole into the foot.
Round 13 :
13 rnd - 10 sc , dec *4, 10 sc = 24
Round 14 :
14 rnd - 9 sc, dec *3, 9 sc = 21
Round 15 :
15 rnd - 8 sc , dec *2 , 9 sc = 19
Round 16-26 :
16-26 rnds (11 rounds) - sc into every st = 19
Info :
Stuff the leg very tightly.
Round 27 :
27 rnd-work decreases to close the hole. Break yarn, weave in the yarn tail. Work the second leg the same way.
— Attach legs :
Info :
Use tight thread (I use the 100% cotton one) four times folded. Insert the needle into the first leg (skipping 4 rnds on it from the top) in the central point (LEAVE A LONG TAIL OUT), bring yarn out on the other side of the leg. Go to the point back where we have inserted the needle, skipping 1 or 2 sts apart. Go through the body sides between rnds 30 and 31 of it to the opposite side. Insert the needle into the second leg (skipping 4 rnds on it from the top) in the central point, bring yarn out on the other side of the leg, and go to the point back where we have inserted the needle, skipping 1 or 2 sts apart. Go through the body sides to the opposite side into the same points we were doing it before. Fasten the threads tightly and tie them into a knot. IT IS VERY IMPORTANT TO FASTEN THE THREADS TIGHTLY SO THAT THE LEGS ARE FIRMLY PRESSED AGAINST THE BODY. I'm fastening the threads not alone and asking for help of the other person; one person pulls the threads carefully and ties them together, the second one slightly presses on the body. Weave in the yarn tails into the body.
— Let's finish crocheting the body :
Round 31 :
31 rnd - (8 sc, dec)*6 = 54
Round 32 :
32 rnd - (7 sc, dec)*6 = 48
Round 33 :
33 rnd - (6 sc, dec)*6 = 42
Round 34 :
34 rnd - (5 sc, dec)*6 = 36
Round 35 :
35 rnd - (4 sc, dec)*6 = 30
Round 36 :
36 rnd - (3 sc, dec)*6 = 24
Round 37 :
37 rnd - (2 sc, dec)*6 = 18
Info :
Stuff the body tightly.
Round 38 :
38 rnd - (sc, dec)*6 = 12
Round 39 :
39 rnd - dec *6 or more to close the hole. Break yarn, weave in the yarn tail.
This Little Teddy Bear pattern gives you a professional-looking amigurumi with expressive facial sculpting and sturdy assembly. 🧸
The pattern includes step-by-step rounds, material lists, and photo-supported finishing tips so you can make a gift-ready toy. ✂️
Enjoy making and gifting this little friend—each stitch brings a bit more charm and warmth. 🧶