🧶 Beautiful ✨ Detailed 💝 Adorable

Bunny baby rattle Amigurumi Pattern

Bunny baby rattle Amigurumi Pattern
4.8★ Rating
2-3 Hours Time Needed
4.1K Made This
✂️

Beginner Friendly Level

Perfect for those just starting their crochet journey, with clear instructions and simple techniques

⏱️

Bite-Sized Project

Finishes in 2-4 hours—perfect for an afternoon of creative relaxation.

🎁

Tiny Treasure

Small, sweet, and gift-worthy creations that fit perfectly in the palm of your hand with detailed charm.

About This Bunny baby rattle Amigurumi Pattern

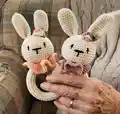
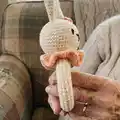
This pattern makes a compact bunny baby rattle with a wooden teether ring and an internal rattle ball. You will crochet the head, two ears, a wrapped body section for the ring, a decorative collar and a tiny flower. The design is baby-friendly with embroidered facial features and secure seams.

Bunny baby rattle Amigurumi Pattern crochet pattern - detailed view of completed project

Instructions are worked in single crochet (US terms) and include photos and a video QR link for extra help. The finished rattle measures approximately 5.5" (14 cm) high including the ring.

Why You'll Love This Bunny baby rattle Amigurumi Pattern

I absolutely love this pattern because it combines a classic amigurumi head with a practical wooden teether ring that babies adore. I enjoy how quick it is to make — you can finish one in an afternoon and gift it the same day. The design feels gentle and timeless, with simple embroidery bringing the face to life. I also love that it includes a small decorative collar and flower, giving you chances to personalize color and detail.

Bunny baby rattle Amigurumi Pattern step 1 - construction progress Bunny baby rattle Amigurumi Pattern step 2 - assembly progress Bunny baby rattle Amigurumi Pattern step 3 - details and accessories Bunny baby rattle Amigurumi Pattern step 4 - final assembly and finishing

Switch Things Up

I love experimenting with color palettes on this pattern — try soft pastels for a gentle baby look or bold primaries for a playful toy.

I sometimes swap the wooden ring for a silicone teething ring that is baby-safe and washable, just be sure the silicone is food-grade and securely wrapped.

I change yarn weight to make size variations: use DK with a 3.25mm hook for a slightly larger rattle or fingering yarn and a 1.75mm hook for a tiny keyring-sized version.

I like to embroider different expressions by altering eyes and mouth placement to give each bunny its own personality.

I add small accessories like a crocheted bow, scarf or tiny jacket to coordinate with nursery colors — these make lovely gift sets.

I sometimes use variegated yarn for the collar or flower to introduce a subtle color shift without changing yarns frequently.

I often replace the simple flower with a tiny crocheted star or heart for seasonal variation or special occasions.

I secure parts extra firmly if the toy is for a very young baby, using stronger thread for sewing and hiding knots well inside the seams.

I recommend felting a small bit of yarn for a raised nose effect if you want texture rather than simple embroidery.

I like to bundle this rattle with a matching mini lovey or hat to create a coordinated gift set for a baby shower.

I sometimes add a loop on top of the head for hanging on a stroller or car seat — make sure it is short and firmly attached to avoid hazards.

I encourage trying different stitch counts for the collar ruffle to create tighter or fuller frills depending on the look you want.

Common Mistakes & How to Fix Them

✗ Skipping the magic ring step can lead to a loose hole at the start; use a proper adjustable magic ring and tighten it securely after your first round. ✗ Understuffing or overstuffing the head creates poor shaping or a misshapen toy; stuff gradually and evenly, checking shape frequently and adding the rattle ball before closing. ✗ Not leaving a long tail for sewing makes assembly fiddly; always cut a long tail where instructed to make sewing and attaching pieces easier. ✗ Sewing the head or ears loosely will make them unstable during play; pin pieces in place and sew firmly with small tight stitches to secure them.

Bunny baby rattle Amigurumi Pattern

Create a sweet handmade bunny baby rattle with a wooden teether ring and a quiet rattle ball. This pattern guides you through crocheting the head, ears, body wrap, collar and a tiny flower—perfect for gifting or selling. Clear step-by-step instructions and a companion video make the process easy to follow. Suitable for crafters who want a quick, adorable baby-safe project.

Beginner Friendly 2-3 Hours

Materials Needed for Bunny baby rattle Amigurumi Pattern

— Main Fabric

  • 01
    YarnArt Jeans (color 05) - approx. 90 yards (main color)
  • 02
    YarnArt Jeans (any color for decoration) - approx. 5 yards
  • 03
    Suggested yarn: Sport / Baby weight (Fine #2)

— Tools Required

  • 01
    Crochet hook size 2.00 mm
  • 02
    Wooden ring 6 cm / 2.5" diameter
  • 03
    Rattle ball 24 mm / 1"
  • 04
    Fiberfill for stuffing
  • 05
    Sewing needle and pins
  • 06
    Scissors

Progress Tracker

0% Complete

— Head :

Round 1 :

6 sc in Magic ring [fig 1] (6)

Round 2 :

6 inc (12)

Round 3 :

(1 sc, inc) * 6 (18)

Round 4 :

(2 sc, inc) * 6 (24)

Round 5 :

(3 sc, inc) * 6 (30)

Round 6 :

(4 sc, inc) *6 [fig 2] (36)

Round 7 :

(5 sc, inc) * 6 (42)

Round 8 :

(6 sc, inc) * 6 (48)

Round 9-15 :

48 sc [fig 3]

Round 16 :

(6 sc, dec) * 6 (42)

Round 17 :

(5 sc, dec) * 6 (36)

Round 18 :

(4 sc, dec) * 6 (30)

Round 19 :

(3 sc, dec) * 6 (24)

Info :

Stuff the head firmly and insert the rattle ball [fig 4]

Round 20 :

(2 sc, dec) * 6 (18)

Round 21 :

(1 sc, dec) * 6 (12)

Round 22 :

(sc) * 6 (6)

Info :

Cut the yarn with long tail [fig 5].

— Ears :

Round 1 :

6 sc in Magic ring (6)

Round 2 :

6 inc (12)

Round 3 :

(2 sc, inc) * 4 (16)

Rounds 4-11 :

16 sc

Round 12 :

(6 sc, dec) * 2 (14)

Round 13 :

14 sc

Round 14 :

(4 sc, dec) * 2 (12)

Round 15 :

12 sc

Round 16 :

(4 sc, dec) * 2 (10)

Info :

Cut the yarn with long tail approx. 15 cm /6" [fig 6]

Info :

Make the second ear.

— Body :

Info :

Working in rows. Start with foundation chain.

Info :

NOTE that you may need to increase or decrease the number of rows to match your wooden ring. It should `hug` wooden ring completely.

Info :

Chain 25.

Rows 1-9 :

24 sc, ch 1 and turn [fig 7]

Info :

Cut the yarn leaving a long tail for sewing. Wrap the ring and sew along [fig 8]

— Collar :

Info :

Working in rows. Using brown yarn.

Info :

Chain 20

Row 1 :

ch 2, 1 dc in the 20th ch, *2 dc in the next st* till the end, turn [fig 9]

Row 2 :

ch 2, *2 dc in the next st* till the end.

Info :

Cut the yarn leaving a long tail for sewing [fig 10]

— Assembling :

Step 1 :

Attach the head to the middle of the body. And sew it, firmly as you can, so it doesn't move when shaking [fig 11]

Step 2 :

Fold the ears in half lengthwise so that a dimple forms at the base. Sew the ears between round 4 and 5. Use the sewing pins to place and fixate the ears. [fig 12]

Step 3 :

Place the collar between the body and head and sew the ends together into a ring. To prevent it from dangling, sew it to the head in several places [fig 13,14].

Step 4 :

Take black yarn and embroider the nose and eyes. Please, refer to the pictures! [fig 15]

Info :

Between the 11th and 12th rows embroider the horizontal line of the nose (the width of the nose is about 4 sc). From the middle down, embroider the nose with a vertical line in 2 rows.

Info :

Embroider the eyes at a distance of 2 sc in the direction of the horizontal line of the nose.

Info :

Make sure the muzzle is symmetrical ☺

— Flower :

Info :

Add some personality to your toy. Complete it with a bow or decorate it with a flower.

Chain :

Chain 10 [fig 17].

Row 1 :

ch 1, 4 sc in one ch, sl-st, 4 hdc in one ch, sl-st, 4 dc in one ch, sl-st, change color of the yarn: (1 hdc, 2 dc, 2 trc, 2 dc, 1 hdc) in one ch, sl-st, (1 hdc, 2 dc, 2 tr, 2 dc, 1 hdc) in one ch.

Info :

Cut the yarn. Roll up and give the shape of a flower [fig 18-19]. Sew tightly.

Info :

Please sew all pieces tightly because a baby will play with it! Do not leave toys unattended in the crib!

Assembly Instructions

  • Attach the head to the middle of the wrapped body and sew it firmly so it does not move when shaking, as shown in figure 11.
  • Fold each ear in half lengthwise to form a dimple at the base and sew each ear between rounds 4 and 5, using pins to fix placement before sewing.
  • Wrap the crocheted body piece around the wooden ring and sew the edges together; leave a long tail to stitch the wrap securely to the ring.
  • Place the collar between the head and the body, sew the collar ends together into a ring and tack the collar to the head in several places to prevent dangling.
  • Embroider the nose and eyes using black yarn: work the horizontal nose line between rows 11 and 12 (about 4 sc wide), then embroider a short vertical line downwards and place eyes 2 sc away from the nose line.

Important Notes

  • 💡Use the recommended 2.00 mm hook or adjust hook size to achieve the gauge of 24 sts and 25 rows = 4" (10 cm) in sc.
  • 💡Stuff the head firmly but evenly and insert the 24 mm rattle ball before closing the opening to ensure correct shape and secure placement.
  • 💡Sew all pieces tightly and secure the wooden ring and collar with strong stitches because this toy will be handled and chewed by babies.
  • 💡Wrap the ring neatly and stitch the wrap closed with a long yarn tail to ensure the ring is completely covered and securely held.

This Bunny Baby Rattle combines a soft crocheted head and ears with a natural wooden teether ring for tactile contrast and safe chewing. Perfect for baby showers, handmade gift shops, or a quick afternoon make, this little bunny is full of charm and personality. Enjoy customizing colors and tiny details to make every rattle uniquely yours. 🧶🐰

You ask,

we answer.

FAQs

What size will the finished piece be?

The finished rattle measures approximately 2 1/2" (6 cm) in rattle diameter and about 5 1/2" (14 cm) high including the wooden ring when using the recommended yarn and hook size.

Can I use different yarn weights for this pattern?

Yes, you can change yarn weight but the final size will change; use a suitable hook for the new yarn and adjust the number of body rows so the wrap hugs the wooden ring completely.

Do I need prior crochet experience for this pattern?

This pattern is rated Beginner Friendly and uses basic stitches like single crochet and simple increases/decreases; experience with magic ring and sewing amigurumi pieces is helpful.

How long does this project typically take to complete?

Most crocheters complete this project in 2-3 hours, though time may vary based on experience, detailing and embellishments.