🧶 Beautiful ✨ Detailed 💝 Adorable

Loafie the Bread Loaf Amigurumi Pattern

Loafie the Bread Loaf Amigurumi Pattern
4.6★ Rating
2-4 Hours Time Needed
2.9K Made This
✂️

Beginner Friendly Level

Perfect for those just starting their crochet journey, with clear instructions and simple techniques

⏱️

Bite-Sized Project

Finishes in 2-4 hours—perfect for an afternoon of creative relaxation.

🧸

Cute Companion

An adorable friend to cherish, handcrafted with love to bring comfort and joy for years to come.

About This Loafie the Bread Loaf Amigurumi Pattern

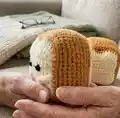
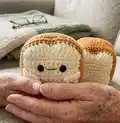
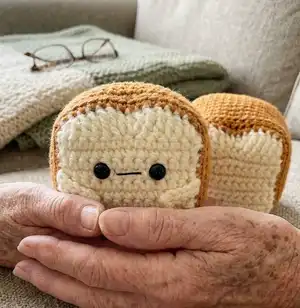
This pattern creates a tiny, squishy loaf-of-bread amigurumi with a cream face and tan crust. You will crochet two flat panels, join them into a hollow loaf body, add tiny bobble feet and arms, and finish with simple embroidery and stuffing. The instructions use basic stitches and short rows so it is great for small, satisfying projects.

Loafie the Bread Loaf Amigurumi Pattern crochet pattern - detailed view of completed project

Detailed step-by-step directions and photos guide you through each stage of assembly. No advanced shaping required — just simple sewing and stuffing to bring Loafie to life.

Why You'll Love This Loafie the Bread Loaf Amigurumi Pattern

I absolutely love this pattern because it transforms basic stitches into a delightful miniature character that feels like a tiny gift. I enjoy how quick it is to make a full loaf in just a couple of hours, which makes it perfect for last-minute handmade presents. The design is playful and approachable, and I love personalizing the face and accessories. It always makes me smile to see how a few stitches and a bit of stuffing become a charming little companion.

Loafie the Bread Loaf Amigurumi Pattern step 1 - construction progress Loafie the Bread Loaf Amigurumi Pattern step 2 - assembly progress Loafie the Bread Loaf Amigurumi Pattern step 3 - details and accessories Loafie the Bread Loaf Amigurumi Pattern step 4 - final assembly and finishing

Switch Things Up

I love to customize Loafie by changing yarn colors—try pastel shades for a soft, kawaii look or deep browns for a rustic loaf.

You can make Loafie bigger or smaller by changing yarn weight and hook size; bulky yarn creates a chunky loaf while fingering weight makes a tiny keychain friend.

I often swap the bobble feet for tiny embroidered toes or felt cutouts to create different personalities.

Make a sleepy Loafie by embroidering closed eyes or a surprised Loafie with a small open mouth using black thread.

Try different eye options: safety eyes for plush durability, embroidered eyes for a baby-safe toy, or tiny buttons for a vintage look.

I sometimes add a tiny crocheted scarf or little appliqued toast slice to add character and narrative to the piece.

Want a stack of loaves? Crochet several in coordinating colors and stitch them together for a bakery display.

For gifting, wrap Loafie in cellophane with a ribbon and a tiny tag—personalized labels make it extra special.

If you like poseable limbs, add a small length of wire inside the arms before attaching, then cover with yarn and stitch closed.

I recommend trying textured yarns for the crust to create a more rustic feel, or fuzzy yarn for a whimsical, plush Loafie.

Common Mistakes & How to Fix Them

✗ Not placing a stitch marker at the beginning of rounds can cause you to lose track of the seam; place a marker in the first stitch (the ch 1 counts as a stitch) to keep orientation accurate. ✗ Forgetting to change color correctly will leave an awkward join; before finishing the last stitch in cream, pull the tan yarn through to complete the stitch and secure a clean color change. ✗ Stuffing too little or too late can create lumps or uneven shape; stuff gradually as you join and stitch so the loaf maintains a smooth silhouette. ✗ Skipping the bobble stitch technique explanation can make the feet look flat; follow the bobble stitch directions carefully and push the bobble out after finishing so it is rounded and visible.

Loafie the Bread Loaf Amigurumi Pattern

Make a cute mini loaf amigurumi you can gift or keep. This small pattern walks you through crocheting the front and back panels, adding cute bobble feet, and assembling a soft stuffed bread loaf. Perfect for quick makes and charming handmade gifts — you'll love how fast and satisfying this little project is.

Beginner Friendly 2-4 Hours

Materials Needed for Loafie the Bread Loaf Amigurumi Pattern

— Main Fabric

  • 01
    Worsted weight yarn (#4) - Cream (main face/panels), approximately 25-50g
  • 02
    Worsted weight yarn (#4) - Tan (crust/top and border), approximately 25-50g
  • 03
    Black thread or embroidery floss for mouth
  • 04
    Polyester fiber fill stuffing - small amount for one loaf

— Tools Required

  • 01
    3.5 mm crochet hook
  • 02
    8 mm safety eyes (2 pieces)
  • 03
    Stitch marker
  • 04
    Scissors
  • 05
    Sewing needle (yarn needle) for sewing and weaving ends
  • 06
    Black embroidery thread
  • 07
    Polyester stuffing (fiber fill)
  • 08
    Pins for assembly (optional)

Progress Tracker

0% Complete

— Arms :

Info :

using cream, make 2

Arms (make 2) :

Starting with a long tail ch 6, slst in the 2nd ch from hook and in remaining ch spaces (5) f/o and leave a long tail for attaching

— Front of Loaf :

Info :

starting with cream

R1 :

ch 13, sc across starting in the 2nd ch from the hook (12) ch 1 and turn

R2 :

sc 2, BO, sc 6, BO, sc 2. ch 1 and turn

R3-10 :

sc across. (12) ch 1 and turn

R11 :

(top of the loaf) 2 HDC in one st, dc, dc, tr, tr, dc & HDC in one st, HDC and dc in one st, tr, tr, dc, dc, 2 HDC in last st (16)

Info :

Now you will crochet around the piece.

Instruction :

-ch 1 and put a st marker in the ch 1 (it counts as a st) then sc 9 down the side

Instruction :

-inc in corner

Instruction :

-sc 10 across bottom

Instruction :

-inc in corner

Instruction :

-sc 10 up the other side

Instruction :

Change to tan.

Instruction :

-inc in the first st along the top, sc in the next 14 sts, inc in the last st

Info :

You are now back at the st marker... you are going to finish sc around the bread with tan.

Instruction :

-sc 10 down the side

Instruction :

-inc in corner

Instruction :

-sc 12 across the bottom

Instruction :

-inc in corner

Instruction :

-sc 10 up the other side (you will reach the tan yarn across the top)

Info :

There should be 54 sts total around the entire bread—do not fasten off.

R1 :

Still using tan, sc around in the BLO (54)

R2-10 :

sc around (54) f/o and weave in yarn tail

Info :

Place safety eyes between rows 7&8, approx. 3 sts apart. Embroider mouth. Attach arms to edge of bread, between rows 5&6.

— Back of Loaf :

Info :

starting with cream

R1 :

ch 13, sc across starting in the 2nd ch from the hook (12) ch 1 and turn

R2-10 :

sc across. (12) ch 1 and turn

R11 :

(top of the loaf) 2 HDC in one st, dc, dc, tr, tr, dc & HDC in one st, HDC & dc in one st, tr, tr, dc, dc, 2 HDC in last st (16)

Info :

Now you will crochet around the piece.

Instruction :

-ch 1 and put a st marker in the ch 1 (it counts as a st) then sc 9 down the side

Instruction :

-inc in corner

Instruction :

-sc 10 across bottom

Instruction :

-inc in corner

Instruction :

-sc 10 up the other side

Instruction :

Change to tan

Instruction :

-inc in the first st along the top, sc in the next 14 sts, inc in the last st.

Info :

You are now back at the st marker... you are going to finish sc around the bread with tan.

Instruction :

-sc 10 down the side

Instruction :

-inc in corner

Instruction :

-sc 12 across the bottom

Instruction :

-inc in corner

Instruction :

-sc 10 up the other side (you will reach the tan yarn that is across the top of the loaf)

Info :

There should be 54 sts total around the entire bread. F/O and leave a long tail for sewing.

— Assembly :

Info :

To attach, line up the front with the back and whip stitch through the BLO of row 10 on the loaf and both loops on the back. See pictured notes for lining up; you want the border stitches to look like little v's.

Instruction :

Whip stitch through both loops of the back of the loaf and the back loop only of the main piece when attaching so the correct side faces out.

Instruction :

Stuff as you go... as firmly as you prefer.

Making Loafie\'s Buns :

Poke the needle between rows 8&9 and up through the back through rows 4&5, centered. Repeat twice.

Instruction :

Pull both tails tight—but not too tight (you don\'t want to see fiber fill poking out). Tie ends together and knot at the bottom then weave in the tails.

Info :

If you don\'t like his arms flapping around and looking crazy, sew or glue them in the position you like!

Final :

You are done!

Assembly Instructions

  • Attach front and back panels by lining them up and whip stitching through the back loop only (BLO) of row 10 on the front panel and through both loops on the back panel so the correct side faces out.
  • Place and secure 8mm safety eyes between rows 7 and 8 on the front panel, spacing them approximately 3 stitches apart, then embroider a small mouth with black thread.
  • Sew the two small arms to the edge of the bread between rows 5 and 6, using the long tail left from the arm to stitch securely and hide ends inside.
  • Stuff the loaf gradually as you sew the panels together to maintain a smooth shape; finish stuffing before closing the final gap and weave in all tails.
  • Create the buns by inserting a needle between rows 8 and 9 and up through rows 4 and 5, centered; pull the tails tight twice, knot them at the bottom and weave in the ends.

Important Notes

  • 💡Use a stitch marker at the start of the round or in the ch 1 (it counts as a stitch) to keep track of your placement.
  • 💡Change color cleanly by pulling the new color through when finishing the last stitch of the previous color to avoid loose joins.
  • 💡Work stuffing in small amounts as you assemble to avoid lumps and keep the loaf shape smooth and even.
  • 💡When joining panels, align the border stitches visually (little v's) to ensure the correct side is facing out.

This little Loafie is a cozy, quick crochet treat you can make in an afternoon. It makes a perfect tiny gift or shelf companion and is delightful to customize with faces and tiny accessories. Packaged with love, Loafie will bring a smile to anyone who receives this handmade loaf. 🧶🍞

You ask,

we answer.

FAQs

What size will the finished piece be?

The finished amigurumi is small—approximately palm-sized using worsted weight yarn and a 3.5 mm hook; exact size may vary by tension.

Can I use different yarn weights for this pattern?

Yes, you can use different yarn weights; using thicker yarn and a larger hook will produce a larger loaf while thinner yarn yields a smaller mini loaf.

Do I need prior crochet experience for this pattern?

This pattern is beginner friendly and uses basic stitches (sc, hdc, dc) and simple shaping, so basic crochet experience is helpful.

How long does this project typically take to complete?

Most crocheters finish this project in 2-4 hours, depending on pace and whether they add custom details or take time on assembly.