🧢 Beautiful ✨ Detailed πŸ’ Adorable

Little Elephant Amigurumi Pattern

Little Elephant Amigurumi Pattern
4.3β˜… Rating
5-7 Hours Time Needed
1.5K Made This
βœ‚οΈ

Intermediate Level

Ideal for those with basic crochet experience, featuring slightly more advanced stitches and techniques to expand your skills.

⏱️

Weekend Treat

Takes 5-7 hours, making it an enjoyable project to finish over a couple of days.

🧸

Cute Companion

An adorable friend to cherish, handcrafted with love to bring comfort and joy for years to come.

About This Little Elephant Amigurumi Pattern

This pattern teaches you how to crochet a charming little elephant amigurumi with a removable bow and skirt. It includes detailed round-by-round instructions for each part: head, ears, trunk, body, arms, feet, skirt and bow. Clear notes on color changes, finishing and assembly will help you create a professional-looking toy.

Little Elephant Amigurumi Pattern crochet pattern - detailed view of completed project

Worked mostly in single crochet (amigurumi style) with some half double crochet for the skirt, it finishes at approximately 20 cm tall. The pattern is written in rounds and includes helpful tips for placement of eyes, embroidery and sewing pieces together.

Why You'll Love This Little Elephant Amigurumi Pattern

I absolutely love this pattern because it combines classic amigurumi shaping with sweet, wearable accessories like the skirt and bow that give the elephant personality. I enjoy how the color change details brighten the design while keeping construction straightforward. The step-by-step rounds make shaping predictable and satisfying, so you can watch the toy take form as you crochet. Sewing and finishing instructions are included, which I always find makes the final assembly much easier and more enjoyable.

Little Elephant Amigurumi Pattern step 1 - construction progress Little Elephant Amigurumi Pattern step 2 - assembly progress Little Elephant Amigurumi Pattern step 3 - details and accessories Little Elephant Amigurumi Pattern step 4 - final assembly and finishing

Switch Things Up

I love how easy it is to customize this elephant by changing yarn colors; I often swap the pink for mint or lavender to create different looks.

I sometimes use a bulkier yarn with a larger hook to make a chunkier, cuddlier version that works great for little hands.

I like to embroider different facial expressionsβ€”moving the eye placement slightly or changing eyebrow angles gives the elephant a new personality.

I often replace safety eyes with embroidered eyes for baby-safe toys and to add a handmade, stitched look that is very soft.

I add felt or tiny crocheted accessories like a tiny hat, scarf, or a small heart to personalize gifts and make sets of toys for siblings.

I occasionally use a sparkly or textured yarn for the skirt to add contrast and a special finish for gifts and photo props.

I sometimes add a small bell or rattle inside the body when making a baby toy, but only if the recipient is appropriate for such additions.

I recommend trying different blush placement or intensity for the cheeks to vary the cuteness levelβ€”subtle blush is sweet, stronger blush is playful.

For a posable version I experiment with thin wire inside the limbs, wrapping it carefully before stuffing so it remains safe and stable.

When I want a mini keychain version, I use thinner yarn and a smaller hook and reduce stuffing to keep it light and portable.

Common Mistakes & How to Fix Them

βœ— Skipping stitch markers at the start of rounds can cause you to lose track of the beginning; place a marker at the start of each round to stay aligned. βœ— Forgetting to change color exactly where instructed will make the dress and body transitions look uneven; change color at the specified round and hide ends neatly. βœ— Not stuffing gradually leads to lumps or overstuffed ends; stuff small amounts as you go to preserve the intended shape and softness. βœ— Placing safety eyes too low or too close will alter the face proportions; follow the guide and place safety eyes between round 22 with 15 stitches between for correct placement. βœ— Working with inconsistent tension will change the finished size noticeably; maintain even tension and check gauge by comparing key pieces as you work.

Little Elephant Amigurumi Pattern

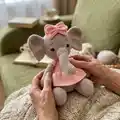
Create an adorable Little Elephant amigurumi with this complete crochet pattern. You'll follow step-by-step rounds for the head, ears, trunk, body, arms, legs, skirt and bow to make a 20 cm tall stuffed elephant. The pattern uses amigurumi yarn and a Clover 2.25 mm hook and includes assembly and finishing notes to help you get a polished result. Perfect for gifting or keeping as a handmade keepsake.

Intermediate 5-7 Hours

Materials Needed for Little Elephant Amigurumi Pattern

β€” Main Fabric

  • 01
    Amigurumi yarn (brand Cdrculo) - Grey yarn (main body)
  • 02
    Light Pink yarn - skirt, dress details and parts of limbs
  • 03
    Dark Pink yarn - optional accents
  • 04
    White yarn - small details
  • 05
    Black yarn for embroidery - facial details

β€” Tools Required

  • 01
    Crochet hook Clover 2.25 mm
  • 02
    Tapestry needle
  • 03
    Embroidery needle
  • 04
    1 Pair of safety eyes 9 mm
  • 05
    Pins for assembly
  • 06
    Universal Glue (optional for bow ends)
  • 07
    Fiberfill stuffing
  • 08
    Crochet stitch marker
  • 09
    Scissors

Progress Tracker

0% Complete

β€” Head :

Round 1 :

8sc in the MR [8]

Round 2 :

inc in each st around [16]

Round 3 :

(1sc, inc) x 8 [24]

Round 4 :

1sc, inc, (2sc, inc) x 7, 1sc [32]

Round 5 :

(3sc, inc) x 8 [40]

Round 6 :

40sc [1 round]

Round 7 :

2sc, inc, (4sc, inc) x 7, 2sc [48]

Round 8 :

48sc [1 round]

Round 9 :

(5sc, inc) x 8 [56]

Round 10 :

56sc [1 round]

Round 11 :

3sc, inc, (6sc, inc) x 7, 3sc [64]

Round 12 :

64sc [1 round]

Round 13 :

(7sc, inc) x 8 [72]

Round 14-23 :

72sc [10 rounds]

Round 24 :

(7sc, dec) x 8 [64]

Round 25 :

64sc [1 round]

Round 26 :

3sc, dec, (6sc, 1 dec) x 7, 3sc [56]

Round 27-28 :

56sc [2 rounds]

Info :

Place safety eyes between round 22 with 15 sc between.

Round 29 :

(5sc, dec) x 8 [48]

Round 30 :

48sc [1 round]

Round 31 :

2sc, dec, (4sc, dec) x 7, 2sc [40]

Round 32 :

40sc [1 round]

Round 33 :

(3sc, dec) x 8 [32]

Round 34 :

(2sc, dec) x 8 [24]

Info :

Fill some more. Cut the Yarn and hide.

β€” EARS 2X :

Round 1 :

6sc in the MR [6]

Round 2 :

2sc in each st around [12]

Round 3 :

(1sc, inc) x 6 [18]

Round 4 :

1sc, inc, (2sc, inc) x 5, 1sc [24]

Round 5 :

(3sc, inc) x 6 [30]

Info :

Continue without cutting the yarn and do: 11 chains, back doing 10sc in the second chain from the hook.

Round 6 :

30sc in the circle, and in the chains of the lower ear: 9sc, inc, 9sc [50]

Info :

Insert the Crochet stitch marker

Round 7-9 :

50sc [3 rounds]

Round 10 :

4sc, dec, (8sc, dec) x 4, 4sc [45]

Round 11-12 :

45sc [2 rounds]

Round 13 :

(7sc, dec) x 5 [40]

Round 14 :

3sc, dec, (6sc, dec) x 4, 3sc [35]

Round 15 :

(5sc, dec) x 5 [30]

Round 16 :

30sc [1 round]

Info :

Do not fill and leave a long yarn to sew. See the photos below.

β€” TRUNK :

Round 1 :

6sc in the MR [6]

Round 2 :

2sc in each st around [12]

Round 3 :

(1sc, inc) x 6 [18]

Round 4 :

18sc (back loop only)

Round 5-13 :

18sc [9 rounds]

Round 14-19 :

inc, 8sc, dec, 7sc [6 rounds]

Round 20 :

(2sc, inc) x 6 [24]

Round 21-24 :

24sc [4 rounds]

Info :

Fill and leave a long yarn to sew.

β€” BOW :

First Part :

Do 17 chains. 1: starting at the second chain from the hook with 16sc, 1 chain and turn the work. 2-12: 16 sc, 1 chain and turn [11 rounds]. 13: Do slts all around the bow.

Second Part :

Do 17 chains. 1: starting at the second chain from the hook with 16sc, 1 chain and turn the work. 2-5: 16sc, 1 chain and turn [3 rounds]. 6: Do slts all around the bow. (see picture)

Chains :

Leave a piece of yarn before you start, do 12 chains, leave a piece of yarn to pass around the bow.

β€” BODY :

Round 1 :

6sc in the MR [6]

Round 2 :

2sc in each st around [12]

Round 3 :

(1sc, inc) x 6 [18]

Round 4 :

1sc, inc, (2sc, inc) x 5, 1sc [24]

Round 5 :

(3sc, inc) x 6 [30]

Round 6 :

2sc, inc, (4sc, inc) x 5, 2sc [36]

Round 7 :

(5sc, inc) x 6 [42]

Round 8 :

3sc, inc, (6sc, inc) x 5, 3sc [48]

Round 9 :

(7sc, inc) x 6 [54]

Round 10 :

4sc, inc, (8sc, inc) x 5, 4sc [60]

Round 11 :

(9sc, inc) x 6 [66]

Round 12-20 :

66sc [9 rounds]

Round 21 :

(9sc, dec) x 6 [60]

Round 22-23 :

60sc [2 carr]

Round 24 :

4sc, dec, (8sc, dec) x 5, 4sc [54]

Info :

Change color to pink.

Round 25 :

54sc [1 round]

Round 26 :

54sc (back loop only)

Round 27 :

(7sc, dec) x 6 [48]

Round 28 :

48sc [1 round]

Round 29 :

3sc, dec, (6sc, dec) x 5, 3sc [42]

Round 30-31 :

42sc [2 rounds]

Round 32 :

(5sc, dec) x 6 [36]

Round 33 :

36sc [1 round]

Round 34 :

2sc, dec, (4sc, dec) x 5, 2sc [30]

Round 35 :

30sc [1 round]

Round 36 :

(3sc, dec) x 6 [24]

Info :

Fill and leave a long yarn to sew.

β€” ARMS 2X :

Round 1 :

6sc in the MR [6]

Round 2 :

inc each st around [12]

Round 3 :

(1sc, inc) x 6 [18]

Round 4 :

1sc, inc, (2sc, inc) x 5, 1sc [24]

Info :

Change color to grey.

Round 5 :

24sc (back loop only)

Round 6-10 :

24sc [5 rounds]

Round 11 :

(4sc, dec) x 4 [20]

Round 12-18 :

20sc [7 rounds]

Round 19 :

(3sc, dec) x 4 [16]

Round 20-22 :

16sc [4 rounds]

Info :

Change color to pink.

Round 23 :

16sc [1 round]

Round 24 :

16sc (back loop only)

Round 25-27 :

16sc [3 rounds]

Info :

Fill the arm halfway. Sc in the front loops of round 24 with pink color. Fold the arm in half and make 8 sc joining both sides.

β€” FOOT 2X :

Info :

Do 7 chains and starting at the second chain from the hook: Spiral work:

Round 1 :

5sc, inc, 5sc [12]

Round 2 :

(1sc, inc) x 6 [18]

Round 3 :

1sc, inc, (2sc, inc) x 5, 1sc [24]

Round 4 :

(3sc, inc) x 6 [30]

Round 5 :

2sc, inc, (4sc, inc) x 5, 2sc [36]

Info :

Change color to grey.

Round 6 :

36sc (back loop only)

Round 7-11 :

36sc [5 rounds]

Round 12 :

14sc, (dec) x 4, 14sc [32]

Round 13 :

14sc, (dec) x 2, 14sc [30]

Round 14-15 :

30sc [2 rounds]

Round 16 :

(3sc, dec) x 6 [24]

Round 17-18 :

24sc [2 rounds]

Info :

Fill and leave a long yarn to sew.

β€” SKIRT :

Round 1 :

front loop only in the round 26: HDC inc [108] (see picture).

Round 2 :

1 slt in the first stitch of the round 1, 1 chain, 108 HDC [108]

Round 3-7 :

repeat 108 HDC working spiral.

Round 8 :

108 slts all round.

Assembly Instructions

  • Embroider the eyelashes with black yarn and embroider the eyebrows 3 rounds above the eyes with 3 stitches wide going up one round.
  • Sew the trunk on round 22 of the head centering in the middle of the eyes, using the long yarn tail left from the trunk; secure tightly and weave in ends.
  • Sew the ears on the twelfth round top to bottom on both sides of the head, leaving 7 stitches away from the corner of the eye for correct placement.
  • Place the second part of the bow over the first part centering in the middle, join the two parts with a knot in the chains and hide the remaining threads; sew or glue the bow to the head as desired.
  • Sew the legs on the sides of the elephant's body at the tenth round from the bottom up to the eighteenth round, leaving 10 stitches between the legs for balance and stability.
  • Sew the arms on the sides of the elephant on the first row of the body from top to bottom, pin parts in place before stitching to ensure symmetrical placement.

Important Notes

  • πŸ’‘Use stitch markers to mark the start of rounds and to hold parts in place during assembly for accurate alignment.
  • πŸ’‘Place safety eyes between round 22 of the head with 15 stitches between them for correct facial proportions.
  • πŸ’‘Change colors exactly on the rounds indicated (body round 25 to pink, arms and feet transitions) and weave ends neatly when changing.
  • πŸ’‘Work some pieces in spiral (no joining) as indicated, such as the foot and some body rounds, to maintain even shaping.
  • πŸ’‘Use back loop only rounds where specified to create visible edges and shaping (for trunk, feet, and selected rounds).

This Little Elephant amigurumi pattern guides you from first stitch to finished toy with clear rounds and helpful assembly photos. 🐘🧢 Make a sweet handmade companion perfect for gifts or nursery decor β€” complete with a pretty bow and skirt for extra charm. ✨ Happy crocheting and enjoy every stitch as your elephant comes to life! 🧡

You ask,

we answer.

FAQs

What size will the finished piece be?

The finished amigurumi measures approximately 20 cm height when using the recommended yarn and a 2.25 mm hook.

Can I use different yarn weights for this pattern?

Yes, you can use different yarn weights, but it will change the final size and may require adjusting the hook size; try a gauge swatch to check proportions.

Do I need prior crochet experience for this pattern?

This pattern is rated intermediate and assumes familiarity with single crochet, increases, decreases, working in the round and basic assembly.

How long does this project typically take to complete?

Most crocheters complete this project in 5-7 hours, depending on experience and how much time you spend on finishing and assembly.