🧶 Beautiful ✨ Detailed 💝 Adorable

Lavender Plant Pattern

Lavender Plant Pattern
4.2★ Rating
1-2 Hours Time Needed
3.2K Made This
✂️

Beginner Friendly Level

Perfect for those just starting their crochet journey, with clear instructions and simple techniques

⏱️

Quick Make

Complete in under 2 hours—lightning fast fun for instant gratification and quick gifts.

🏡

Cozy Accent

A warm touch for your space that transforms ordinary corners into inviting nooks filled with handmade charm.

About This Lavender Plant Pattern

This pattern creates a small, realistic lavender flowerhead worked in DK yarn and finished on a wired stem. It uses simple stitches and clear step-by-step instructions with photos so you can follow along easily. The finished flowers are great for bouquets, wreaths or small decorative arrangements.

Lavender Plant Pattern crochet pattern - detailed view of completed project

Designed for confident beginners, the pattern focuses on texture to mimic lavender buds. You only need a small amount of yarn and a flower wire stem to get beautiful results.

Why You'll Love This Lavender Plant Pattern

I absolutely love this pattern because it turns a few simple stitches into a realistic, charming lavender sprig that looks great in bunches. I enjoy how quick it is to make yet how satisfying the textured flowerhead looks when finished. The pattern photo steps make it accessible, so I can happily share it with crafters who are new to shaping with wire. Making a set of stems is a relaxing way for me to practice consistent tension and creative color choices.

Lavender Plant Pattern step 1 - construction progress Lavender Plant Pattern step 2 - assembly progress Lavender Plant Pattern step 3 - details and accessories Lavender Plant Pattern step 4 - final assembly and finishing

Switch Things Up

I like to customize these lavender stems by changing yarn colors to create a mixed bouquet effect.

I sometimes use lighter purple tones or mix in pale pinks for a cottagecore look.

If you want a larger flower, I switch to worsted weight yarn and a 4.5 mm hook to scale up the design.

For miniature keychains, I use finer yarn and a 2.5 mm hook to make tiny lavender sprigs that fit in the palm of my hand.

I often wrap the wire with floral tape or green embroidery thread to give the stem a more natural finish.

Try adding tiny crocheted leaves to the base by making small chains and single crocheting back along them before securing to the stem.

I also experiment with adding a dab of glue or a stitch of yarn at the top to slightly alter the bud shape for variety.

To create a posable arrangement, use a slightly thicker wire and twist two stems together for extra stability.

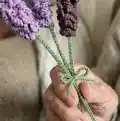
I enjoy grouping three to five stems and tying them with twine for rustic gift bundles or vase displays.

Don’t be afraid to combine textures — a fuzzy or boucle yarn can give a different, charming effect to the flowerhead.

Common Mistakes & How to Fix Them

✗ Skipping the first chain when starting the foundation chain can make the edge uneven; always skip one from the hook before beginning R1 so the edge sits flat. ✗ Not working on the opposite side of the chain for the return row will result in a single-sided strip; be sure to work along the opposite side as instructed to create the flower spikes. ✗ Cutting the yarn too short at the end of R2 will make assembly difficult; fasten off but leave a long tail for sewing the wire securely into the top. ✗ Not bending and securing the top of the wire can make the flowerhead slip off the stem; bend the wire tip and sew over it with the yarn tail to lock it in place.

Lavender Plant Pattern

Make a delicate crocheted lavender flowerhead that is perfect for bouquets, home decor, or tiny gifts. This quick project uses DK yarn and a small hook to create realistic little flower spikes you can attach to wired stems. The pattern is photo-supported and ideal if you want a satisfying, fast make with a lovely finished look.

Beginner Friendly 1-2 Hours

Materials Needed for Lavender Plant Pattern

— Main Fabric

  • 01
    DK (size 3) yarn: approximately 10 g purple shade (main color)

— Tools Required

  • 01
    3.5 mm crochet hook
  • 02
    Yarn needle
  • 03
    Scissors
  • 04
    Flower wire for the stem
  • 05
    Tape (to secure the stem below the flowerhead)
  • 06
    Stitch marker (optional)

Progress Tracker

0% Complete

— Lavender plant :

Info :

With purple yarn.

Info :

Start by creating a slip knot and chain 50.

Round 1 :

Skip one from the hook, sc into each chain until one chain remains. Sc 5, slst into the final chain.

Info :

You will now be working on the opposite side of the chain.

Round 2 :

*ch 6, sc into the next stitch*, repeat from * to * until the end of the row, ch 6, sc into the opposite side of your work and repeat from * to * on the other side until you reach the first ch-6, slst and fasten off. Cut yarn but leave a long tail.

— Assembly :

Info :

From the top end (where you finished your crocheting), start feeding the flower wire through the row 1 sc stitches, going in one and out next.

Info :

Bend the top part of the wire so that your plant will not pop out of the top.

Info :

Using the end tail of your yarn, sew over the bent end of the wire a few times to keep it in place.

Info :

Push and twist the flowerhead towards the top.

Info :

To finish off, add a little bit of tape to the stem just below the flowerhead to keep it in place.

Info :

Happy crocheting!

Assembly Instructions

  • Feed the flower wire through the Row 1 sc stitches from the top end, pushing the wire in and out along the row so it follows the base of the flowerhead.
  • Bend the top of the wire inside the flowerhead so the wire cannot slip back through, then secure that bent tip by sewing over it with the long yarn tail several times.
  • Push and twist the crocheted flowerhead up the wire so the buds sit neatly at the top; arrange the spikes for a natural look.
  • Finish by wrapping a small piece of tape or floral tape around the stem just below the flowerhead to keep the head firmly in place.
  • If making multiple stems, group and bind them together with tape or wrap to create a bouquet or arrangement.

Important Notes

  • 💡Gauge/tension is not important for this pattern as long as your stitches are tight and without gaps.
  • 💡Cut yarn but leave a long tail after fastening off R2 to use for sewing the wire securely into the flowerhead.
  • 💡You can use a different yarn type or weight for this project but adjust hook size accordingly for best results.
  • 💡Work on the opposite side of the chain for the second row to create the textured flower spikes.

This little lavender pattern is perfect for quick, elegant handmade decor you can assemble in minutes. Add several stems to a small vase for a charming display or tie them into small bundles for gifts. I hope this pattern brings you relaxed, creative moments and a touch of floral beauty at home. 🧶🌿

You ask,

we answer.

FAQs

What size will the finished piece be?

The finished lavender spike is small—approximately the length of the 50-chain strip plus the ch-6 loops; exact size depends on yarn and tension.

Can I use different yarn weights for this pattern?

Yes, you can use different yarn weights but this will change the size; use an appropriate hook and expect the flowerhead to scale up or down.

Do I need prior crochet experience for this pattern?

This pattern is rated beginner friendly for confident beginners; basic knowledge of chain, single crochet and slip stitch is recommended.

How long does this project typically take to complete?

Most crocheters can complete a single lavender stem in under 2 hours, though time will vary with experience and number of stems made.