🧢 Beautiful ✨ Detailed πŸ’ Adorable

Ladybug Keychains Pattern

Ladybug Keychains Pattern
4.4β˜… Rating
2-3 Hours Time Needed
1.5K Made This
βœ‚οΈ

Beginner Friendly Level

Perfect for those just starting their crochet journey, with clear instructions and simple techniques

⏱️

Bite-Sized Project

Finishes in 2-4 hoursβ€”perfect for an afternoon of creative relaxation.

✨

Stylish Touch

An elegant detail to elevate any look, combining traditional techniques with contemporary design sensibilities.

About This Ladybug Keychains Pattern

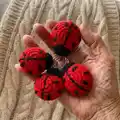
This pattern creates small crocheted ladybug keychains using DK weight yarn and a 3mm hook. You will crochet two matching halves, join them together, stuff and finish with embroidered stripes and spots. Both UK and US term versions are included so you can follow the instructions in the terminology you prefer.

Ladybug Keychains Pattern crochet pattern - detailed view of completed project

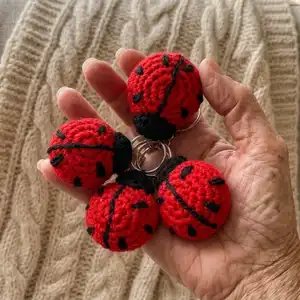
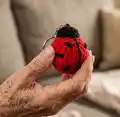
The finished keychains are compact and perfect for gifts, bag charms or markets. The techniques used are simple increases, basic stitches and basic embroidery for the spots.

Why You'll Love This Ladybug Keychains Pattern

I absolutely love this pattern because it turns basic crochet stitches into a charming, useful accessory you can finish quickly. I enjoy how small details like the embroidered stripe and spots give each keychain personality. The pattern is flexible, letting me use oddments of yarn to create bright combinations. I also love that it includes both UK and US terms so more crocheters can confidently follow along.

Ladybug Keychains Pattern step 1 - construction progress Ladybug Keychains Pattern step 2 - assembly progress Ladybug Keychains Pattern step 3 - details and accessories Ladybug Keychains Pattern step 4 - final assembly and finishing

Switch Things Up

I love customizing these keychains by changing the yarn colors; try soft pastels for a cute nursery set or bold reds and blacks for classic ladybirds.

I sometimes switch to a slightly larger hook and DK yarn to make oversized charms that stand out on a tote bag.

For a tiny version use a finer yarn and a 2mm hook to create pocket-sized keychains perfect for zipper pulls.

I also like to add a small bow or tiny crocheted flower to the head for an extra decorative touch.

If you prefer less sewing, try attaching a small snap ring inside the head before closing so the keychain hardware can clip on easily.

I often embroider different patterns of spots β€” try asymmetrical spots or heart-shaped spots for a playful twist.

Want changeable accessories? Make tiny removable hats or scarves with matching yarn to swap seasonally.

I recommend experimenting with metallic thread or embroidery floss for a subtle shimmer on the stripe or spots.

If you want a sturdier charm for bags, use a small amount of craft glue inside the opening before final stitches to help hold stuffing in place.

I sometimes make matching sets in different colors and string them together on a single split ring to create a decorative cluster keyring.

Common Mistakes & How to Fix Them

βœ— Forgetting to mark the last stitch when working continuous rounds can lead to mis-shaped pieces; place a stitch marker at the last stitch of each round and move it up each round. βœ— Overstuffing the ladybug halves makes seams and stitches show through; stuff gradually and only until the piece can be gently pinched to shape. βœ— Not weaving the short ends through to the inside before finishing can result in loose tails; always weave ends through the body and cut flush after securing small stitches. βœ— Skipping the step to place halves wrong sides together before joining can leave an exposed seam; place halves wrong sides together and sl st firmly before continuing. βœ— Pulling embroidery yarn too tight when adding the back stripe will distort the shape; use small running stitches with even tension and check the shape as you work.

Ladybug Keychains Pattern

Make a set of adorable ladybug keychains using simple stitches and DK yarn. This compact pattern guides you step-by-step from crocheting each half to joining, stuffing and finishing with embroidered spots. Perfect for quick gifts, bag charms or market pieces β€” you can make several in an afternoon. Clear UK and US term versions are included for ease of use.

Beginner Friendly 2-3 Hours

Materials Needed for Ladybug Keychains Pattern

β€” Main Fabric

  • 01
    Hayfield Bonus (DK) Ladybird 0698 - approximately 5g (red)
  • 02
    Hayfield Bonus (DK) Black 0965 - oddment (black)
  • 03
    Hi-Loft quality toy stuffing - small amount per keychain (approx 5-10g)
  • 04
    Keychain hardware (one per finished ladybug)

β€” Tools Required

  • 01
    3mm Crochet Hook
  • 02
    Wool needle (for sewing and finishing)
  • 03
    Stitch marker (to mark last stitch of rounds)
  • 04
    Hi-Loft quality toy stuffing
  • 05
    Keychain hardware
  • 06
    Embroidery needle or yarn needle for spots and stripe

Progress Tracker

0% Complete

β€” Materials :

Infos :

Hayfield Bonus (DK) Ladybird 0698 – 5g. Hayfield Bonus (DK) Black 0965 – Oddment. Hi-Loft Quality Toy Stuffing. Keychain. 3mm Crochet Hook. Wool Needle (for sewing).

β€” Abbreviations :

Infos :

ch – chain. dc – double crochet (UK term). htr – half treble crochet (UK term). inc – 2 double crochet stitches into next stitch. sl st – slip stitch. f/o – fasten off by slip stitch in next stitch. sc – single crochet (US term, equivalent to UK dc). hdc – half double crochet (US term, equivalent to UK htr).

β€” Note :

Info :

Unless stated work in continuous rounds marking last stitch of each row with a stitch marker before proceeding with the next. When stuffing parts make sure that you don’t overstuff them as you don’t want the stuffing to show through when complete. Each part should be filled just enough that it can be easily squeezed when pinched firmly.

β€” Ladybug Back (UK Terms) :

Round 1 :

ch2, dc 6 into 2nd st from hook (alternatively dc 6sts into magic ring) (6)

Round 2 :

inc x6 (12)

Round 3 :

(dc into next st, inc) x6 (18)

Round 4 :

dc (18)

Round 5 :

(dc into next 2sts, inc) x6 (24)

Round 6 :

dc (24)

Info :

F/O leaving a short end. Weave short end through back of bun. DO NOT CUT FLUSH.

β€” Ladybug Tummy (UK Terms) :

Round 1 :

ch2, dc 6 into 2nd st from hook (alternatively dc 6sts into magic ring) (6)

Round 2 :

inc x6 (12)

Round 3 :

(dc into next st, inc) x6 (18)

Round 4 :

(dc into next 2sts, inc) x6 (24)

Round 5 :

dc (24)

Info :

F/O leaving a short end. Weave short end through back of bun. DO NOT CUT FLUSH.

β€” Joining Row (UK Terms) :

Round 5 :

place the 2 halves of the ladybug wrong sides together and sl st to join, ch1, htr into next 23sts (24, ch1 counts as 1st st) sl st to join

Info :

F/O leaving a 15cm end. Secure ends with a couple of small sts. Weave end through body and cut flush to finish.

β€” Ladybug Back (US Terms) :

Round 1 :

leaving a 15cm end, ch2, sc 6 into 2nd st from hook (alternatively sc 6sts into magic ring) (6)

Round 2 :

flip 15cm end to front of work, inc x6 (12)

Round 3 :

sc (12)

Info :

F/O leaving a 50cm end.

β€” Ladybug Tummy (US Terms) :

Round 1 :

ch2, sc 6 into 2nd st from hook (alternatively sc 6sts into magic ring) (6)

Round 2 :

inc x6 (12)

Round 3 :

(sc into next st, inc) x6 (18)

Round 4 :

(sc into next 2sts, inc) x6 (24)

Info :

Row 5: sc (24) then F/O leaving a short end. Weave short end through back of bun. DO NOT CUT FLUSH.

β€” Assembly :

Attaching Head :

Using 50cm end from head, thread through tummy section just behind the F/O join. Then working straight up from entry point, come out through the ladybugs back, 3 rows above the htr join row. Catch in opposite edge of head and pull tight to position. Using small mattress sts attach head to body. DO NOT CUT END.

Back Stripe and Spots :

Using remainder of 50cm end and small running sts, embroider a straight line down the ladybug’s back making sure that you go across the starting circle. Now using a split st (small running sts that catch in each end of previous running st), work back along the back finishing up at head join. Using small embroidery daisy (ch) sts sew 3 spots on each side of back making sure that they are fairly symmetrical. Weave ends through inside of ladybug’s body and cut flush to finish.

Attaching Keychain :

Thread keychain onto 15cm end. Do 3 small back sts to attach the keychain to top of head. Secure end with a couple of small sts. Weave end through body and cut flush to finish.

Assembly Instructions

  • Using 50cm end from head, thread through tummy section just behind the F/O join then work up to the back and attach head with small mattress stitches.
  • Place the two halves wrong sides together and slip stitch to join, then work the joining round (ch1 counts as first stitch) before fastening off.
  • Embroider the central back stripe using small running stitches and return with split stitches to finish the line before sewing spots.
  • Thread the keychain onto the 15cm tail and secure with three small back stitches at the top of the head, then secure and weave ends through the body and cut flush.

Important Notes

  • πŸ’‘Work in continuous rounds unless otherwise stated and mark the last stitch of each round with a stitch marker.
  • πŸ’‘Do not overstuff the parts; fill just enough so the piece can be pinched gently to shape.
  • πŸ’‘Weave and secure ends through the inside of the body and cut flush to finish for a neat look.

This sweet ladybug keychain pattern is perfect for quick handmade gifts and market stalls. These little charms use tiny amounts of DK yarn and finish with embroidered details for big personality. Make them in bright or pastel shades to suit your style β€” give as gifts or add them to your own bag for a pop of handmade charm. 🧢✨

You ask,

we answer.

FAQs

What size will the finished piece be?

The finished ladybug keychain is a small charm measuring approximately 3-4 cm in diameter when using DK yarn and a 3mm hook; size may vary with yarn and tension.

Can I use different yarn weights for this pattern?

Yes, you can use different yarn weights but this will affect the final size; use a smaller hook for finer yarn or a larger hook for bulkier yarn and adjust stuffing accordingly.

Do I need prior crochet experience for this pattern?

This pattern is rated Beginner Friendly and uses basic stitches (chains, single/double crochet, increases and slip stitch); basic knowledge of working in rounds is helpful.

How long does this project typically take to complete?

Most crocheters complete one keychain in 2-3 hours; you can make multiple in an afternoon depending on experience and speed.