๐Ÿงถ Beautiful โœจ Detailed ๐Ÿ’ Adorable

Keychain Cow Amigurumi Pattern

Keychain Cow Amigurumi Pattern
4.5โ˜… Rating
2-3 Hours Time Needed
2.1K Made This
โœ‚๏ธ

Intermediate Level

Ideal for those with basic crochet experience, featuring slightly more advanced stitches and techniques to expand your skills.

โฑ๏ธ

Bite-Sized Project

Finishes in 2-4 hoursโ€”perfect for an afternoon of creative relaxation.

๐ŸŽ

Tiny Treasure

Small, sweet, and gift-worthy creations that fit perfectly in the palm of your hand with detailed charm.

About This Keychain Cow Amigurumi Pattern

This pattern creates a tiny keychain cow amigurumi made with soft chenille yarn for a plush, cuddly texture. It includes step-by-step rounds for head, body, ears, horns, hands, legs and the nose, plus assembly instructions. The pattern uses color changes to add spots and accents for a realistic, adorable look.
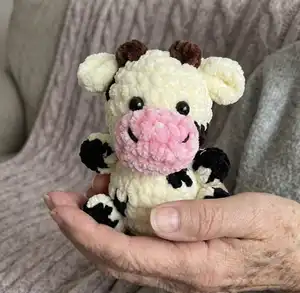
Keychain Cow Amigurumi Pattern crochet pattern - detailed view of completed project

Suitable for crafters comfortable with basic crochet stitches and simple shaping. The finished piece is a small portable companion ideal for gifts, bag charms, or keepsakes.

Why You'll Love This Keychain Cow Amigurumi Pattern

I absolutely love this pattern because it turns a few simple shapes into a character full of personality. I enjoy the soft texture of chenille yarn which makes the cow feel extra cuddly and playful. The color-change spots are a fun way to add uniqueness to each piece and let me personalize every cow I make. Sewing the tiny parts together and seeing the little face come to life always brings me joy, and I hope youll feel the same as you assemble yours.

Keychain Cow Amigurumi Pattern step 1 - construction progress Keychain Cow Amigurumi Pattern step 2 - assembly progress Keychain Cow Amigurumi Pattern step 3 - details and accessories Keychain Cow Amigurumi Pattern step 4 - final assembly and finishing

Switch Things Up

I love experimenting with colors on this pattern; try pastel shades for a soft, whimsical cow or bold contrasting colors for a quirky look.

I often change the yarn weight and hook size to make different sizes โ€” use bulky chenille with a larger hook for a chunky plush or fine yarn for a tiny charm.

I sometimes embroider a tiny mouth or freckles instead of using hot glue for a softer finish and safer toy for small children.

I add small accessories like a crocheted bow, tiny bell, or miniature scarf to personalize each cow and create a theme set of keychains.

I recommend swapping 8mm safety eyes for embroidered eyes for baby-safe versions; embroidery also gives a more stylized expression.

I like to alter the spot placement and size to create unique characters โ€” draw spot layouts on paper first or pin small yarn scraps to test placement.

I occasionally use a metallic keychain ring or a lobster clasp to make the piece into a bag charm that can be removed easily.

I sometimes add wire in the legs for posability when making display dolls, but skip the wire if intended for small children or keychains.

I enjoy mixing textures: try fluffy chenille for the body and a smooth acrylic for horns and hooves to create contrast.

I also make sets in matching colors for gifts โ€” experiment with color palettes and create coordinating family or farm sets using the same basic pattern.

Common Mistakes & How to Fix Them

โœ— Skipping the instruction to join rounds with a slip stitch can create visible gaps at the seam; always join rounds as directed to keep a neater finish. โœ— Not changing yarn colors exactly where indicated leads to misplaced spots and mismatched shaping; follow the color-change notes and font color cues carefully when switching yarns. โœ— Forgetting to stuff pieces before closing causes lumps or flat areas; stuff gradually and firmly up to the recommended rounds to maintain smooth shapes. โœ— Cutting tails too short makes sewing parts together difficult; leave long tails for sewing so you have enough yarn to attach pieces securely. โœ— Ignoring stitch counts during increases and decreases causes uneven shaping; count stitches at the end of each round to ensure the correct number of stitches.
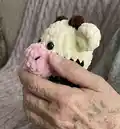
Keychain Cow Amigurumi Pattern

Make this adorable keychain cow using soft chenille yarn โ€” perfect as a small gift or cute accessory. The pattern walks you through making the head, body, ears, horns, hands, legs and nose with clear round-by-round instructions. Youll learn color changes, simple shaping and assembly techniques to create a charming mini amigurumi.

Intermediate 2-3 Hours

Materials Needed for Keychain Cow Amigurumi Pattern

โ€” Main Fabric

  • 01
    100g Soft Chenille Yarn - White (main color)
  • 02
    100g Soft Chenille Yarn - Black (spots and extremities)
  • 03
    100g Soft Chenille Yarn - Brown (horns)
  • 04
    100g Soft Chenille Yarn - Pink (nose/muzzle)
  • 05
    Additional small amounts of contrasting colors for details as needed

โ€” Tools Required

  • 01
    Crochet hook size 3.5mm
  • 02
    Stitch maker (stitch marker)
  • 03
    Sewing needle / yarn needle
  • 04
    Scissors
  • 05
    Plastic safety eyes 8mm (2 pieces)
  • 06
    Hot gun glue
  • 07
    Fiberfill (polyester stuffing)

Progress Tracker

0% Complete

โ€” Head :

Info :

*join the rounds with a slip stitch* Begin with White Yarn and change the yarn color according to the font color.

Round 1 :

8 SC in an MR (8)

Round 2 :

8 INC (16)

Round 3 :

(SC, INC) 6 times, (SC, INC) 2 times (24)

Round 4 :

18 SC, 6SC (24)

Round 5 :

19 SC, 4 SC, SC (24)

Round 6 :

24 SC (24)

Round 7 :

8 SC, 3 SC, 13 SC (24)

Round 8 :

(2 SC, DEC) 2 times, 2 SC, DEC, (2 SC, DEC) 3 times (18)

Round 9 :

(SC, DEC) 6 times (12)

Info :

*stuffing*

Info :

Cut the yarn, leaving a long tail for sewing.

โ€” Body :

Info :

Begin with white yarn unless noted otherwise.

Round 1 :

Make chain 4, start in second chain from the hook. Working on both sides of a chain (working on afoundation chain), 2 SC, 3SC in one st, SC, INC (8)

Round 2 :

INC, SC, 3 INC, SC, 2 INC (14)

Round 3 :

SC, INC, SC, (SC, INC) 3 times, 2 SC, INC, SC, INC (20)

Round 4 :

16 SC, 4 SC (20)

Round 5-6 :

20 SC (20)

Round 7 :

8 SC, DEC, SC, 2 SC, 5 SC, DEC (18)

Round 8 :

(SC, DEC) 3 times, SC, DEC, (SC, DEC) 2 times (12)

Info :

*stuffing*

Info :

Cut the yarn

โ€” Ears (Make 2) :

Round 1 :

6 SC into MR (6)

Round 2 :

6 INC (12)

Info :

Cut the yarn, leaving a long tail for sewing.

โ€” Horns (Make 2) :

Round 1 :

6 SC into MR, slst (6)

โ€” Hands (Make 2) :

Info :

Begin with black yarn

Round 1 :

6 SC into MR (6)

Info :

Change to white yarn

Round 2 :

6 SC (6)

Round 3 :

(SC, DEC) 2 times (4)

Info :

Cut the yarn, leaving a long tail for sewing.

โ€” Legs (Make 2) :

Info :

Begin with black yarn

Round 1 :

8 SC into MR (8)

Info :

Change to white yarn

Round 2-3 :

8 SC (8)

Round 4 :

4 DEC (4)

Info :

Cut the yarn, leaving a long tail for sewing.

โ€” Nose :

Round 1 :

Make chain 4, start in the second chain from the hook, 3 SC, (3 SC), 2 SC, INC (10)

Round 2 :

INC, 2 SC, 3 INC, 2 SC, 2 INC (16)

Round 3 :

16 SC (16)

Info :

Cut the yarn, leaving a long tail for sewing.

โ€” Assembly :

Info :

Attach the head and the nose to the body.

Info :

Attach the horns and the ears to the head.

Info :

Sew the hands and the legs to the body (as photo).

Info :

Use eye size 8mm and attach to row 6.

Assembly Instructions

  • Attach the head and the nose to the body, aligning the nose on the front center of the head and sewing securely with the long tail left from the nose.
  • Position and attach the horns and the ears to the head using the long tails for sewing; pin in place to check symmetry before sewing.
  • Sew the hands to either side of the body and the legs to the bottom of the body, following the photos for spacing and orientation.
  • Use plastic safety eyes 8mm and attach them to the head at row 6, ensuring they are evenly spaced and secured with washers.
  • Weave in all ends after assembly and use a small amount of hot gun glue where needed to secure small parts such as horns if desired.

Important Notes

  • ๐Ÿ’กJoin rounds with a slip stitch as indicated to keep a neat seam and consistent shaping for each round.
  • ๐Ÿ’กChange the yarn color according to the font color cues in the pattern to create spots and accents in the correct rounds.
  • ๐Ÿ’กStuff parts firmly but evenly before closing to avoid lumps; stuff the head and body up to the indicated rounds for best shape.
  • ๐Ÿ’กLeave long yarn tails when cutting so you can sew pieces together easily and securely without needing extra yarn.
  • ๐Ÿ’กUse an 8mm eye size and attach at row 6 as shown for correct facial placement.

Thank you for making this little Keychain Cow โ€” your handmade creation is ready to bring smiles! This mini amigurumi is perfect for gifts, key rings, or a cute desk companion. Share photos of your finished cow and spread the handmade joy. ๐Ÿฎ๐Ÿงถ

You ask,

we answer.

FAQs

What size will the finished piece be?

The finished keychain cow measures approximately 8-12 cm tall depending on your tension and exact yarn usage when using the recommended chenille yarn and 3.5mm hook.

Can I use different yarn weights for this pattern?

Yes, you can adjust yarn weight and hook to change size; using thicker chenille will give a chunkier toy while light-weight yarn will create a smaller, more delicate amigurumi.

Do I need prior crochet experience for this pattern?

This pattern is rated intermediate because it includes color changes, shaping with increases and decreases, and assembling multiple small parts, so basic crochet experience is recommended.

How long does this project typically take to complete?

Most crafters complete this keychain cow in about 2-3 hours, though time may vary with experience, detail work, and assembly pace.