🧢 Beautiful ✨ Detailed πŸ’ Adorable

Christmas Pudding Amigurumi Pattern

Christmas Pudding Amigurumi Pattern
4.5β˜… Rating
2-3 Hours Time Needed
1.4K Made This
βœ‚οΈ

Intermediate Level

Ideal for those with basic crochet experience, featuring slightly more advanced stitches and techniques to expand your skills.

⏱️

Bite-Sized Project

Finishes in 2-4 hoursβ€”perfect for an afternoon of creative relaxation.

🧸

Cute Companion

An adorable friend to cherish, handcrafted with love to bring comfort and joy for years to come.

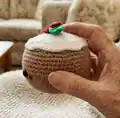
About This Christmas Pudding Amigurumi Pattern

This pattern creates a small, adorable Christmas pudding amigurumi complete with icing, leaves and berries. It includes full round-by-round instructions for the body and separate pieces for decoration. The finished pudding is compact and gift-ready, perfect for holiday crafting or handmade presents.

Christmas Pudding Amigurumi Pattern crochet pattern - detailed view of completed project

Clear stitch abbreviations and step-by-step rounds make this pattern easy to follow for intermediate crocheters. Small details like brads, embroidered smile and glued berries give the pudding its charming personality.

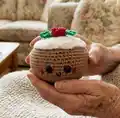
Why You'll Love This Christmas Pudding Amigurumi Pattern

I absolutely love this pattern because it combines simple amigurumi construction with delightful seasonal details that bring the piece to life. The icing, leaves and berries let me add personality with tiny embellishments, and I enjoy the quick finishing time for holiday gift making. The shaping instructions encourage playful squishing to achieve a charming pancake silhouette. Every time I stitch one up I find it hard not to smile at the little face and festive top.

Christmas Pudding Amigurumi Pattern step 1 - construction progress Christmas Pudding Amigurumi Pattern step 2 - assembly progress Christmas Pudding Amigurumi Pattern step 3 - details and accessories Christmas Pudding Amigurumi Pattern step 4 - final assembly and finishing

Switch Things Up

I love customizing this little pudding by changing the icing color β€” try cream or pale pink for a different holiday vibe.

You can alter the size by using thicker yarn and a larger hook to create a chunky pudding, or finer yarn for a mini keychain version.

I sometimes add embroidered freckles or a different mouth shape to change the pudding's personality β€” experiment with placement to see what you like.

If youd like a hangable ornament, add a small loop of yarn at the top of the icing before sewing it down.

Use felt instead of yarn for the leaves and berries for a different texture; glue or hand-sew these down for a mixed-media look.

I often replace brads with small embroidered French knots for a fully soft finish if making this for small children.

Embellish with tiny beads or sequins for a sparkly holiday edition that catches the light on a tree.

Try creating a whole set with different facial expressions β€” position the eyes and mouth slightly differently to create surprised, sleepy or winking puddings.

For a posable novelty, consider lightly inserting a small pipe cleaner inside the frosting layer before securing, but be mindful of safety for kids.

I encourage you to mix and match yarn brands and colors to develop a festive collection unique to your style.

Common Mistakes & How to Fix Them

βœ— Placing safety eyes too low or too high can throw off the facial expression; position eyes between rounds 14-15 and measure before securing to ensure the intended look. βœ— Forgetting to stuff as you go can make decreases difficult; stuff semi-firmly during the decrease rounds to maintain the shape and avoid lumps. βœ— Not securing the red brads with glue can cause them to fall off later; after inserting brads between rounds 13-14, add a drop of craft glue for a permanent hold. βœ— Skipping stitch counting during increases and decreases leads to incorrect stitch counts; count after each increase or decrease round to keep your round totals accurate.

Christmas Pudding Amigurumi Pattern

Make a charming little Christmas Pudding amigurumi that measures about 12cm across. This pattern walks you through a compact body, a cute icing topper, leaves and tiny berries for the perfect festive finish. Youll enjoy a quick, satisfying make with clear rounds and simple assembly instructions.

Intermediate 2-3 Hours

Materials Needed for Christmas Pudding Amigurumi Pattern

β€” Main Fabric

  • 01
    Paintbox Yarns - Paper White - 1 ball (for icing)
  • 02
    Paintbox Yarns - Grass Green - 1 ball (for leaves)
  • 03
    Paintbox Yarns - Pillar Red - 1 ball (for berries)
  • 04
    Paintbox Yarns - Soft Fudge - 1 ball (for body)
  • 05
    Small amounts of black yarn for embroidery details
  • 06
    Polyester stuffing - small amount for body and berries

β€” Tools Required

  • 01
    Crochet hook size 3.25mm
  • 02
    Amigurumi eyes 9mm (2 pieces)
  • 03
    Red brads 5mm (2 pieces)
  • 04
    Tapestry needle
  • 05
    Glue (for securing brads)
  • 06
    Polyester stuffing

Progress Tracker

0% Complete

β€” Body [Make one] :

Round 1 :

MR 6

Round 2 :

inc around [12]

Round 3 :

(sc, inc) x6 [18]

Round 4 :

(sc 2, inc) x6 [24]

Round 5 :

(sc 3, inc) x6 [30]

Round 6 :

(sc 4, inc) x6 [36]

Round 7 :

(sc 5, inc) x6 [42]

Round 8 :

(sc 6, inc) x6 [48]

Round 9 :

(sc 7, inc) x6 [52]

Round 10 :

(sc 8, inc) x6 [60]

Round 11-20 :

sc around [10 rounds]

Info :

Embroider a smile on R13, add eyes between R14-15, 3-4 stitches above smile. Add red brads between R13-14 next to eyes. Secure with glue.

Round 21 :

(sc 8, dec) x6

Round 22 :

(sc 7, dec) x6 [52]

Round 23 :

(sc 6, dec) x6 [48]

Round 24 :

(sc 5, dec) x6 [42]

Round 25 :

(sc 4, dec) x6 [36]

Info :

Stuff semi firmly as you go

Round 26 :

(sc 3, dec) x6

Round 27 :

(sc 2, dec) x6

Round 28 :

(sc, dec) x6

Round 29 :

dec around

Info :

FO. Weave in all ends.

Info :

Squish the body by pressing the top and bottom so it is more of a tall pancake shape.

β€” Leaves [Make three or more] :

Info :

Using Green Yarn:

Instruction 1 :

ch 7, sl st in 2nd ch from hook through bb, (sl st through bb, ch 2, sl st in same bb), sl st in next 2 back bumps, ch 3, sl st in same bb, sl st in next bb, 3 sl st in next bb.

Info :

working on other side of the ch:

Instruction 2 :

sl st in next 2 st, ch 3, sl st in current st, sl st in next, ch 2, sl st in same, sl st in last.

Info :

FO leaving long tail for sewing.

β€” Berries [Make three or more] :

Round 1 :

MR 4

Info :

Clean FO and leave a long tail for sewing.

β€” Icing [Make one] :

Info :

Using White Yarn:

Round 1 :

MR 6 [6]

Round 2 :

inc around [12]

Round 3 :

(sc, inc) x6 [18]

Round 4 :

(sc 2, inc) x6 [24]

Round 5 :

(sc 3, inc) x6 [30]

Round 6 :

(sc 4, inc) x6 [36]

Round 7 :

(sc 5, inc) x6 [42]

Round 8-9 :

sc, hdc in next 2 st, sc in next 3st, hdc, sc, hdc, sc, hdc in next 2 st, sc in next 2 st, hdc in next 3 st, sc in next 4 st, hdc in next 5 st, sc in next 6 st, hdc in 8 st, sc in last 2 st. [2 rounds]

Info :

FO leaving long tail for sewing.

β€” Assembly :

Info :

Sew Leaves onto the top of the icing, then the berries. Place Icing onto the top of the head (around R21-29). Weave in all ends. Please use picture for reference.

Assembly Instructions

  • Sew leaves onto the top of the icing first, positioning three or more leaves radially across the icing surface and secure with small stitches.
  • Sew the red berries onto the icing between the leaves, using the long tail left from FO to stitch each berry securely in place.
  • Place the completed icing (with leaves and berries attached) onto the top of the body around rounds 21-29 and sew the icing to the body evenly around the edge.
  • Weave in all ends after assembly and add a drop of glue to the back brads to secure them; use the reference photos to adjust placement and spacing for a balanced look.

Important Notes

  • πŸ’‘Stuff semi-firmly as you work the decreases to maintain smooth shaping and avoid lumps in the finished body.
  • πŸ’‘Position eyes between rounds 14 and 15, approximately 3-4 stitches above the embroidered smile for the intended facial expression.
  • πŸ’‘Secure the red brads with a small amount of glue after inserting them between rounds 13-14 to prevent them from coming loose.

This adorable Christmas Pudding amigurumi is perfect for holiday gifts, tree displays or little festive keepsakes. Its compact size and cute face make it a delightful quick make for crafters and gift-givers alike. Handcrafted details like the icing, leaves and berries add personality and charm to every piece. πŸŽ„πŸ§Ά

You ask,

we answer.

FAQs

What size will the finished piece be?

The finished amigurumi measures about 12cm across when using Paintbox Yarns and a 3.25mm hook, as shown in the photos.

Can I use different yarn weights for this pattern?

Yes, you can change the yarn weight, but your final size will change; choose an appropriate hook and expect size variation if you swap yarns.

Do I need prior crochet experience for this pattern?

This pattern is rated intermediate and is best for crocheters comfortable with working in the round, increases, decreases and basic shaping.

How long does this project typically take to complete?

Most crafters can finish this project in 2-4 hours, depending on experience and how much time you spend on embellishments and assembly.