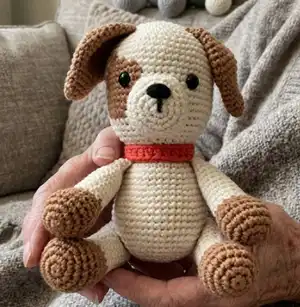
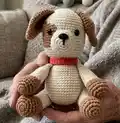
Make an adorable Puppy Chip amigurumi with this easy-to-follow crochet pattern. You will create a sweet spotted puppy complete with floppy ears, a little tail, and a bright collar. The pattern includes full round-by-round instructions, materials, and assembly tips so you can finish a charming handmade toy. Perfect as a gift or a cuddly companion for your home.
Progress Tracker
0% Complete
— Head and Body :
Info :
Using the color A yarn, begin with a magic ring and and make 6 sc in the ring. Place a stitch marker, and move up with row
Round 2 :
(inc in each st) around [12]
Round 3 :
(sc; inc in next st) around [18]
Round 4 :
(sc in next 2 sts; inc in next st) around [24]
Round 5 :
(sc in next 3 sts; inc in next st) around [30]
Round 6 :
(sc in next 4 sts; inc in next st) around [36]
Round 7 :
(sc in next 5 sts; inc in next st) around [42]
Round 8 :
(sc in next 6 sts; inc in next st) around [48]
Round 9 :
(sc in next 7 sts; inc in next st) around [54]
Round 10 :
(sc in each st) around [54]
Info :
Attach yarn B in this round
Round 11 :
5 sc in color A; 2 sc in color B; 47 sc in color A around [54]
Round 12 :
5 sc in color A; 4 sc in color B; 45 sc in color A around [54]
Round 13 :
4 sc in color A; 7 sc in color B; 43 sc in color A around [54]
Round 14 :
3 sc in color A; 9 sc in color B; 42 sc in color A around [54]
Round 15 :
3 sc in color A; 9 sc in color B; 42 sc in color A around [54]
Round 16 :
4 sc in color A; 8 sc in color B; 42 sc in color A around [54]
Round 17 :
3 sc in color A; 10 sc in color B; 41 sc in color A around [54]
Round 18 :
2 sc in color A; 9 sc in color B; 43 sc in color A around [54]
Round 19 :
3 sc in color A; 8 sc in color B; 43 sc in color A around [54]
Round 20 :
4 sc in color A; 6 sc in color B; 44 sc in color A around [54]
Info :
Attach safety eyes between rows 15 and 16. Count 9 sc from one eye to another.
Info :
Stuff and shape the head as you work.
Round 21 :
(sc in next 7 sts; dec) around [48]
Round 22 :
(sc in next 6 sts; dec) around [42]
Round 23 :
(sc in next 5 sts; dec) around [36]
Round 24 :
(sc in next 4 sts; dec) around [30]
Round 25 :
(sc in next 3 sts; dec) around [24]
Round 26-27 :
(sc in each st) around [24]
Round 28 :
(sc in next 3 sts; inc in next st) around [30]
Round 29-30 :
(sc in each st) around [30]
Round 31 :
(sc in next 4 sts; inc in next st) around [36]
Round 32-33 :
(sc in each st) around [36]
Round 34 :
(sc in next 5 sts; inc in next st) around [42]
Round 35-36 :
(sc in each st) around [42]
Round 37 :
(sc in next 6 sts; inc in next st) around [48]
Round 38-40 :
(sc in each st) around [48]
Round 41 :
(sc in next 11 sts; inc in next st) around [52]
Round 42 :
(sc in each st) around [52]
Round 43 :
(sc in next 11 sts; dec) around [48]
Round 44 :
(sc in next 6 sts; dec) around [42]
Round 45 :
(sc in next 5 sts; dec) around [36]
Round 46 :
(sc in next 4 sts; dec) around [30]
Round 47 :
(sc in next 3 sts; dec) around [24]
Round 48 :
(sc in next 2 sts; dec) around [18]
Round 49 :
(sc in next st; dec) around [12]
Round 50 :
(dec x 6) around [6]
Info :
Fill the body with fiberfill firmly.
Info :
F/O and thread tail end of yarn onto a tapestry needle, insert the needle in and out of the remaining sts, pull tight to close and weave in end.
— Ears (Make 2) :
Round 2 :
(sc; inc in next st) around [9]
Round 3 :
(sc in next 2 sts; inc in next st) around [12]
Round 4 :
(sc in each st) around [12]
Round 5 :
(sc in next 3 sts; inc in next st) around [15]
Round 6 :
(sc in next 4 sts; inc in next st) around [18]
Round 7 :
(sc in each st) around [18]
Round 8 :
(sc in next 2 sts; inc in next st) around [24]
Round 9 :
(sc in next 3 sts; inc in next st) around [30]
Round 10-11 :
(sc in each st) around [30]
Round 12 :
(sc in next 3 sts; dec) around [24]
Round 13-14 :
(sc in each st) around [24]
Round 15 :
(sc in next 4 sts; dec) around [20]
Round 16 :
(sc in each st) around [20]
Round 17 :
(sc in next 8 sts; dec) around [18]
Info :
Do not stuff the ears. Flatten the top of the ear in half, and sc in next 9 sts through both sides. F/O leaving a long tail for sewing.
— Hind Legs (Make 2) :
Info :
Start with color B yarn
Round 2 :
(inc in each st) around [12]
Round 3 :
(sc; inc in next st) around [18]
Round 4 :
(sc in next 2 sts; inc in next st) around [24]
Round 5-6 :
(sc in each st) around [24]
Round 7 :
sc in next 6 sts; (sc in next 2 sts; dec)x 3 times; sc in 6 next sts around [21]
Round 8 :
sc in next 6 sts; (sc in next st; dec)x 3 times; sc in next 6 sts around [18]
Round 9 :
sc in next 6 sts; (dec)x 3 times; sc in next 6 sts around [15]
Info :
Change to color A yarn
Round 10-19 :
(sc in each st) around [15]
Info :
stuff and shape the paw firmly, stuff the bottom of leg lightly.
First leg :
Undo one stitch from the last round. Fold the top of the leg in half, sc in the next 7 sts through both sides. F/O leaving a long tail for sewing.
Second leg :
Sc in the next 6 sts. Fold the top of the leg in half, sc in the next 7 sts through both sides. F/O leaving a long tail for sewing.
Info :
Make sure one paw points to the right and other to the left. Add or remove stitches in the last round if it is needed.
— Fore Legs (Make 2) :
Info :
Start with color B yarn
Round 2 :
(inc in each st) around [12]
Round 3 :
(sc; inc in next st) around [18]
Round 4 :
(sc in next 5 sts; inc in next st) around [21]
Round 5-6 :
(sc in each st) around [21]
Round 7 :
(sc in next 5 sts; dec) around [18]
Round 8 :
(sc in next 5 sts; dec x 4 times; sc in next 5 sts) around [14]
Info :
Change to color A yarn
Round 9-19 :
(sc in each st) around [14]
Info :
Stuff and shape the paw firmly and bottom of the leg lightly.
First Leg :
Fold the top of the leg in half, sc in the next 7 sts through both sides. F/O leaving a long tail for sewing.
Second leg :
Sc in the next 2 sts. Fold the top of the leg in half, sc in the next 7 sts through both sides. F/O leaving a long tail for sewing.
Info :
Make sure one paw points to the left and other to the right. Add or remove stitches in the last round if it's needed.
— Muzzle :
Round 2 :
(inc in each st) around [12]
Round 3 :
(sc; inc in next st) around [18]
Round 4 :
(sc in next 2 sts; inc in next st) around [24]
Round 5 :
(sc in next 5 sts; inc in next st) around [28]
Round 5 :
(sc in each st) around [28]
Info :
Sl st in next stitch and F/O leaving a long tail for sewing.
— Tail :
Round 2 :
(sc; inc in next st) around [9]
Round 3 :
(sc in next 2 sts; inc in next st) around [12]
Round 4-9 :
(sc in each st) around [12]
Round 10 :
(sc in next 4 sts; dec) around [10]
Info :
Sl st in next stitch. Stuff the tail lightly. F/O leaving a long tail for sewing.
— Collar :
Info :
Using red color yarn
Round 2 :
hdc into 2nd ch from hook and across [24]
Info :
Try this on your puppy and adjust the no. of stitches if needed.
— Assembly :
Info :
Position the parts with bobbin pins and play around with placement before sewing them in place.
Info :
Use black yarn to embroider a nose onto the muzzle. Stuff the muzzle lightly and center it between the eyes. Sew the muzzle on neatly and carefully.
Info :
Position the ears evenly on the sides of the head. I have placed them between rows 5 and 6 starting from the top.
Info :
Sew the fore legs to the shoulders and hind legs at the sides. Make sure that the paws are in the right position. You can sew 1 or 2 stitches from under the hind legs to the body to tack the legs close to the body if they are flaring out too far.
Info :
Put the collar around the neck and join using a tapestry needle.
Info :
Sew the tail on to the back of the body.
This Puppy Chip pattern brings a tiny spotty friend to life with simple shaping and sweet details. You will love the floppy ears and color patch that give so much personality. Make one for yourself or as a handmade gift that will be treasured. 🧶🐶