🧢 Beautiful ✨ Detailed πŸ’ Adorable

Jigglypuff Amigurumi Pattern

Jigglypuff Amigurumi Pattern
4.2β˜… Rating
5-7 Hours Time Needed
3.6K Made This
βœ‚οΈ

Intermediate Level

Ideal for those with basic crochet experience, featuring slightly more advanced stitches and techniques to expand your skills.

⏱️

Weekend Treat

Takes 5-7 hours, making it an enjoyable project to finish over a couple of days.

🧸

Cute Companion

An adorable friend to cherish, handcrafted with love to bring comfort and joy for years to come.

About This Jigglypuff Amigurumi Pattern

This pattern walks you through making a 6-inch Jigglypuff amigurumi with layered eyes, shaped ears, feet, arms, and a decorative poof. It uses standard amigurumi construction worked mostly in the round with some partial rows for detail. The pattern includes clear round-by-round instructions, materials, abbreviations, and assembly guidance so you can follow along easily.

Jigglypuff Amigurumi Pattern crochet pattern - detailed view of completed project

You will learn how to crochet stacked eye pieces, join ear layers, and create the multi-colored poof using partial rows. Photos and tips are included to help with placement and finishing.

Why You'll Love This Jigglypuff Amigurumi Pattern

I absolutely love this pattern because it captures Jigglypuff's sweet round shape and expressive eyes while remaining fun to make. I adore how the layered eyes add personality with simple circular pieces stacked together. The poof construction offers a fun challenge that teaches partial-row techniques and creative shaping. Making the ears with two layers and hiding the inner color is one of my favorite finishing touches that gives the toy a polished, professional look.

Jigglypuff Amigurumi Pattern step 1 - construction progress Jigglypuff Amigurumi Pattern step 2 - assembly progress Jigglypuff Amigurumi Pattern step 3 - details and accessories Jigglypuff Amigurumi Pattern step 4 - final assembly and finishing

Switch Things Up

I love how easy it is to personalize this pattern by swapping yarn colors β€” try pastel pinks for a softer look or bright bubblegum for a playful version.

I often change the eye colors for variety; using greens, blues, or even purple for the iris gives each Jigglypuff a new personality.

To make a larger Jigglypuff, choose a bulkier yarn and a larger hook; this will produce a snuggly, plush version perfect for cuddling.

Want a mini keychain? Use fingering weight yarn and a smaller hook to create a tiny pocket-sized companion that’s great as a gift.

I sometimes embroider small blush marks or a tiny mouth instead of crocheting them to add subtle facial details and simplify finishing.

If you want posable limbs, insert thin craft wire into the arms before stuffing and closing for slight adjustability in poses.

Try adding felt accessories like a small microphone or a tiny hat glued or sewn on to create themed variations for display.

Experiment with different stuffing levels: slightly less stuffing gives a squishier, floppy look, while firmer stuffing keeps the round shape crisp and tidy.

For a more professional finish on ears, use a small amount of contrasting yarn threaded between stitches to hide any inner-ear color showing through.

I also like to make setsβ€”crochet several characters in coordinating colors to create a pocket-sized team of plushies that look great displayed together.

Common Mistakes & How to Fix Them

βœ— Not using a stitch marker for the start of rounds leads to miscounts and uneven shaping; place a marker at the first stitch of every round and move it up as you work to maintain accuracy. βœ— Overstuffing the body can distort the shape and make sewing pieces together difficult; stuff gradually with small amounts of Poly-fil and shape as you go to keep consistent firmness. βœ— Skipping stitch counts after increases and decreases can create misaligned rows; count your stitches at the end of each round, especially after any inc/dec rounds to catch errors early. βœ— Crocheting the ear layers together along the chained edge will close the ear incorrectly; join the two ear triangles along the side edges only and leave the chained edge open for proper ear shape. βœ— Pulling color-change yarns too tightly when making the poof partial rows will pucker the fabric; maintain even tension and tie off strands as instructed, then add the clean edge to hide loose ends.

Jigglypuff Amigurumi Pattern

Make your own adorable Jigglypuff amigurumi with this detailed intermediate crochet pattern. You will create a soft, round Jigglypuff complete with expressive layered eyes, tiny ears, feet, arms, and the signature poof. Clear step-by-step rounds and helpful photos guide you through shaping and assembly so you can create a neat finished piece to gift or keep.

Intermediate 5-7 Hours

Materials Needed for Jigglypuff Amigurumi Pattern

β€” Main Fabric

  • 01
    Vanna's Choice Yarn - Pink (approx 1 skein)
  • 02
    Vanna's Choice Yarn - Black (less than 1 skein)
  • 03
    Vanna's Choice Yarn - White (less than 1 skein)
  • 04
    Red Heart Super Saver Economy Yarn - Real Teal (less than 1 skein)
  • 05
    Poly-fil stuffing (as needed for body, arms, feet, and poof)

β€” Tools Required

  • 01
    Crochet hook size 5.5 mm
  • 02
    Scissors
  • 03
    Yarn needle for sewing and weaving ends
  • 04
    Stitch markers
  • 05
    Pins for assembly (optional)

Progress Tracker

0% Complete

β€” Body :

Round 1 :

Magic ring 6 [6]

Round 2 :

(inc) x 6 [12]

Round 3 :

(inc, sc 1) x 5, inc [19]

Round 4 :

(inc, sc 2) x 6, sc 1 [25]

Round 5 :

sc 1, (inc, sc 3) x 6 [31]

Round 6 :

sc 3, (inc, sc 4) x 5, inc, sc 2 [37]

Round 7 :

sc 6, (inc, sc 7, inc, sc 6) x 2, inc [42]

Round 8 :

sc 3, inc, sc 6, inc x 5, sc 3 [48]

Round 9 :

sc 5, inc, sc 8, inc, sc 9, inc x 2, sc 4 [53]

Round 10 :

sc 8, inc, (sc 9, inc, sc 10) x 2, sc 2 [58]

Round 11 :

sc 3, inc, (sc 10, inc, sc 11, inc) x 2, sc 8 [63]

Round 12 :

(sc 12, inc, sc 11, inc) x 2, sc 12, inc [68]

Round 13 :

sc 6, inc, (sc 16, inc) x 3, sc 10 [72]

Round 14 :

sc 11, inc, (sc 17, inc) x 3, sc 6 [76]

Round 15 :

sc 3, inc, (sc 24, inc) x 2, sc 22 [79]

Round 16 :

sc 18, inc, (sc 25, inc) x 2, sc 8 [82]

Round 17 :

sc 6, inc, (sc 26, inc) x 2, sc 21 [85]

Round 18 :

sc 14, inc, (sc 27, inc) x 2, sc 14 [88]

Round 19 :

sc 43, inc x 2 [90]

Round 20 :

sc 20, inc, sc 69 [91]

Round 21 :

sc 3, inc, sc 44, inc, sc 42 [93]

Round 22 :

sc 92, inc [94]

Round 23 :

sc 94 [94]

Round 24 :

sc 94 [94]

Round 25 :

sc 94 [94]

Round 26 :

dec, sc 92 [93]

Round 27 :

sc 42, dec, sc 44, dec, sc 3 [91]

Round 28 :

sc 69, dec, sc 20 [90]

Round 29 :

dec, sc 43 x 2 [88]

Round 30 :

sc 14, (dec, sc 27) x 2, dec, sc 14 [85]

Round 31 :

sc 21, (dec, sc 26) x 2, dec, sc 6 [82]

Round 32 :

sc 8, (dec, sc 25) x 2, dec, sc 18 [79]

Round 33 :

sc 22, (dec, sc 24) x 2, dec, sc 3 [76]

Round 34 :

sc 6, (dec, sc 17) x 3, dec, sc 11 [72]

β€” Body Continued :

Round 35 :

sc 10, (dec, sc 16) x 3, dec, sc 6 [68]

Round 36 :

dec, sc 12, (dec, sc 11, dec, sc 12) x 2 [63]

Round 37 :

sc 8, (dec, sc 11, dec, sc 10) x 2, dec, sc 3 [58]

Round 38 :

sc 2, (dec, sc 10, dec, sc 9) x 2, dec, sc 8 [53]

Round 39 :

sc 4, (dec, sc 9, dec, sc 8) x 2, dec, sc 5 [48]

Round 40 :

sc 3, (dec, sc 6) x 5, dec, sc 3 [42]

Round 41 :

dec, (sc 6, dec, sc 7, dec) x 2, sc 6 [37]

Round 42 :

sc 2, dec, (sc 4, dec) x 5, sc 3 [31]

Round 43 :

(sc 3, dec) x 6, sc 1 [25]

Round 44 :

sc 1, (sc 2, dec) x 6 [19]

Round 45 :

dec, dec, (sc 1, dec) x 5 [12]

Round 46 :

(dec) x 6 [6]

β€” Eyes :

Info :

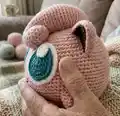
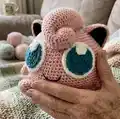
Each eye is made up of three circles: the sclera (large white circle), the iris (teal circle), and the highlight (small white circle). The circles are stacked on each other and then stitched to the body. You will need to make 2 eyes total (six circles total). Once finished and attached to the body, your amigurumi should look like Image 3.

Sclera β€” White (Round 1) :

Magic ring 6 [6]

Sclera β€” White (Round 2) :

(inc) x 6 [12]

Sclera β€” White (Round 3) :

(inc, sc 1) x 6 [18]

Sclera β€” White (Round 4) :

(sc 1, inc, sc 1) x 6 [24]

Sclera β€” White (Round 5) :

(sc 3, inc) x 6 [30]

Iris β€” Teal (Round 1) :

Magic ring 6 [6]

Iris β€” Teal (Round 2) :

(inc) x 6 [12]

Iris β€” Teal (Round 3) :

(inc, sc 1) x 6 [18]

Iris β€” Teal (Round 4) :

(sc 1, inc, sc 1) x 6 [24]

Iris β€” Teal (Round 5) :

(sc 3, inc) x 6 [30]

Highlight (Round 1) :

Magic ring 6 [6]

β€” Ears :

Info :

Each ear is made up of two triangles: the outer ear (pink) and the inner ear (black). Neither of these pieces will be crocheted in the round. Instead the piece will be turned at the end of each row. Once both triangles are finished the two will be crocheted together along the two side edges by first inserting the crochet hook through a hole along the edge of the inner ear and then through the corresponding hole along the edge in the outer ear and pulling the yarn through both and continuing along the 2 edges. Do not crochet the two triangles together along the initial chained edge; this needs to stay open for the ears to maintain the proper shape. If black yarn shows through under the pink, thread some pink yarn between the stitches to hide the black. Stuff lightly with Poly-fil before attaching.

Inner Ear β€” Black (Row 1) :

ch 7 [6]

Inner Ear β€” Black (Row 2) :

sc in second ch, sc 5, ch 1, turn [6]

Inner Ear β€” Black (Row 3) :

dec, sc 4, ch 1, turn [5]

Inner Ear β€” Black (Row 4) :

dec, sc 3, ch 1, turn [4]

Inner Ear β€” Black (Row 5) :

dec, sc 2 [3]

Outer Ear β€” Pink (Row 1) :

ch 13 [12]

Outer Ear β€” Pink (Row 2) :

sc in second ch, sc 11, ch 1, turn [12]

Outer Ear β€” Pink (Row 3) :

dec, sc 3, dec, sc 3, dec, ch 1, turn [9]

Outer Ear β€” Pink (Row 4) :

dec, sc 1, dec, sc 2, dec, ch 1, turn [6]

Outer Ear β€” Pink (Row 5) :

(dec) x 3 [3]

β€” Feet :

Round 1 :

Magic ring 7 [7]

Round 2 :

inc, (inc, sc 1) x 3 [11]

Round 3 :

inc, sc 1, inc, sc 4, inc, sc 3 [14]

Round 4 :

inc, sc 13 [15]

Round 5 :

sc 8, inc, sc 3, inc, sc 2 [17]

Round 6 :

sc 17 [17]

Round 7 :

sc 5, inc, sc 4, dec, sc 5 [17]

Round 8 :

sc 17 [17]

Round 9 :

dec, sc 9, inc, sc 5 [17]

Round 10 :

sc 9, dec, sc 6 [16]

Round 11 :

sc 12, dec, sc 2 [15]

Round 12 :

sc 4, dec, sc 3, dec, sc 4 [13]

Round 13 :

dec, sc 6, dec, sc 3 [11]

Round 14 :

(dec) x 4, sc 1, dec [6]

β€” Arms :

Info :

Each arm is made in the round and will consist of a few partial rows. After completing the third round, tie off your current strand and start a new one; each new strand will be worked into only a subset of the stitches as described in the pattern. Once complete, give the arm a clean edge by crocheting once around the outer edge (for the arms there should be 10 stitches total for the edge), stuff with Poly-fil, and attach to the body.

Round 1 :

Magic ring 5 [5]

Round 2 :

(inc, sc 1) x 2, inc [8]

Round 3 :

sc 3, inc, sc 4 [9]

Round 4 :

pr 2: sc 2, inc, sc 3 [7]

Round 5 :

pr 2: sc 5 [5]

Round 6 :

pr 2: sc 3 [3]

Round 7 :

Add clean edge

β€” Poof :

Info :

Jigglypuff's poof is constructed with a mix of full rounds and many partial rows to create curvature. Partial rows are used from row 8 onward in alternating colors to shape the poof. When you reach the end of row 7 do not cut the working strand; instead leave strands and work partial rows as described. The clean edge will be added after row 34 then the poof will be pinched and tied to form the final shape.

β€” Poof Continued :

Row 1 :

Magic ring 6 [6]

Row 2 :

(inc) x 5, sc 1 [11]

Row 3 :

(sc 2, inc) x 3, sc 1, inc [15]

Row 4 :

sc 3, inc, sc 7, inc, sc 3 [17]

Row 5 :

sc 8, dec, sc 7 [16]

Row 6 :

dec, sc 3, dec, sc 4, dec, sc 3 [13]

Row 7 :

dec, sc 1, dec, dec, sc 1, dec [8]

Row 8 :

pr 3: inc, sc 2, inc [6]

Row 9 :

sc 10 [10]

Row 10 :

pr 4: sc 5 [5]

Row 11 :

sc 10 [10]

Row 12 :

sc 4, inc, sc 5 [11]

Row 13 :

inc, sc 10 [12]

Row 14 :

pr 6: sc 6 [6]

Row 15 :

sc 3, inc, sc 5, inc [14]

Row 16 :

pr 7: sc 7 [7]

Row 17 :

sc 1, inc, sc 6, inc, sc 5 [16]

Row 18 :

sc 6, inc, sc 6, inc, sc 1 [18]

Row 19 :

sc 3, inc, sc 8, inc, sc 5 [20]

Row 20 :

pr 3: sc 18 [18]

Row 21 :

pr 1: sc 8, inc, sc 9 [19]

Row 22 :

pr 1: sc 4, inc, sc 14 [20]

Row 23 :

pr 1: sc 20 [20]

Row 24 :

pr 1: sc 20 [20]

Row 25 :

pr 1: sc 20 [20]

Row 26 :

pr 1: sc 8, dec, sc 10 [19]

Row 27 :

pr 1: sc 12, dec, sc 5 [18]

Row 28 :

pr 1: sc 5, dec, sc 11 [17]

Row 29 :

pr 1: sc 4, dec, sc 5, dec, sc 4 [15]

Row 30 :

pr 1: sc 6, dec, sc 7 [14]

Row 31 :

pr 1: sc 8, dec, sc 4 [13]

Row 32 :

pr 1: sc 3, dec, sc 3, dec, sc 3 [11]

Row 33 :

pr 1: sc 5, dec, sc 4 [10]

Row 34 :

pr 1: sc 2, dec, sc 2, dec, sc 2 [8]

Row 35 :

Add clean edge

Assembly Instructions

  • Layer the sclera (white), then the teal iris, and finally the small white highlight; stack and stitch the three circles together and sew each finished eye to the body in the positions shown in Image 3.
  • Join the inner (black) and outer (pink) ear triangles along the two side edges by inserting the hook through corresponding holes and slip stitching or whipstitching along the sides, leaving the chained edge open; stuff lightly and sew ears to the top of the head.
  • Attach arms to the sides of the body at the desired placement (reference Image 1 for pictured placement), angle slightly forward if desired, and sew securely with a yarn needle.
  • Sew the feet to the bottom of the body spaced evenly for balance and stability; flatten the bottom of each foot if needed so the finished amigurumi sits properly.
  • Pin the poof edge to the front/top of the head, weave a small segment of yarn through the poof edge to pinch it into shape, tie tight, stuff as needed, tuck the edge under, and securely sew the poof to the head.

Important Notes

  • πŸ’‘Use stitch markers to mark the beginning of rounds to avoid losing track during increases and decreases.
  • πŸ’‘Stuff the body gradually and evenly, shaping as you go to avoid lumps and maintain a smooth round shape.
  • πŸ’‘Pin pieces in place before sewing to confirm placement and symmetry, especially the eyes and ears.

This Jigglypuff amigurumi pattern is a joyful project that results in a squeezably soft, cheerful companion you can keep or gift. It blends classic amigurumi rounds with a playful poof construction and layered eyes for personality. Have fun experimenting with colors and small details to make your Jigglypuff uniquely yours. 🧢😊✨

You ask,

we answer.

FAQs

What size will the finished piece be?

The finished amigurumi measures approximately six inches tall when using the recommended yarn and 5.5 mm hook and working at the same tension as the pattern.

Can I use different yarn weights for this pattern?

Yes, you can use different yarn weights but this will change the final size; switch to an appropriate hook size for the yarn you choose and be aware that eyes and details will scale differently.

Do I need prior crochet experience for this pattern?

This pattern is rated intermediate; basic knowledge of single crochet, increases, decreases, working in the round, and reading stitch patterns is recommended.

How long does this project typically take to complete?

Most crocheters finish this project in about 5-7 hours, though time will vary with experience level, yarn choice, and how much finishing and detailing you do.