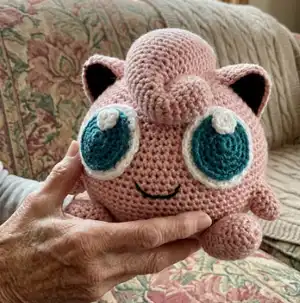
Make your very own Jigglypuff in amigurumi form with this friendly intermediate crochet pattern. You will create a soft, round body, adorable eyes, delicate ears, little feet and arms, plus the signature poof detail. Clear step-by-step rounds and helpful photos guide you through shaping, assembly, and finishing touches to make a lovable handmade companion.
Progress Tracker
0% Complete
— Body :
Round 1 :
Magic ring 6 [6]
Round 3 :
(inc, sc 1) x 6 [18]
Round 4 :
(inc, sc 2) x 6 [24]
Round 5 :
sc 1, (inc, sc 3) x 6 [30]
Round 6 :
sc 3, (inc, sc 4) x 6 [36]
Round 7 :
sc 6, (inc, sc 7) x 2, inc, sc 1 [42]
Round 8 :
sc 3, (inc, sc 6) x 5, sc 3 [48]
Round 9 :
sc 5, (inc, sc 8, inc, sc 9) x 2, sc 4 [53]
Round 10 :
sc 8, inc, (sc 9, inc, sc 10, inc) x 2, sc 2 [58]
Round 11 :
sc 3, inc, (sc 10, inc, sc 11, inc) x 2, sc 8 [63]
Round 12 :
sc 12, inc, sc 11, inc x2, sc 12, inc [68]
Round 13 :
sc 6, inc, (sc 16, inc) x 3, sc 10 [72]
Round 14 :
sc 11, inc, (sc 17, inc) x 3, sc 6 [76]
Round 15 :
sc 3, inc, (sc 24, inc) x 2, sc 22 [79]
Round 16 :
sc 18, inc, (sc 25, inc) x 2, sc 8 [82]
Round 17 :
sc 6, inc, (sc 26, inc) x 2, sc 21 [85]
Round 18 :
sc 14, inc, (sc 27, inc) x 2, sc 14 [88]
Round 19 :
(sc 43, inc) x 2 [90]
Round 20 :
sc 20, inc, sc 69 [91]
Round 21 :
sc 3, inc, sc 44, inc, sc 42 [93]
Round 22 :
sc 92, inc [94]
Round 26 :
dec, sc 92 [93]
Round 27 :
sc 42, dec, sc 44, dec, sc 3 [91]
Round 28 :
sc 69, dec, sc 20 [90]
Round 29 :
(dec, sc 43) x 2 [88]
Round 30 :
sc 14, (dec, sc 27) x 2, dec, sc 14 [85]
Round 31 :
sc 21, (dec, sc 26) x 2, dec, sc 6 [82]
Round 32 :
sc 8, (dec, sc 25) x 2, dec, sc 18 [79]
Round 33 :
sc 22, (dec, sc 24) x 2, dec, sc 3 [76]
Round 34 :
sc 6, (dec, sc 17) x 3, dec, sc 11 [72]
— Body Continued :
Round 35 :
sc 10, (dec, sc 16) x 3, dec, sc 6 [68]
Round 36 :
dec, sc 12, (dec, sc 11, dec, sc 12) x 2 [63]
Round 37 :
sc 8, (dec, sc 11, dec, sc 10) x 2, dec, sc 3 [58]
Round 38 :
sc 2, (dec, sc 10, dec, sc 9) x 2, dec, sc 8 [53]
Round 39 :
sc 4, (dec, sc 9, dec, sc 8) x 2, dec, sc 5 [48]
Round 40 :
sc 3, (dec, sc 6) x 5, dec, sc 3 [42]
Round 41 :
dec, (sc 6, dec, sc 7, dec) x 2, sc 6 [37]
Round 42 :
sc 2, dec, (sc 4, dec) x 5, sc 3 [31]
Round 43 :
(sc 3, dec) x 6, sc 1 [25]
Round 44 :
sc 1, (sc 2, dec) x 6 [19]
Round 45 :
dec, dec, (sc 1, dec) x 5 [12]
— Eyes :
Info :
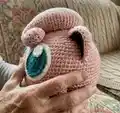
Each eye is made up of three circles: the sclera (large white circle), the iris (teal circle), and the highlight (small white circle). Stack the circles and stitch to the body. Make two eyes total (six circles total).
Sclera—White Round 1 :
Magic ring 6 [6]
Sclera—White Round 2 :
(inc) x 6 [12]
Sclera—White Round 3 :
(inc, sc 1) x 6 [18]
Sclera—White Round 4 :
(sc 1, inc, sc 1) x 6 [24]
Sclera—White Round 5 :
(sc 3, inc) x 6 [30]
Iris—Teal Round 1 :
Magic ring 6 [6]
Iris—Teal Round 2 :
(inc) x 6 [12]
Iris—Teal Round 3 :
(inc, sc 1) x 6 [18]
Iris—Teal Round 4 :
(sc 1, inc, sc 1) x 6 [24]
Highlight Round 1 :
Magic ring 6 [6]
— Ears :
Info :
Each ear consists of two triangles: the outer ear (pink) and the inner ear (black). Neither triangle is crocheted in the round; pieces are worked in rows and turned. After both triangles are finished, crochet them together along the two side edges, leaving the initial chained edge open so the ear maintains shape. Use a yarn needle to hide any black showing through with pink yarn if needed. Stuff lightly with Poly-fil before attaching.
Inner Ear—Black Round 1 :
ch 7 [6]
Inner Ear—Black Round 2 :
sc in second ch, sc 5, ch 1, turn [6]
Inner Ear—Black Round 3 :
dec, sc 4, ch 1, turn [5]
Inner Ear—Black Round 4 :
dec, sc 3, ch 1, turn [4]
Inner Ear—Black Round 5 :
dec, sc 2 [3]
Outer Ear—Pink Round 1 :
ch 13 [12]
Outer Ear—Pink Round 2 :
sc in second ch, sc 11, ch 1, turn [12]
Outer Ear—Pink Round 3 :
dec, sc 3, dec, sc 3, dec, ch 1, turn [9]
Outer Ear—Pink Round 4 :
dec, sc 1, dec, sc 2, dec, ch 1, turn [6]
Outer Ear—Pink Round 5 :
(dec) x 3 [3]
— Feet :
Round 1 :
Magic ring 7 [7]
Round 2 :
inc, (inc, sc 1) x 3 [11]
Round 3 :
inc, sc 1, inc, sc 4, inc, sc 3 [14]
Round 5 :
sc 8, inc, sc 3, inc, sc 2 [17]
Round 7 :
sc 5, inc, sc 4, dec, sc 5 [17]
Round 9 :
dec, sc 9, inc, sc 5 [17]
Round 10 :
sc 9, dec, sc 6 [16]
Round 11 :
sc 12, dec, sc 2 [15]
Round 12 :
sc 4, dec, sc 3, dec, sc 4 [13]
Round 13 :
dec, sc 6, dec, sc 3 [11]
Round 14 :
(dec) x 4, sc 1, dec [6]
— Arms :
Info :
Each arm is made in the round and will include a few partial rows. After round 3, tie off the current strand and start new strands in specific stitches to create color/strand sections. Add a clean edge around the outer edge, stuff with Poly-fil, and attach to the body. Each arm should have 10 stitches total along the clean edge.
Round 1 :
Magic ring 5 [5]
Round 2 :
(inc, sc 1) x 2, inc [8]
Round 3 :
sc 3, inc, sc 4 [9]
Round 4 :
pr 2: sc 2, inc, sc 3 [7]
Round 7 :
Add clean edge (crochet once around outer edge to make 10 stitches)
— Poof :
Info :
The poof is constructed using a combination of full rounds and partial rows. Start crocheting in the round and when you reach the end of round 7 do not cut the strand; leave it and continue with partial rows for teal sections. Row 8 is the first teal partial row. For rows 20 to 34 work in partial rows and start a new strand for each row to maintain consistent stitch texture with the body.
Poof Round 1 :
Magic ring 6 [6]
Poof Round 2 :
(inc) x 5, sc 1 [11]
Poof Round 3 :
(sc 2, inc) x 3, sc 1, inc [15]
Poof Round 4 :
sc 3, inc, sc 7, inc, sc 3 [17]
Poof Round 5 :
sc 8, dec, sc 7 [16]
Poof Round 6 :
dec, sc 3, dec, sc 4, dec, sc 3 [13]
Poof Round 7 :
dec, sc 1, dec, sc 1, dec, sc 1, dec [8]
Poof Row 8 :
pr 3: inc, sc 2, inc [6]
Poof Row 10 :
pr 4: sc 5 [5]
Poof Row 12 :
sc 4, inc, sc 5 [11]
Poof Row 13 :
inc, sc 10 [12]
Poof Row 14 :
pr 6: sc 6 [6]
Poof Row 15 :
sc 3, inc, sc 5, inc [14]
Poof Row 16 :
pr 7: sc 7 [7]
Poof Row 17 :
sc 1, inc, sc 6, inc, sc 5 [16]
Poof Row 18 :
sc 6, inc, sc 6, inc, sc 1 [18]
Poof Row 19 :
sc 3, inc, sc 8, inc, sc 5 [20]
Poof Row 20 :
pr 3: sc 18 [18]
Poof Row 21 :
pr 1: sc 8, inc, sc 9 [19]
Poof Row 22 :
pr 1: sc 4, inc, sc 14 [20]
Poof Row 23 :
pr 1: sc 20 [20]
Poof Row 24 :
pr 1: sc 20 [20]
Poof Row 25 :
pr 1: sc 20 [20]
Poof Row 26 :
pr 1: sc 8, dec, sc 10 [19]
Poof Row 27 :
pr 1: sc 12, dec, sc 5 [18]
Poof Row 28 :
pr 1: sc 5, dec, sc 11 [17]
Poof Row 29 :
pr 1: sc 4, dec, sc 5, dec, sc 4 [15]
Poof Row 30 :
pr 1: sc 6, dec, sc 7 [14]
Poof Row 31 :
pr 1: sc 8, dec, sc 4 [13]
Poof Row 32 :
pr 1: sc 3, dec, sc 3, dec, sc 3 [11]
Poof Row 33 :
pr 1: sc 5, dec, sc 4 [10]
Poof Row 34 :
pr 1: sc 2, dec, sc 2, dec, sc 2 [8]
Poof Row 35 :
Add clean edge
— Closing Thoughts and Finish :
Info :
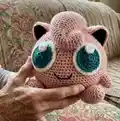
After completing the poof add a clean edge and tie a small segment of yarn to pinch the poof in front and back to match the photo references. Stuff the poof and attach to the body, tucking the clean edge under to create a rounder shape. Attach eyes (stacked circles), ears, feet, and arms in positions shown in images; weave in ends, and adjust stuffing as needed.
This cute Jigglypuff amigurumi pattern brings a beloved Pokemon to life with a charming round body, layered eyes, and a fluffy poof. It is a delightful project to make for gifts or to add to your handmade collection. Have fun stitching and sharing your creations! 🧶😊