๐Ÿงถ Beautiful โœจ Detailed ๐Ÿ’ Adorable

Hulk Amigurumi Pattern

Hulk Amigurumi Pattern
4.1โ˜… Rating
2-4 Hours Time Needed
1.9K Made This
โœ‚๏ธ

Beginner Friendly Level

Perfect for those just starting their crochet journey, with clear instructions and simple techniques

โฑ๏ธ

Bite-Sized Project

Finishes in 2-4 hoursโ€”perfect for an afternoon of creative relaxation.

๐Ÿงธ

Cute Companion

An adorable friend to cherish, handcrafted with love to bring comfort and joy for years to come.

About This Hulk Amigurumi Pattern

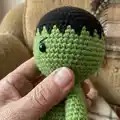
This pattern creates a small, adorable Hulk-inspired amigurumi approximately 13 cm tall using YarnArt Jeans and a 2.0 mm hook. The toy features color-changed hair, a green body, purple shorts, and embroidered eyebrows for personality. Instructions are written in continuous rounds with clear counts and finishing steps for easy assembly.

Hulk Amigurumi Pattern crochet pattern - detailed view of completed project

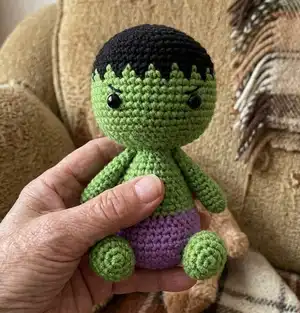
Ideal for makers with basic crochet skills, this pattern includes every round and placement notes for safety eyes and limbs. The finished doll is compact and perfect for gifting or displaying.

Why You'll Love This Hulk Amigurumi Pattern

I absolutely love this pattern because it balances simplicity with charming details that bring the character to life. I enjoy the color-change technique used for the hair edge โ€” it creates a cute jagged hairline that adds personality. The small size makes it a satisfying quick project I can finish in an afternoon. I also appreciate how the pattern uses simple shaping to form a tidy, stable body and head.

Hulk Amigurumi Pattern step 1 - construction progress Hulk Amigurumi Pattern step 2 - assembly progress Hulk Amigurumi Pattern step 3 - details and accessories Hulk Amigurumi Pattern step 4 - final assembly and finishing

Switch Things Up

I love customizing this pattern to create different characters by changing colors; try pastel shades for a softer, cuter version or bold colors for a superhero collection.

I often change yarn weight and hook size to make a tiny keychain version or a larger cuddly doll; using thicker yarn with a larger hook creates a chunky toy.

I add embroidered details like freckles or a tiny mouth to change the expression and personality of each amigurumi I make.

For eyes, you can swap safety eyes for stitched eyes or tiny buttons for a different look and to make it safer for babies.

Try adding tiny crocheted accessories like a cape, belt, or little shorts in contrasting colors to personalize your character.

I sometimes stuff with firmer material for a stable toy or softer stuffing for a plushier feel depending on how I plan to use it.

Embroider different eyebrow shapes or add a little blush with yarn or fabric paint to change the mood of the face.

If you want posable limbs, consider adding thin wire inside the arms and legs before stuffing to allow gentle posing.

Mix yarn texturesโ€”cotton gives a neat finish while acrylic is squishier; use what feels best for your finished piece.

Make a whole set in various colors and sizes to create a family of little characters that display well together.

I also switch up the hair detail by altering the number of alternating color rounds to make spikes or a smoother hairline.

Finally, experiment with placement of the eyes and spacing to create different facial proportionsโ€”move them up, down, or closer together for variety.

Common Mistakes & How to Fix Them

โœ— Skipping the stitch marker while working in spiral rounds causes you to lose the beginning of the round; use a stitch marker at the first stitch of every round to maintain accurate counts. โœ— Stuffing too late or unevenly results in lumps and misshapen parts; stuff gradually and firmly as you work to keep the shape smooth and even. โœ— Changing colors without catching yarn ends can create loose loops and messy edges; loop the new color over the hook and pull through both loops to secure a clean color change. โœ— Not aligning openings before sewing arms or legs makes parts stick out or tilt; press the opening together aligning three stitches side by side and check placement before sewing firmly.

Hulk Amigurumi Pattern

Create a cute, pocket-sized Hulk amigurumi with this easy-to-follow crochet pattern. You will make a 13 cm tall plush toy using simple single crochet rounds, color changes and basic shaping. Perfect for gifts or a fun weekend make, this pattern guides you through every round and assembly step so you can crochet with confidence.

Beginner Friendly 2-4 Hours

Materials Needed for Hulk Amigurumi Pattern

โ€” Main Fabric

  • 01
    Yarn: green, purple and black colors (I used YarnArt Jeans yarn)
  • 02
    Any size yarn may be used but follow the yarn label hook suggestion for best size results
  • 03
    Use small amounts of each color (green for body, purple for shorts, black for hair) โ€” enough to complete a 13 cm amigurumi

โ€” Tools Required

  • 01
    Crochet hook Clover Soft Touch 2.00 mm
  • 02
    8 mm black safety eyes (2 pieces)
  • 03
    Toys filler (polyester stuffing)
  • 04
    Black thin thread for eyebrows
  • 05
    Scissors
  • 06
    Tapestry needle
  • 07
    Pins for assembly
  • 08
    Stitch marker

Progress Tracker

0% Complete

โ€” General Info :

Info :

Skill level -easy. Pattern does not contain crochet tutorials! You should have basic crochet skills. Approx.13cm (about 5.1 inches) tall using the materials stated in the pattern. You may use any size yarn for this amigurumi, just make sure to use the hook size suggestion on the yarn label. Use safety eyes that are a suitable size for the yarn you are using.

Infos :

Terms used: MR -magic ring. sc-single crochet. ch-chain stitch. slst-slip stitch. blo-through back loops only. inc-increase (stitch 2 times into the next stitch). dec -invisible decrease (crochet 2 sc together using invisible method). hdc -half double crochet. (...)xn -repeat instructions in brackets n times. R -round.

Infos :

Change colors in crochet. Loop your new yarn color over your hook. Crochet your new yarn color back through the two loops on your hook.

Infos :

Notes: -Crochet continuously in a spiral, unless otherwise specified. -In order to not lose track of the number of worked stitches in each round, use a stitch marker to mark the beginning of each round -a thin thread of contrasting color. -Crochet tightly enough so the filler is not visible through the holes between loops. -Tightly and gradually fill all the details of the toy in the process of crocheting. -Size of the finished toy can vary depending on the materials used, the density of crocheting and filling, etc.

โ€” Body + head :

Info :

Stuff body and head firmly, stuffing as you go.

Info :

Start working with purple yarn.

Round 1 :

6 scMR (6)

Round 2 :

6 inc(12)

Round 3 :

(1 sc, inc)x6 (18)

Round 4 :

(2 sc, inc)x6 (24)

Round 5 :

(3 sc, inc)x6 (30)

Round 6 :

(4 sc, inc)x6 (36)

Round 7 :

(5 sc, inc)x6 (42)

Round 8-10 :

42 sc (3 rounds) (42)

Round 11 :

(5 sc, dec)x6 (36)

Round 12 :

36 sc (36)

Round 13 :

36 hdc (36)

Info :

Continue on with green.

Round 14 :

(4 sc, dec)x6 (30)

Round 15 :

30 sc (30)

Round 16 :

(13 sc, dec)x2 (28)

Round 17 :

28 sc (28)

Round 18 :

(12 sc, dec)x2 (26)

Round 19 :

26 sc (26)

Round 20 :

(11 sc, dec)x2 (24)

Round 21 :

24 sc (24)

Round 22 :

(2 sc, dec)x6 (18)

Round 23 :

18 sc (18)

Info :

Cut the yarn. Stuff the body firmly.

โ€” Arm x2 :

Info :

Crochet withgreen.

Round 1 :

6 sc MR(6)

Round 2 :

(2 sc, inc)x2 (8)

Round 3-8 :

8 sc (8)

Info :

Stuff only half of the arms.

Round 9-13 :

8 sc (8)

Info :

Do not stuff of the arms. This way the arm doesn't stick out too much after sewing it to the body. Press the opening with your fingers, aligning 3 stitches side by side. Break the yarn and leave a long tail to sew arms to body.

โ€” Head :

Info :

Crochet with black yarn.

Round 1 :

6 sc MR(6)

Round 2 :

6 inc(12)

Round 3 :

(1 sc, inc)x6 (18)

Round 4 :

(2 sc, inc)x6 (24)

Round 5 :

(3 sc, inc)x6 (30)

Round 6 :

(4 sc, inc)x6 (36)

Round 7 :

(5 sc, inc)x6 (42)

Round 8 :

(6 sc, inc)x6 (48)

Round 9 :

(7 sc, inc)x6 (54)

Round 10-11 :

54 sc (2 rounds)(54)

Info :

In the next 12 and 13 rounds we will alternate green and black colors.

Round 12 :

(green 1 sc, black 2 sc)x18 (54)

Round 13 :

(green 2 sc, black 1 sc)x18 (54)

Info :

Continue on with green.

Round 14-19 :

54 sc (6 rounds)(54)

Round 20 :

(7 sc, dec)x6 (48)

Round 21 :

(6 sc, dec)x6 (42)

Info :

Place safety eyes between rounds 16 and 17, 11 stapart.

Round 22 :

(5 sc, dec)x6 (36)

Round 23 :

(4 sc, dec)x6 (30)

Round 24 :

(3 sc, dec)x6 (24)

Info :

Start to stuff the head.

Round 25 :

(2 sc, dec)x6 (18)

Round 26 :

Only through back loops, (1 sc, dec)x6 (12)

Round 27 :

6 dec. Leave the thread for sewing.

โ€” Leg x2 :

Info :

Start working with green yarn.

Round 1 :

6 sc MR(6)

Round 2 :

6 inc(12)

Round 3 :

inc, 3 sc, 3 inc, 3 sc, 2 inc(18)

Round 4 :

7 sc, 3 inc, 8 sc (21)

Round 5 :

Only through back loops, 21 sc (21)

Round 6 :

7 sc, 3 dec, 8 sc (18)

Round 7 :

4 sc, 4 dec, 6 sc (14)

Round 8 :

2 sc, 4 dec, 4 sc (10)

Round 9 :

(3 sc, dec)x2 (8)

Info :

Stuff only half of the legs.

Round 10-15 :

8 sc(6 rounds) (8)

Round 16 :

Only 5 sc. Do not stuff of the legs. Press the opening with your fingers, aligning 3 stitches side by side. Break the yarn and leave a long tail.

โ€” Finishing :

Info :

Sew the head to the body.

Info :

Sew the legs to the body.

Info :

Sew the arms to the body symmetrically.

Info :

Embroider eyebrows.

Assembly Instructions

  • Sew the head to the top opening of the body using the long tail left from Round 27; secure with a ladder stitch and weave in thread.
  • Attach each arm to the sides of the body aligning with the arm openings, press the opening aligning 3 stitches side by side and sew firmly so the arm does not stick out.
  • Position and sew legs to the bottom of the body using the long tails left from the leg rounds; space them evenly for stability and balance.
  • Place safety eyes between rounds 16 and 17 of the head, 11 stitches apart, before stuffing the head fully and closing the final rounds.
  • Embroider thin black eyebrows with black thread above the eyes for expression, and weave in all ends securely.

Important Notes

  • ๐Ÿ’กCrochet continuously in a spiral unless otherwise specified to avoid visible seams.
  • ๐Ÿ’กUse a stitch marker to mark the beginning of each round so you do not lose track of stitch counts.
  • ๐Ÿ’กStuff gradually and firmly while crocheting the head and body so the shape remains smooth and filler is not visible.

This adorable Hulk amigurumi pattern is perfect for a quick and satisfying crochet make that packs a lot of charm into a small size. ๐Ÿงถ Make it for a friend, a child, or keep it as a cute collectible on your shelf. The pattern uses simple rounds, a fun color-change hair detail, and clear finishing steps to bring your tiny hero to life. โœจ

You ask,

we answer.

FAQs

What size will the finished piece be?

The finished amigurumi measures approximately 13 cm (about 5.1 inches) tall when using the recommended yarn and 2.0 mm hook.

Can I use a different yarn weight or hook?

Yes, you can use different yarn weights and adjust the hook accordingly, but this will change the final size. Follow gauge and try a small test to ensure the look you want.

Where should I place the safety eyes?

Place the safety eyes between rounds 16 and 17 on the head, spaced 11 stitches apart, before you finish stuffing and closing the head.

Do I need prior crochet experience for this pattern?

This pattern is rated beginner friendly and requires basic crochet skills like single crochet, increases, decreases, and working in the round.