๐Ÿงถ Beautiful โœจ Detailed ๐Ÿ’ Adorable

Horizon Fingerless Gloves Amigurumi Pattern

Horizon Fingerless Gloves Amigurumi Pattern
4.8โ˜… Rating
2-4 Hours Time Needed
1.1K Made This
โœ‚๏ธ

Intermediate Level

Ideal for those with basic crochet experience, featuring slightly more advanced stitches and techniques to expand your skills.

โฑ๏ธ

Bite-Sized Project

Finishes in 2-4 hoursโ€”perfect for an afternoon of creative relaxation.

๐Ÿงฃ

Snug Essential

Everyday comfort with practical charm, designed for both functionality and style through changing seasons.

About This Horizon Fingerless Gloves Amigurumi Pattern

This pattern creates a single-size pair of Horizon Fingerless Gloves featuring a ribbed cuff and decorative bobble stitch bands. You will work a flat rib cuff, join it to form a wrist tube, then crochet around to create the body and thumbhole. The design uses aran weight yarn and contrast colors for striking bobble rows.

Horizon Fingerless Gloves Amigurumi Pattern crochet pattern - detailed view of completed project

Written in US crochet terms with photos to guide key steps. The pattern includes instructions for both right and left gloves and finishing tips.

Why You'll Love This Horizon Fingerless Gloves Amigurumi Pattern

I absolutely love this pattern because it combines simple ribbing with playful bobble texture to create a glove that's both practical and stylish. I enjoy how the contrast color bobbles pop against the main color, giving each pair personality. The cuff construction is clever and creates a comfortable fit that stays in place. I also love that the pattern is quick to make, so you can create multiple color variations in an afternoon. Sharing finished pairs always brings a smileโ€”these are perfect for gifting.

Horizon Fingerless Gloves Amigurumi Pattern step 1 - construction progress Horizon Fingerless Gloves Amigurumi Pattern step 2 - assembly progress Horizon Fingerless Gloves Amigurumi Pattern step 3 - details and accessories Horizon Fingerless Gloves Amigurumi Pattern step 4 - final assembly and finishing

Switch Things Up

I love customizing these gloves by changing the contrast bobble colors; try two bold shades for a modern look or soft pastels for a gentle finish.

I sometimes use bulky yarn and a larger hook to create a chunkier, snugger pair that works great for colder weather.

To make mini keychain or bag charm versions, use thinner yarn and a smaller hook to scale the pattern down beautifully.

I often embroider small initials or tiny motifs above the thumbhole for a personalized giftโ€”simple backstitch embroidery works great on these stitches.

For a different texture, replace bobble rows with puff stitches or popcorns to experiment with how the pattern sits on the hand.

If you want longer gloves, extend the number of repeat rows before the thumbhole to cover more of the hand or wrist.

Try adding a small crocheted button and loop at the thumbhole edge for a decorative closure or to hold small folds in place.

I occasionally add a thin elastic thread through the cuff after finishing to make the cuff extra secure without changing the look.

Mix fibers for visual interestโ€”pair a slightly shiny contrast color with a matte main color to make the bobbles pop.

I recommend practicing the bobble stitch on a small swatch first so you can adjust tension and color changes comfortably before starting the full glove.

Common Mistakes & How to Fix Them

โœ— Using a larger hook for the cuff can make it loose and cause the glove to slip; use the recommended 5mm hook or the optional 4mm/4.5mm for a firmer cuff. โœ— Forgetting to join rounds correctly leads to an uneven seam and mismatched stitch counts; always join to the top of the first stitch indicated and place a marker to mark the start of round. โœ— Not cutting contrast color ends as you finish each CC band can create bulky joins; cut each contrast color when you are finished with it and leave a tail for weaving in neatly. โœ— Skipping the slip stitch join through front loop only when forming the cuff can change the cuff edge; be sure to slip stitch the front loop of row 25 and the adjacent loop of the starting chain row as instructed. โœ— Pulling bobble stitch loops too tightly or too loosely can change the bobble appearance; work bobble stitches with consistent tension and practice the bobble technique on a swatch first.

Horizon Fingerless Gloves Amigurumi Pattern

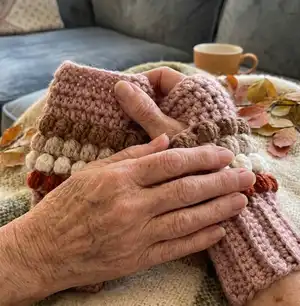
Make a stylish pair of Horizon Fingerless Gloves with bobble stitch detail and a cosy ribbed cuff. This pattern is written in US terms and guides you through cuff construction, bobble rows, and thumbhole shaping for both right and left hands. Perfect for gifting or keeping your hands warm while keeping fingers free. Clear step-by-step instructions and photos help you every stitch of the way.

Intermediate 2-4 Hours

Materials Needed for Horizon Fingerless Gloves Amigurumi Pattern

โ€” Main Fabric

  • 01
    Aran weight (10-12 ply) yarn, approximately 100 meters for main color (MC)
  • 02
    Contrast colors (CC) - 4 colors, approximately 10 meters each (similar weight to MC)

โ€” Tools Required

  • 01
    Crochet hook size 5mm
  • 02
    Optional crochet hook size 4mm or 4.5mm for a firmer cuff
  • 03
    Tapestry needle

Progress Tracker

0% Complete

โ€” Notes :

Info :

Thank you for downloading my pattern. The pattern is one size only and is written in US terms. Please feel free to share your finished creations on Instagram, tagging @littlegoldennook. Please don't sell, change or claim this pattern as your own

โ€” Materials :

Info :

Approximately 100 meters Aran weight/10-12ply yarn for main color. 10 meters each of 4 contrast colors (similar weight). 5mm hook. Tapestry needle.

โ€” Stitches :

Infos :

Ch sp: chain space. Ss: slip stitch. Sc: single crochet. HDC: Half double crochet. Scblo: single crochet in back loop of stitch only. Bobble stitch or dc4tog - yarn over, insert into stitch, yarn over and pull up a loop, yarn over and pull through two loops, repeat 4 times until you have 5 loops on the hook, then yarn over and pull through all 5 loops. Bobble stitch in contrast color - With MC still on your hook, YO with CC, insert hook into stitch, draw up a loop of CC, YO and pull through 2 loops, repeat 3 times until you have 4 CC loops and one MC loop on your hook, YO with MC and pull through all 5 loops. See Horizon video on my instagram

โ€” Cuff :

Info :

Optional: use a smaller 4 or 4.5mm hook for the cuff if you like (I didn't)

Round 1 :

With MC (main color) chain 11. Row 1: Sc in 2nd chain from the hook and in each chain to end, ch 1, turn (10)

Round 2 :

Row 2: scblo in first stitch, scblo in each stitch to end, ch 1, turn (10)

Round 3 - 25 :

Row 3 - 25: repeat row 2 (10)

Info :

Join ends of your wrist cuff by slip stitching through front loop only of row 25 and adjacent loop of starting chain row. Once joined, turn wrist cuff inside out to what is now the outside of the glove, using same loop insert hook (with right side facing) and chain 1. You are now ready to crochet your first row around the top of the cuff.

โ€” Body :

Round 1 :

Row 1: sc in same place as you last chained 1 from, sc in the top of each rib row around the cuff (sc in protruding rib and in inverted rib), sc in base of starting chain, join to 1st sc with ss, ch 1 do not turn (26)

Round 2 :

Row 2: sc with MC, bobble with CC, *sc with MC, bobble with CC*, repeat ** around finishing with bobble w CC, join to top of 1st sc with ss, ch 1 (26)

Round 3 :

Row 3: (with MC) 1 sc in each stitch around, join to top of 1st sc with ss, ch 1, 26

Round 4 :

Row 4: start with a *bobble stitch with CC, sc with MC*, repeat ** around finishing with sc w MC, join to top of 1st bobble stitch with ss, ch 1 (26)

Round 5 :

Row 5: repeat row 3

Round 6 :

Row 6: repeat row 2

Round 7 :

Row 7: repeat row 3

Round 8 :

Row 8: repeat row 4

Info :

Cut each CC when you are finished with it, leaving an end for weaving in later

Round 9 :

Row 9: thumb hole row 1 hdc in each stitch around to last 4 stitches, chain 4, join to top of 1st hdc with ss, ch 1 (26)

Round 10 :

Row 10: 1 hdc in each stitch around including 1 in each chain space, join to top of 1st hdc with ss, ch 1 (26)

Round 11-12 :

Row 11-12: 1 hdc in each stitch around, join to top of 1st hdc with ss, ch 1 (26)

Round 13 :

Row 13: ss in each stitch around, fasten off

โ€” Left Hand Glove :

Info :

Make cuff the same as right hand

Round 1 :

Row 1: sc in same place as you last chained 1 from, sc in the top of each rib row around the cuff (sc in protruding rib and in inverted rib), sc in base of starting chain, join to 1st sc with ss, ch 1 do not turn (26)

Round 2 :

Row 2: sc with MC, bobble with CC, *sc with MC, bobble with CC*, repeat ** around finishing with bobble w CC, join to top of 1st sc with ss, ch 1 (26)

Round 3 :

Row 3: (with MC) 1 sc in each stitch around, join to top of 1st sc with ss, ch 1, 26

Round 4 :

Row 4: start with a *bobble stitch with CC, sc with MC*, repeat ** around finishing with sc w MC, join to top of 1st bobble stitch with ss, ch 1 (26)

Round 5 :

Row 5: repeat row 3

Round 6 :

Row 6: repeat row 2

Round 7 :

Row 7: repeat row 3

Round 8 :

Row 8: repeat row 4

Round 9 :

Row 9: thumb hole row 1 hdc, chain 4, skip 4 stitches, 1 hdc in next stitch and in remaining stitches, join to top of 1st hdc with ss, ch 1 (26)

Round 10 :

Row 10: 1 hdc in each stitch around including 1 in each chain space, join to top of 1st hdc with ss, ch 1 (26)

Round 11-12 :

Row 11-12: 1 hdc in each stitch around, join to top of 1st hdc with ss, ch 1 (26)

Round 13 :

Row 13: ss in each stitch around, fasten off

โ€” Finishing Off :

Info :

Weave in all MC and CC ends securely... ..and voila, enjoy wearing your fun cosy gloves!

Assembly Instructions

  • Join the cuff ends by slip stitching through the front loop only of row 25 and the adjacent loop of the starting chain row to create a neat wrist tube.
  • Turn the joined cuff inside out so the outside of the glove faces out, insert your hook into the same loop used for joining (with right side facing) and chain 1 to begin crocheting around the cuff top.
  • Work the body rows with MC and add bobble stitches in CC as directed, cutting each contrast color when finished with it and leaving ends for weaving in later.
  • Create the thumb hole row by chaining 4 where indicated, then join and continue working hdc rounds to build up the thumb opening and the rest of the hand section.
  • Weave in all MC and CC ends securely with a tapestry needle to finish and tidy all color changes before wearing.

Important Notes

  • ๐Ÿ’กUse the optional smaller 4mm or 4.5mm hook for a firmer cuff if you prefer a snugger fit around the wrist.
  • ๐Ÿ’กCut each contrast color (CC) after completing its bobble band and leave a tail for weaving in to avoid bulky joins.
  • ๐Ÿ’กTurn the cuff inside out after joining to ensure your first round is worked from the correct side and the cuff edge looks neat.
  • ๐Ÿ’กWork consistent tension during bobble stitches so the texture sits evenly across the glove.
  • ๐Ÿ’กMeasure the thumb hole placement before joining to ensure comfortable fit and correct alignment on right and left gloves.

Make a cosy pair of Horizon Fingerless Gloves to keep your hands warm with playful bobble detail and a snug ribbed cuff. These gloves are quick to make and perfect for mixing colors and gifting. Enjoy creating something beautiful and functional for yourself or someone special! ๐Ÿงถโœจ

You ask,

we answer.

FAQs

What size will the finished piece be?

The pattern is one size only and will fit an average women's hand when made with recommended aran weight yarn and a 5mm hook; gauge and personal tension will affect final fit.

Can I use different yarn weights for this pattern?

Yes, you can substitute yarn weights, but it will change the finished size; adjust hook size accordingly and make a gauge swatch to ensure a good fit.

Do I need prior crochet experience for this pattern?

This pattern is rated intermediate because it uses bobble stitches and tube joining techniques; basic knowledge of single crochet, half double crochet, and working in rounds is recommended.

How long does this project typically take to complete?

Most crocheters finish a pair of gloves in about 2-4 hours, depending on experience and the speed of working bobble sections and weaving in ends.