๐Ÿงถ Beautiful โœจ Detailed ๐Ÿ’ Adorable

Mini crossbody bag Pattern

Mini crossbody bag Pattern
4.4โ˜… Rating
5-7 Hours Time Needed
3.5K Made This
โœ‚๏ธ

Intermediate Level

Ideal for those with basic crochet experience, featuring slightly more advanced stitches and techniques to expand your skills.

โฑ๏ธ

Weekend Treat

Takes 5-7 hours, making it an enjoyable project to finish over a couple of days.

โœจ

Stylish Touch

An elegant detail to elevate any look, combining traditional techniques with contemporary design sensibilities.

About This Mini crossbody bag Pattern

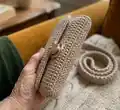
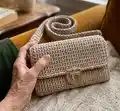
This pattern shows you how to crochet a compact, structured mini crossbody bag using 2 mm macrame cord and a 3.5 mm hook. You will make a rectangular main panel, two side pieces, assemble them with slip stitches and add a flap, clasp and handle. The design uses the back-loop single crochet main pattern for a neat textured finish and clear photos to guide each step.

Mini crossbody bag Pattern crochet pattern - detailed view of completed project

Suitable for crocheters comfortable with single crochet and working in rows, the pattern includes measurements, gauge and accessory recommendations. Follow the step-by-step assembly instructions to attach the side panels, sew on D-rings and fit the clasp for a professional finish.

Why You'll Love This Mini crossbody bag Pattern

I absolutely love this pattern because it turns simple stitches into a refined, wearable accessory that feels designer-made. I enjoy how the back-loop single crochet creates a subtle texture that makes the bag look more structured and tailored. The pattern is satisfying to complete because every step builds clearly toward a finished piece that functions beautifully. I also love that the handle can be crocheted or substituted with ready-made straps, so you can personalise the final look. Making the bag feels quick and rewarding โ€” it is a project I enjoy gifting and wearing myself.

Mini crossbody bag Pattern step 1 - construction progress Mini crossbody bag Pattern step 2 - assembly progress Mini crossbody bag Pattern step 3 - details and accessories Mini crossbody bag Pattern step 4 - final assembly and finishing

Switch Things Up

I love how easy it is to customise this bag by changing the cord colour or using variegated macrame for a different look.

I sometimes make a larger version by using thicker cord and a larger hook to create a chunky statement bag.

I often add a lining for extra structure and protection โ€” a simple fabric rectangle sewn in makes the bag more durable.

I like to experiment with different hardware finishes like brass, silver or matte black to match my wardrobe.

I also swap the clasp for a magnetic snap for a cleaner front look when I want quicker access.

I sometimes embroider a small monogram on the flap or attach a crochet flower for a personalised touch.

I recommend trying a shorter strap for a shoulder bag or a longer strap for crossbody wear depending on how you plan to use it.

I find adding a small internal pocket sewn to the lining is perfect for cards or keys to keep the interior organised.

I also experiment with combining macrame cord with a narrow leather trim for a mixed-media finish that looks professional.

I enjoy making matching accessories like a coin pouch or key fob using the same stitch pattern for a coordinated set.

Common Mistakes & How to Fix Them

โœ— Starting with too few foundation chains will make the bag too narrow; count your chains carefully and compare to the gauge before continuing. โœ— Working into the wrong loop when forming the main pattern will disrupt the texture; always insert the hook into the back loop of the current row and the back loop of the previous row as shown. โœ— Cutting the working yarn too early during assembly can ruin the continuous slip-stitch seam; do not cut the working yarn until you reach the middle of the closing flap as instructed. โœ— Not steaming and straightening the fabric before measuring leads to inaccurate sizing; steam and shape the rectangle before marking sides and bottom for assembly.

Mini crossbody bag Pattern

Make a stylish mini crossbody bag using macrame cord and simple single crochet stitches. This pattern guides you step-by-step from the foundation chain to assembly and handle attachment so you can create a polished handmade accessory. Perfect for a handmade gift or a chic everyday bag, it uses easy techniques and clear photos to help you along.

Intermediate 5-7 Hours

Materials Needed for Mini crossbody bag Pattern

โ€” Main Fabric

  • 01
    Sensy 2 mm macrame cord (100% polypropylene), 230 m / 251 yards per 200 g / 7 oz skein โ€” approximately 251 yards total used
  • 02
    Substitute: macrame cord 2 mm (similar thickness and fibre)
  • 03
    Bag hardware: 46 mm x 44 mm bag lock (1 piece)
  • 04
    D-rings: 16 mm (5/8" inner) metal D-rings (2 pieces)
  • 05
    Swivel clasps/carabiners: 25 mm / 1" inner metal swivel clasp (2 pieces)
  • 06
    Optional ready-made handle materials (leather or fabric straps) as desired

โ€” Tools Required

  • 01
    Crochet hook size 3.50 mm (E/4)
  • 02
    Measuring tape
  • 03
    Scissors
  • 04
    Stitch markers
  • 05
    Tapestry needle for weaving ends and sewing hardware
  • 06
    Bag accessories: bag lock (46mmx44mm), 16mm D-rings, 25mm swivel clasps/carabiners
  • 07
    Pins for assembly (optional)
  • 08
    Steamer or iron for steaming fabric (use appropriate steam setting)

Progress Tracker

0% Complete

โ€” Main Part :

Info :

Leave a long tail of yarn approximately 25 cm / 10 inches and make a chain of foundation chain stitches.

Info :

Note: You can make more or fewer stitches depending on the desired width of the bag.

Info :

I made 31 chains [Fig 1].

Row 1 :

30 sc, 1 ch, turn [Fig 2].

Info :

Next, lay the long tail of yarn on top, and will crochet it into the second row. Work single crochet stitches, inserting the hook into the back loop of the current row and the loop of the foundation chain [Fig 3-6].

Row 2 :

30 sc, 1 ch, turn [fig 7].

Info :

Straighten the beginning of the crocheted fabric and use the long tail to adjust so that the first rows are not overstretched.

Info :

MAIN PATTERN: Work single crochet stitches, inserting the hook into the back loop of the current row and the back loop of the previous row [Fig 8-10]. Detailed instructions for crocheting this pattern are shown in the video.

Row 3 :

30 sc, 1 ch, turn [Fig 11].

Info :

Repeat Row 3 until the desired length is reached, 35-36 cm / 13.8 - 14 inches.

Info :

I ended up with 90 rows [Fig 12]. Straighten the fabric, steam it, and shape it into a clear rectangular form. Measure the length and width.

Info :

Mark the bottom and sides of the bag with stitch markers. Note: You can fold the fabric along these markers to estimate the size of the finished bag.

โ€” Bag Sides (Make 2) :

Info :

Make a chain of 5 foundation chain stitches.

Row 1 :

4 sc, 1 ch, turn. Continue with the main pattern.

Row 2 :

4 sc, 1 ch, turn.

Rows 3-25 :

4 sc, 1 ch, turn.

Row 26 :

4 sl-sts [Fig 13]

Info :

Cut the working yarn. Straighten and steam the side piece.

โ€” Assembly :

Info :

Attach the side pieces to the main part using sl-sts. Start with the left side piece. Place the side piece onto the main part and connect the corner parts [Fig 14].

Info :

Insert the hook into the back loop of the main part and the front loop of the side piece (3 loops on the hook) and pull the working yarn through all 3 loops [Fig 15].

Info :

In this way, work slip stitches along the three sides of the bag side piece [Fig 16-17]. A video of the joining process can be found here.

Info :

Do not cut the working yarn! Continue to crochet slip stitches along the main part to the corner and then to the middle of the closing flap. Cut the yarn [Fig 18-19].

Info :

Attach the right bag side in the same way [Fig 20-21].

Info :

Weave in the ends of the working yarn into the fabric. Mark the center of the flap [Fig 22].

Info :

Attach the clasp to the flap. First, attach the lock to the upper flap [Fig 23], and then the corresponding part of the lock to the main part of the bag [Fig 24-25].

Info :

Sew D-rings to the bag side for attaching the handle [Fig 26].

โ€” Handle :

Info :

You can use a ready-made handle or crochet one. For easy attachment of the handle to the bag, I use a 2.5 cm / 1-inch wide carabiner [Fig 26].

Info :

Leave a long tail of yarn approximately 15 cm / 6 inches. Make a chain of 4 foundation chain stitches.

Row 1 :

3 sc, 1 ch, turn. Continue with the main pattern of the bag.

Row 2 :

3 sc, 1 ch, turn.

Row 3 :

3 sc, 1 ch, turn.

Info :

Crochet rows until the desired length of the handle is reached.

Info :

I made a medium-length handle, 67 cm / 26 inches long. I ended up with 146 rows. Attach the handle to the carabiners [Fig 27]. Weave in the yarn ends.

Info :

Attach the handle, and the bag is ready!

Assembly Instructions

  • Attach the left side piece to the main part by aligning the side piece corners with the main panel and join using slip stitches inserting the hook through the back loop of the main panel and the front loop of the side piece.
  • Work slip stitches along the three sides of the side piece to close the corner and create the bag bottom, continuing without cutting the working yarn until you reach the middle of the flap.
  • Sew the bag lock to the center of the flap and then attach the corresponding lock part to the front of the main bag body so the clasp aligns and functions correctly.
  • Sew the D-rings to each bag side securely in the reinforced corner area to allow the handle or swivel clasps to attach without pulling out.
  • Attach the handle (crocheted or ready-made) to the D-rings using swivel clasps or carabiners and weave in all yarn ends neatly into the fabric for a clean finish.

Important Notes

  • ๐Ÿ’กCheck gauge before beginning: 17 sc x 13 rows = 4" (10 cm) so your finished bag matches pattern measurements.
  • ๐Ÿ’กDo not cut the working yarn while joining the side piece; continue slip stitching across to the flap center before cutting.
  • ๐Ÿ’กSteam and shape your crocheted rectangle before measuring and marking to ensure accurate placement of side pieces and flap.

This mini crossbody bag pattern lets you create a polished, everyday accessory from macrame cord with simple stitches and clear assembly steps. Whether you crochet the handle or use a ready-made strap, the finished bag is compact, stylish, and practical. Happy crocheting and enjoy styling your handmade bag! โœจ๐Ÿงถ

You ask,

we answer.

FAQs

What size will the finished piece be?

When using similar materials, the bag will be approximately width = 18.5 cm / 7.3", height = 11 cm / 4.5", depth = 4 cm / 1.5" and handle length 70 cm / 27.5" (or as customized).

Can I use different yarn weights for this pattern?

You can substitute cord or yarn, but changing weight will alter the bag size and gauge; adjust your hook size and check gauge (17 sc x 13 rows = 4" / 10 cm) before proceeding.

Do I need prior crochet experience for this pattern?

This pattern is rated intermediate (advanced beginner) and requires confident single crochet, working in back loops for texture, and joining with slip stitches. Basic crochet and finishing skills are recommended.

How long does this project typically take to complete?

Most crocheters complete this project in 5-7 hours, depending on experience and whether you crochet the handle or use a ready-made one.