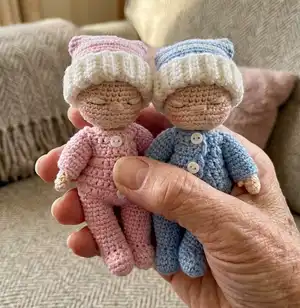
— Body of Cap :
Info :
Change to 2.0mm hook. Change to Light Blue yarn (or desired color).
Rnd 1 :
(2 sc in next ridge) x18 (see below), place marker (36)
Info :
Every 3rd round will be done in White (if desired). Color changes are hidden inside the cap. (Rounds in White: 3, 6, 9, 12, 15, 18, 21, 24) The last 3 rounds are in Light Blue.
Rnd 2-4 :
36 sc (3 rounds) (36)
Rnd 5 :
(7 sc, inv DEC) x4 (32)
Rnd 6-8 :
32 sc (3 rounds) (32)
Rnd 9 :
(6 sc, inv DEC) x4 (28)
Rnd 10-11 :
28 sc (2 rounds) (Fig. 24) (28)
Rnd 12 :
(5 sc, inv DEC) x4 (24)
Rnd 13-14 :
24 sc (2 rounds) (24)
Rnd 15 :
(4 sc, inv DEC) x4 (20)
Rnd 16-17 :
20 sc (2 rounds) (20)
Rnd 18 :
(3 sc, inv DEC) x4 (16)
Rnd 19-20 :
16 sc (2 rounds) (16)
Rnd 21 :
(2 sc, inv DEC) x4 (12)
Rnd 22-23 :
12 sc (2 rounds) (12)
Rnd 24 :
(1 sc, inv DEC) x4 (8)
Rnd 25-27 :
8 sc (3 rounds) (8)
Info :
Close hole, pull tail through the hole with tapestry needle, and sew in ends.
— Basket Bed :
Info :
Base: Starting Yarn Over (v-stitch) (or preferred). Using Size 2 yarn (super fine) double stranded OR Size 4 (medium) single strand. Using 3.25mm - 3.75mm hook. Brown/light brown yarn. Note: turning ch (ch1) not included in the stitch count.
Row 1 :
Starting in 2nd ch from hook, 8 sc, ch 1, turn (8)
Row 2 :
INC, 6 sc, INC, ch 1, turn (10)
Row 3 :
INC, 8 sc, INC, ch 1, turn (12)
Row 4 :
INC, 10 sc, INC, ch 1, turn (14)
Row 5-25 :
14 sc, ch 1, turn (21 rows) (14)
Row 26 :
DEC, 10 sc, DEC, ch 1, turn (12)
Row 27 :
DEC, 8 sc, DEC, ch 1, turn (10)
Row 28 :
DEC, 6 sc, DEC, ch 1 (place marker) (Fig. 25) (8)
Item Name (Border) :
27 sc across ends of rows, 2 sc in corner (starting ch), 6 sc across starting chains, 2 sc in corner (last starting ch), 27 sc across ends of rows, 2 sc in corner (next sc), 6 sc (across Row 28), 2 sc in corner (last sc), skip ch 1 and slst into the first sc of the border (Fig. 26) (74)
Section Title (Side Wall) :
Changing to Yarn Under (x-stitch). (Starting continuous rounds)
Rnd 1 :
BLO 74 sc (Fig. 27) (74)
Rnd 2-8 :
74 sc (7 rounds) (74)
Info :
Note: If you are using the larger hook size, you may want to reduce the height by 2 rounds, in other words 'Rnd 2-6: 74 sc (5 rounds)' for previous step.
Rnd 9 :
(starting this round from center of the bottom side of the basket bed) 16 sc, ch 8, sk 5 sc, (Fig. 29) 32 sc, ch 8, sk 5 sc, 16 sc (80)
Rnd 10 :
16 sc, 10 sc in ch 8 space, 32 sc, 10 sc in ch 8 space, 16 sc (84)
Info :
Note: Handles should be centered on basket, across from each other. Adjust if necessary. Finish with invisible join. Sew in ends.
— Pillow :
Info :
Using Yarn Over (v-stitch). Using 2.0mm hook. Starting with Light Blue yarn (or desired color).
Item Name (Circle) :
Circle (make 2)
Rnd 3 :
(1 sc, INC) x7 (21)
Rnd 4 :
(2 sc, INC) x7 (28)
Rnd 5 :
(3 sc, INC) x7 (35)
Rnd 6 :
(4 sc, INC) x7 (42)
Rnd 7 :
(5 sc, INC) x7 (49)
Rnd 8 :
(6 sc, INC) x7 (56)
Info :
Finish with invisible join. Sew in ends. Take both circles, and match up corners with back side facing back side. Continue to Rnd 9.
Rnd 9 :
Change to Navy Blue yarn (or desired color) on first circle. (Fig. 30 and 31) 56 sc around through both layers, stopping around 48 sc to lightly stuff pillow with fiber fill. Slst into first sc. (56)
Ruffle (Rnd 10) :
(ch 2, 2 dc) in first sc (ch 2 counts as first dc), ((3 dc) in next sc) x55 (168)
Info :
Finish with invisible join. Sew in ends.
— Granny Square Blanket :
Info :
Using Yarn Over (v-stitch). Using 2.0mm hook. Make a total of 9 squares - 3 of each color arrangement.
Rnd 1 :
8 sc in mr, join with slst, cut yarn (Fig. 32)
Rnd 2 :
Join with slst to one sc of Rnd 1. Make first petal, followed by 7 more petals. First petal: Ch 2, yarn over (as if making a dc), insert into same sc, yarn over and pull up a loop. Yarn over and pull through first 2 loops on hook. Repeat yarn over and pull through first 2 loops on hook. (as if making dc) insert into same sc, yarn over and pull up a loop, Yarn over and pull through all 3 loops on hook. Ch 2. Petals 2-8: *(Yarn over (as if making a dc), insert into next sc, yarn over and pull up a loop. Yarn over and pull through first 2 loops on hook.) Repeat from * 2 more times. Yarn over and pull through all 4 loops on hook. Ch 2. Join with slst, cut yarn.
Rnd 3 :
Join with slst to one ch 2 space of Rnd 2. (Ch 3 counts as first dc), 1 dc, ch 3, 2 dc in first ch 2 space, (3 dc) in next ch 2 space, *[(2 dc, ch 3, 2 dc) in next ch2 space, (3 dc) in next ch 2 space], repeat from * 2 more times, join with slst, cut yarn. Sew in all ends.
Info :
Make 3 different color arrangements as shown, 3 squares of each, for a total of 9 squares. Lay out squares in a 3x3 grid and sew together with a whip stitch. Create a border with the lightest color, 11 sc across each square, but with 3 sc in each of the 4 corners of the blanket. Join with slst. Join the darkest color, and make a second border as directed in the pattern pages.
— Bedtime Bunny Toy :
Info :
Starting with Yarn Under (x-stitch). Starting with 1.5mm hook. White or Natural White yarn.
Item Name (Head) :
Head: Rnd 1: 6 sc in mr (6)
Round 3 :
(1 sc, INC) x6 (18)
Round 4 :
(2 sc, INC) x6 (24)
Round 5-9 :
24 sc (5 rounds) (24)
Round 10 :
(2 sc, inv DEC) x6 (18)
Round 11 :
(1 sc, inv DEC) x6 (12)
Round 12 :
BLO 12 sc (Fig. 34) (12)
Info :
Stuff head lightly with fiber fill. Create indents for eyes 6 sts apart, between Rows 7 and 8. (Fig. 35 and 36). Add more fiber fill to fill out the head completely. Glue eyes in place (where you placed the indents.) (Fig. 37). Cut yarn and close hole. (Fig. 38)
— Ears :
Item Name (Ears) :
Ears (make 2): Ch 5
Round 1 :
Starting in 2nd ch from hook, 3 sc, 3 sc across end in next ch, (now working opposite side) 2 sc, (2 sc, 2 dc) in next ch (12)
Round 2 :
INC, 3 sc (sk rest of round) (5)
Info :
Finish off. Fold bottom end of ear together and sew with yarn tail. Sew ear to head at Rnd 2-3.
— Body :
Info :
Change to Yarn Over (v-stitch). Change to 2.0mm hook. Change to Blue yarn. With head upside down and facing away from you, join desired color yarn to exposed front loops from Rnd 11. (Fig. 39) Try to join at the center of the back of the head.
Round 1 :
12 sc, place marker (Fig. 40) (12)
Round 2 :
(2 sc, INC) x4 (16)
Round 3 :
(3 sc, INC) x4 (20)
Round 4 :
(4 sc, INC) x4 (24)
Round 5-10 :
24 sc (6 rounds) (24)
— Left Leg :
Round 11 :
2 sc, sk 12 sc, 10 sc (Note: adjust sc placement if needed for legs to be correctly positioned) (Fig. 41 and 42) (12)
Round 13 :
(2 sc, inv DEC) x3 (9)
Info :
Change to Yarn Under (x-stitch). Change to 1.5mm hook. Change to white yarn.
Round 15 :
BLO 9 sc (Fig. 43) (9)
Round 17 :
(1 sc, inv DEC) x3 (Fig. 44) (6)
Info :
Close hole, pull tail through the hole with tapestry needle, and sew in ends.
— Right Leg :
Info :
Change to Yarn Over (v-stitch). Change to 2.0mm hook.
Round 11 :
Join yarn (color from body) on back of body where you skipped 12 sc on Rnd 11 of the Left Leg. (Fig. 45) 12 sc, place marker. (12)
Round 13 :
(2 sc, inv DEC) x3 (9)
Info :
Change to Yarn Under (x-stitch). Change to 1.5mm hook. Change to white yarn.
Round 17 :
(1 sc, inv DEC) x3 (6)
Info :
Close hole, pull tail through the hole with tapestry needle, and sew in ends.
— Arms :
Info :
Arms (make 2). Using Yarn Under (x-stitch). Using 1.5mm hook. Using White yarn.
Round 3 :
(2 sc, inv DEC) x2 (6)
Round 4-7 :
6 sc (4 rounds) (6)
Info :
Finish off, leaving a tail for sewing. Sew opening on end of arm together flat. Sew arms to body about 2 rows down from where head and body join.
— Tail :
Info :
Using Yarn Under (x-stitch). Using 2.0mm hook. Using White yarn.
Info :
Join with slst (close the mr), pull tight (forming a little half-ball shape). (Fig. 47) Knot ends together and cut tails short. Attach tail to back of body with craft glue.
Assembly Instructions
- Attach head to body by sewing the neck opening to the top of the body using a mattress stitch or whipstitch, making sure the head is centered before securing.
- Position arms on either side of the body about two rows down from where the head and body join; tack in place with pins and sew securely with matching yarn tails.
- Sew the legs to the bottom of the body where the leg openings were formed, aligning the left and right legs symmetrically and reinforcing with several passes of yarn for durability.
- Sew ears to the head between Rnd 2-3 on the head, spacing them evenly and sewing through the base of the ear to secure.
- Sew buttons onto the sleeper to match the buttonholes created on Rows 22 and 26; use small white buttons and tack them securely with thread.
- Assemble the basket bed by sewing the border and side wall into place, add the pillow and ruffle, then place the finished doll and bunny into the bed for display.
Important Notes
- 💡Use stitch markers to keep track of rounds, especially during joins and when converting between rounds and rows.
- 💡Stuff firmly but not too tightly for the best shape; overstuffing can distort small pieces like the head and limbs.
- 💡Work BLO rounds precisely where indicated to create the correct ridges and fold-up brims for the cap and sleeper cuffs.
- 💡Weave in ends as you go to avoid a tedious finishing session at the end and to keep small pieces tidy.
- 💡Test hook size and gauge on a small sample if substituting different yarn to ensure pieces fit the basket bed and bonnet correctly.
This Goodnight Set was made with love to create tiny, heartfelt toys and cozy accessories for doll play or nursery decor. It includes a sleeper, night cap, bunny toy, pillow, granny square blanket, and a basket bed — everything for sweet miniature bedtime play. Mix and match colors to make it uniquely yours and enjoy the slow, satisfying process of tiny amigurumi creation. 🧶✨
What size will the finished piece be?
The finished amigurumi doll measures approximately 10-12 cm tall when worked with 8/4 super fine yarn and a 1.5mm hook; the basket bed and blanket sizes will vary with yarn and hook choices.
Can I use different yarn weights for this pattern?
Yes, you can substitute yarn weights, but this affects final size; use a larger hook for thicker yarn and expect the basket bed to require a larger hook and possibly double-stranding for structure.
Do I need prior crochet experience for this pattern?
This pattern is rated intermediate; basic experience with single crochet, increases, decreases, BLO, and working in rounds is recommended for best results.
How long does this project typically take to complete?
Most crafters finish the full Goodnight Set in about 12-15 hours total, though time may vary depending on experience and how many items you make in one session.
How should I secure the tiny buttons?
Sew small 6mm buttons on with a strong thread and pass through the buttonhole area multiple times to ensure they stay put; for toys meant for young children, consider using embroidered buttons or securely glued felt instead.
Stay in the Loop!
Get notified when we release new free crochet patterns and join our crafting community!