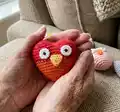
About This Crochet Owl Amigurumi Pattern
This pattern teaches you how to crochet a small, charming owl using simple rounds and basic stitches. You will make a compact body with a color change, plus tiny white eyes and a sewn-on beak to give your owl personality. The design is quick to work up and ideal for using up scrap yarn in fun color combinations.

Perfect for beginners and quick makes, each owl is small and customizable with color choices. The instructions use US crochet terms and include guidance for finishing and assembly.
Why You'll Love This Crochet Owl Amigurumi Pattern
I absolutely love this pattern because it turns a few simple rounds into an adorable little character you can finish in no time. I enjoy how versatile it is—changing yarn colors instantly creates a new personality for each owl. It is quick to make, which means I can whip up several for gifts or to brighten a shelf. Every tiny detail, from the folded ear shaping to the sewn beak, adds so much charm and makes the finished owls incredibly satisfying to give away.
Switch Things Up
I love to change up the colours to create entirely different personalities for each owl; try pastel palettes for a soft look or neon brights for playful owls.
I sometimes switch yarn weight and hook size to make larger or smaller owls; using bulky yarn makes a cuddly chunky owl while thinner yarn makes a tiny keychain friend.
I often replace safety eyes with small embroidered eyes for baby-safe toys or to give a softer look.
Try different beak styles: embroider a tiny triangle, crochet a small cone, or use felt for a crisp shape.
Make eyes with coloured centres by working a tiny contrasting ring inside the white eye round before attaching the safety eye.
Add tiny wings by crocheting small half-circle pieces and sewing them to the sides for more character and texture.
I like to attach a keyring or loop to the top to turn the owl into a keychain or zipper pull for gifts.
For a decorative garland, make many owls in coordinating colours and string them on a ribbon or cord, spacing evenly for a playful banner.
Experiment with different stitches for the body (for example, alternate rows of HDC or textured stitches) to give a unique surface to each owl.
If you want a weighted base for stability, add a small amount of plastic pellet or heavier stuffing to the bottom before fully closing the body.
I also enjoy embellishing with tiny felt or crocheted flowers, hats, or scarves to create themed owls for seasons and holidays.
Common Mistakes & How to Fix Them
✗ Not counting increases carefully during the first rounds leads to uneven shaping; recount after each increase round and mark the start of the round with a stitch marker.
✗ Attaching safety eyes before closing the top can trap the closure; always push the safety eyes through the middle and the inside closure as instructed before stuffing.
✗ Overstuffing the body makes it hard to close the top neatly and can distort the ears; stuff gradually and stop when the owl feels firm but still soft.
✗ Changing colour poorly creates a visible jog or loose ends; fasten off neatly and weave in the colour tails or carry yarn cleanly when switching at round 5.