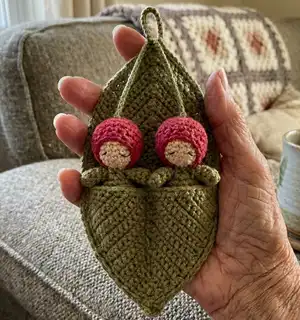
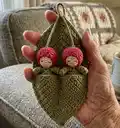
Make two tiny, adorable cherry baby amigurumi dolls nestled in a crocheted leaf cradle. This pattern gives you step-by-step rounds, clear photos, and helpful finishing notes so you can create a sweet handmade gift or decoration. Perfect for gifting or adding a playful accent to your home, the result is a compact, palm-sized keepsake you'll love to make.
Progress Tracker
0% Complete
— Instruction :
Infos :
NOTE#1 How decrease does: insert the hook into the next stitch and thread over. Pull a loop through so that there are now 2 loops on the hook. Insert the hook into the next stitch and thread over. Pull a loop through so that there are now 3 loops on the hook. Thread over again and pull the loop of thread through all 3 loops on the hook. NOTE#2 For crocheting of circles - pull the initial thread end out between rounds 2 and 3, it would serve as the marker and help you to count the rounds. Level: Intermediate. Abbreviations: sts – stitches. ch – chain stitch. sl st – slip stitch. sc – single crochet for US (double crochet stitch for UK). dc – double crochet for US (treble crochet stitch for UK). inc – increase: 2 sc in 1 stitch. dec – decrease.
— Head :
Round 1 :
6 sc into magic ring (6 sts)
R3 :
(1 sc, inc) X 6 (18 sts)
R4-7 :
(4 rounds): sc around (18 sts)
R8 :
(1 sc, dec) X 6 (12 sts)
Info :
After R9 stuff the head tightly. Leave a tail.
Info :
In remaining 6 sc sew 6 stitches from inside to outside in sequence, pull the yarn, secure and hide it.
— Cap :
Round 1 :
6 sc into magic ring (6 sts)
R3 :
(1 sc, inc) X 6 (18 sts)
R4-8 :
(5 rounds): sc around (18 sts)
Info :
Put the cap on the doll's head and work
R10 :
(1 sc, dec) X 6 (12 sts)
Info :
Make 1 sc and 1 sl st more. Leave a tail.
Info :
Make clean fastening off. How to do clean fastening off: insert the yarn into the first stitch after your last stitch. Insert the yarn back into this last stitch and repeat. Secure the yarn and hide inside.
— Body&Arms :
Info :
Green yarn. First make 2 arms:
Round 1 :
6 sc into magic ring (6 sts)
R2-4 :
(3 rounds): sc around (6 sts)
Info :
Make 1 sl st more and leave short tail.
Round 1 :
6 sc into magic ring (6 sts)
R3 :
(inc, 5 sc) X 2 (14 sts)
R4 :
(inc, 6 sc) X 2 (16 sts)
R5 :
(inc, 7 sc) X 2 (18 sts)
R6-7 :
(2 rounds): sc around (18 sts)
R8 :
(dec, 7 sc) X 2 (16 sts)
R9 :
(dec, 6 sc) X 2 (14 sts)
R10 :
(dec, 5 sc) X 2 (12 sts)
Info :
Now place the one arm closely the body and join them together with 2 sc (these inner connecting sc will not be used in the next round). For the arm use its last stitch and the next following stitch. Work 4 sc and join the second arm with 2 sc, when 4 sc again. Now you have round 11.
R11 :
4 sc (arm), 4 sc (body), 4 sc (arm), 4 sc (body) (16 sts)
Info :
Make 1 sl st more and leave long tail for stitching.
Info :
Make clean fastening off. Lightly stuff the body (not the arms).
— Doll Assembly :
Info :
Place the head onto the body, pin it. It is comfortably to fix the head with a large thick needle, piercing the head and body through. Carefully sew on the head with small stitches.
— Face :
Info :
Embroider the eyes a few stitches with thin black thread, as shown further in the photos.
— LEAF-CRADLE :
Info :
consist of 2 leaves - big and small worked back-and-forth in rows. Be sure to check the chart as you work, as some rows start and end differently! Green yarn
— Big leaf :
Row 1 :
2 ch, 1 dc, 1 sc into magic ring (4 sts), turn...
R2 :
2 ch, (1 sc,1 dc,1 sc in one loop – hereafter I refer to this set as "sds" for convenience, but it counts as three stitches!), 1 sc (6 sts)
R3 :
2 ch, 1 sc, sds, 2 sc (8 sts)
R4 :
2 ch, 2 sc, sds, 3 sc (10 sts)
R5 :
2 ch, 3 sc, sds, 4 sc (12 sts)
R6 :
2 ch, 4 sc, sds, 5 sc (14 sts)
R7 :
2 ch, 5 sc, sds, 6 sc (16 sts)
R8 :
2 ch, 6 sc, sds, 7 sc (18 sts)
R9 :
2 ch, 7 sc, sds, 8 sc (20 sts)
R10 :
2 ch, 8 sc, sds, 9 sc (22 sts)
R11 :
2 ch, 9 sc, sds, 10 sc (24 sts)
R12 :
2 ch, 10 sc, sds, 10 sc (25 sts)
R13 :
2 ch, 10 sc, sds, 11 sc (26 sts)
R14 :
2 ch, 11 sc, sds, 11 sc (27 sts)
R15 :
2 ch, 11 sc, sds, 12 sc (28 sts)
R16 :
2 ch, 12 sc, sds, 12 sc (29 sts)
R17 :
2 ch, 12 sc, sds, 13 sc (30 sts)
R18 :
2 ch, 13 sc, sds, 13 sc (31 sts)
R19-26 :
(8 rows): 2 ch, 13 sc, sds, 12 sc, 1 dec (31 sts)
R27 :
2 ch, 13 sc, sds, 10 sc, 2 dec (30 sts)
R28 :
2 ch, 12 sc, sds, 10 sc, 2 dec (29 sts)
R29 :
2 ch, 12 sc, sds, 7 sc, 3 dec (27 sts)
R30 :
2 ch, 10 sc, sds, 7 sc, 3 dec (25 sts)
R31 :
2 ch, 10 sc, sds, 3 sc, 4 dec (22 sts)
R32 :
2 ch, 7 sc, sds, 3 sc, 4 dec (19 sts)
Info :
Make 1 ch more and leave short tail.
Info :
At the finish end of the leaf attach a new yarn (blue arrow in the photo) and work the leaf in a round with an edging of sc. To keep the edge of the leaf from pulling down, sometimes make increases. At the sharp end of the leaf make a prong - in one loop: sc, ch, dc, ch, sc. I got 100 sc -50 sc on one side of leaf and 50 sc on the other. Then work chain of 15, connect the round with sl st and make 2 sl st more. Leave a tail and make clean fastening off, hide the tail inside.
— Small leaf :
Row 1 :
2 ch, 1 sc, 1 dc, 2 sc into magic ring (6 sts), turn...
R2 :
2 ch, 1 sc, sds, 2 sc (8 sts)
R3 :
2 ch, 2 sc, sds, 3 sc (10 sts)
R4 :
2 ch, 3 sc, sds, 4 sc (12 sts)
R5 :
2 ch, 4 sc, sds, 5 sc (14 sts)
R6 :
2 ch, 5 sc, sds, 6 sc (16 sts)
R7 :
2 ch, 6 sc, sds, 7 sc (18 sts)
R8 :
2 ch, 7 sc, sds, 8 sc (20 sts)
R9 :
2 ch, 8 sc, sds, 9 sc (22 sts)
R10 :
2 ch, 9 sc, sds, 10 sc (24 sts)
R11 :
2 ch, 10 sc, sds, 11 sc (26 sts)
R12 :
2 ch, 11 sc, sds, 12 sc (28 sts)
R13 :
2 ch, 10 sc, dec (13 sts)
R14 :
2 ch, 11 sc (13 sts)
R15 :
2 ch, 8 sc, dec (11 sts)
R17 :
2 ch, 5 sc, dec (8 sts)
R19 :
2 ch, 2 sc, dec (5 sts)
Info :
Make 1 ch more and leave short tail.
Info :
Now attach a new yarn according to the chart (blue arrow) and work second side: R13: 2 ch, 11 sc (13 sts). R14: 2 ch, 11 sc (13 sts). R15: 2 ch, dec, 8 sc (11 sts). R16: 2 ch, 8 sc (10 sts). R17: 2 ch, dec, 5 sc (8 sts). R18: 2 ch, 5 sc (7 sts). R19: 2 ch, dec, 2 sc (5 sts). R20: 2 ch, dec (3 sts). Make 1 ch more and leave short tail.
Info :
Work the leaf in a round with a edging of sc (I got 72 sc). Leave long tail for stitching. Iron the leaves gently through a damp cloth.
— CRADLY ASSEMBLY :
Info :
Put a smaller leaf on top of a large, pin it. Carefully sew them together with small stitches over the edge. At the very beginning and finish, sew firmly, making several stitches on top of each other. Then make a neat seam exactly in the middle of the leaf.
— Petiole and Final Assembly :
Info :
Now make a petiole for the cherry berry. Take a 15 cm long piece of thin wire. Hook the wire on one sc on the top of the doll, twist it tightly. Bend the tail of the wire to the necessary distance (I made a 5 cm long petiole). Cut off the excess from the wire tail, so that there was 5 mm. Take a piece of green yarn 80 cm long, pull it along the wire, hook on the wire tail and start wrapping the petiole, very tightly, gently, coil by coil. (As you get closer to the cap, it will become harder to wrap, you have to try) After wrapping the entire petiole, tie both tails of yarn together very tightly.
Info :
Insert the tails into a thick needle, stick it near the petiole and pull it out the doll's neck. Pull the yarn. To be sure, once again pull the needle out near the petiole and back - at the doll's neck. Cut the end of the yarn.
Info :
When both dolls are ready, connect their petioles in the same way, wrapping them together at a distance of 5 mm. Insert the tails of the yarn into the needle and pull it through the winding, cut it off.
These tiny Cherry Babies are a delightful, hand-crocheted keepsake that add charm wherever they sit. They make a perfect quick gift, ornament, or pocket-sized friend to brighten someone
ay. Give them as a sweet surprise or keep them for your own handmade collection. 🍒🧶