🧢 Beautiful ✨ Detailed πŸ’ Adorable

Canadian Maple Leaf Amigurumi Pattern

Canadian Maple Leaf Amigurumi Pattern
3.9β˜… Rating
2-3 Hours Time Needed
2.4K Made This
βœ‚οΈ

Intermediate Level

Ideal for those with basic crochet experience, featuring slightly more advanced stitches and techniques to expand your skills.

⏱️

Bite-Sized Project

Finishes in 2-4 hoursβ€”perfect for an afternoon of creative relaxation.

🏑

Cozy Accent

A warm touch for your space that transforms ordinary corners into inviting nooks filled with handmade charm.

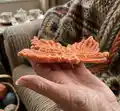
About This Canadian Maple Leaf Amigurumi Pattern

This pattern creates a decorative Canadian maple leaf that works beautifully as a coaster or applique9. Youe2ll crochet three identical small leaves, join them together, and add a stalk for an authentic look. The design uses worsted weight yarn and a simple mix of single crochets and post stitches for texture.

Canadian Maple Leaf Amigurumi Pattern crochet pattern - detailed view of completed project

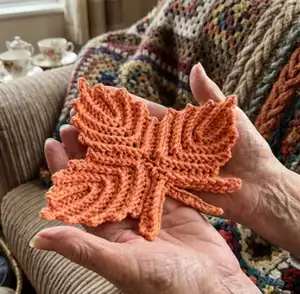
Detailed row-by-row instructions and diagrams are included so you can follow along easily. Wet blocking is recommended to shape the leaf and smooth the edges for a finished, polished result.

Why You'll Love This Canadian Maple Leaf Amigurumi Pattern

I absolutely love this pattern because it combines simple stitches with striking textured results that feel more advanced than they are. I enjoy how quickly one leaf comes together and how three assembled create a dramatic shape that looks professional. I designed it to be adaptable, so you can easily change yarn weight for different sizes. I take pleasure in seeing how a few whip stitches and a little blocking transform individual pieces into a cohesive leaf.

Canadian Maple Leaf Amigurumi Pattern step 1 - construction progress Canadian Maple Leaf Amigurumi Pattern step 2 - assembly progress Canadian Maple Leaf Amigurumi Pattern step 3 - details and accessories Canadian Maple Leaf Amigurumi Pattern step 4 - final assembly and finishing

Switch Things Up

I love experimenting with different yarns for this pattern to create varied textures and sizes.

You can make a delicate lace-like leaf using fingering weight yarn and a smaller hook for tiny applique9s.

To create a chunky coaster, try bulky yarn with a larger hook for a plush, sturdy result.

I sometimes add a metallic or variegated yarn to give the leaf depth and visual interest.

For a rustic look, use natural fibres like wool and slightly felt the finished leaf for a textured finish.

I recommend changing colors between leaves to make a set of multicolored coasters for a festive table display.

You can embroider veins on the right side using surface slip stitch or a contrasting yarn for extra detail.

I often make a matching set in seasonal colors and package them as gifts with a small card describing care instructions.

If you want a hanging ornament, add a small crocheted loop at the top of the stalk before fastening off.

I also experiment with sewing the leaves onto cushions or totes as applique9s to add a handmade seasonal accent.

Common Mistakes & How to Fix Them

βœ— Skipping the foundation chain count will change the stitch placement and shape; always count your initial chain and confirm 10 chains before proceeding. βœ— Forgetting that ch 1 does not count as a stitch can offset your stitch counts; mark that ch 1 is only a turning chain and do not include it in totals. βœ— Not placing or keeping the center marker will make assembly difficult and misaligned; place a marker in the 9th stitch as instructed and keep the middle marker during joining. βœ— Overstuffing or uneven tension during whip stitching will distort the leaf edges; keep a gentle, consistent tension and weave in ends neatly on the wrong side.

Canadian Maple Leaf Amigurumi Pattern

Create a beautiful Canadian Maple Leaf coaster or applique9 with this detailed crochet pattern. Youe2ll make three small leaves, assemble them, add a stalk, and optionally wet-block for a crisp professional finish. The pattern includes diagrams, step-by-step row instructions, special stitch explanations, and clear assembly photos to guide you. Perfect for seasonal decor, coasters, or applique9 embellishments.

Intermediate 2-3 Hours

Materials Needed for Canadian Maple Leaf Amigurumi Pattern

β€” Main Fabric

  • 01
    Red Heart Super Saver Yarn or any other worsted weight yarn (Medium / 4)

β€” Tools Required

  • 01
    Crochet hook 4.5 mm (G)
  • 02
    Tapestry needle
  • 03
    Straight pins
  • 04
    Stitch markers
  • 05
    Blocking board (or interlocking play mat)

Progress Tracker

0% Complete

β€” Size :

Info :

8bd" (21.6 cm) from side to side. 7bd" (19 cm) from top to bottom. TIP: To make a smaller leaf, simply use a thinner yarn or thread & smaller size hook.

β€” Materials :

Info :

Red Heart Super Saver Yarn or any other worsted weight yarn (Medium / 4). Tapestry needle & straight pins. Stitch markers. Blocking board (or interlocking play mat).

β€” Hook :

Info :

4.5 mm (G).

β€” Gauge :

Info :

8 sc X 8 rows = 2" X 2" (5 X 5 cm). NOTE: The gauge is not very important for this item & your finished size may vary slightly.

β€” Special Stitches :

Info :

Whip stitch.

Info :

Sc2(4)tog - [Insert hook in next st, yo & pull up a lp] 2(4) times; yo & pull through all lps on hook. 1 (3) sts decreased.

Info :

Back post single crochet (Bpsc) - insert hook from back to front to back around post of next st, yo & pull up a lp; yo & pull yarn through 2 lps on hook.

Info :

Front post single crochet (Fpsc) - insert hook from front to back to front around post of next st, yo & pull up a lp; yo & pull yarn through 2 lps on hook.

β€” Abbreviations :

Infos :

Beg = Begin(ning). Bpsc = Back post single crochet. Ch(s) = Chain(s). Ea = Each. Fpsc = Front post single crochet. Lp(s) = Loop(s). Rnd(s) = Round(s). RS = Right Side. Sc = Single crochet. Sc2(4)tog = Single crochet 2(4) together. Sl st = Slip stitch. St(s) = Stitch(es). WS = Wrong Side. Yo = Yarn over. Parentheses used in explanation.

β€” Small Leaf :

Info :

Make 3 small leaves to complete 1 Maple leaf (diagram 1). Work in rows.

Info :

To beg: ch 10

Row 1 :

(RS) sc in second ch from hook; sc in next 7 chs; 5 sc in last ch; work across the bottom of foundation ch --> sc in next 6 chs; turn = 19 sts

Row 2 :

(WS) ch 1 (do not count as a st here & throughout); [fpsc around post of next st] 17 times (photos a-1 & a-2, page 4); turn = 17 sts

Row 3 :

(RS) ch 1; sc in next 8 sts; 5 sc in next st; sc in next 6 sts; turn = 19 sts

Row 4-7 :

repeat 2 more times rows 2 & 3

Row 8 :

same as Row 2

Info :

Finishing: Fasten off, leaving a long tail for sewing; weave in the end from the beg. Turn & place a MARKER in 9th st from finishing (photo a-3).

β€” Assembling Maple Leaf :

Info :

Place all small leaves next to each other, with the markers meeting in the center (photo b-1).

Info :

With WS facing you, whip stitch the leaves together across 9 sts on the sides (photo b-2). Remove markers as you go from the left and right leaves, but keep the middle MARKER. Weave in the ends on WS.

β€” Leaf Stalk :

Info :

Make 1 (diagram 2, page 7).

Info :

To beg: holding the leaf with RS facing you & with the center marker facing up, work ch 4 (photo c-1)

Row 1 :

(RS) work across the top 9 sts of right small leaf --> sc in first st on the right (photo c-2), sc in next 6 sts, sc2tog; skip st with MARKER & remove the MARKER (photo c-3); work across the top 9 sts of left small leaf --> sc2tog, sc in next 7 sts, ch 5 (photo c-4); turn = 16 sts & 2 chs on each side

Row 2 :

(WS) sc in second ch from hook; sc in next 3 chs; sc in next 6 sts; sc4tog; sc in next 6 sts; sc in next 4 chs (photo c-5, page 6); turn = 21 sts

Row 3 :

(RS) ch 1 (do not count as a st); [bpsc around post of next st] 10 times; ch 10 (photo c-6, page 6); sc in second ch from hook, sc in next 8 chs (photo c-7, page 6); [bpsc around post of next st] 10 times; sl st in last st (photo c-8, page 6) = 30 sts

Info :

Finishing: Fasten off & weave in all the ends on WS.

β€” Wet Blocking :

Info :

Wet blocking is optional, but recommended. Blocking removes creases & adjusts the shape of crochet pieces.

Info :

1. Soak the leaves in warm water; 2. Squeeze excess moisture out; 3. Lay the leaves flat on a blocking board (or interlocking play mat); 4. Shape & pin around the edges (photo d-1); 5. Let the leaves dry.

Assembly Instructions

  • Place all three small leaves next to each other so the markers meet in the center before stitching them together.
  • With wrong sides (WS) facing you, whip stitch the leaves together across the 9 stitches on each side, removing the outer markers as you stitch and keeping the middle marker in place.
  • When stalk is worked, attach it by crocheting across the top stitches of the right and left small leaves as instructed in Row 1 of the Leaf Stalk section; remove the center marker when instructed.
  • Weave in all ends on the wrong side and wet block the assembled leaf by pinning it to a blocking board to set the shape.

Important Notes

  • πŸ’‘The gauge is not very important for this item; finished size may vary slightly depending on yarn and tension.
  • πŸ’‘Place a marker in the 9th stitch from finishing each small leaf to ensure correct alignment during assembly.
  • πŸ’‘Work with consistent tension and check stitch counts after every row to avoid shaping errors during assembly.
  • πŸ’‘Wet blocking is recommended to remove creases and shape the leaf edges for a crisp finish.

This Canadian Maple Leaf coaster pattern is a cozy and creative project perfect for seasonal decor and handmade gifts. 🍁 Ite2ll brighten your home and make thoughtful presents for friends and family. 🧢 Happy crocheting and enjoy bringing a piece of the season to life!

You ask,

we answer.

FAQs

What size will the finished piece be?

The finished leaf measures approximately 8bd" (21.6 cm) side to side and 7bd" (19 cm) top to bottom using worsted weight yarn and a 4.5 mm hook.

Can I use different yarn weights for this pattern?

Yes, you can use different yarn weights, but the final size and texture will change; choose an appropriate hook for your yarn and expect changes in dimensions.

Do I need prior crochet experience for this pattern?

This pattern is rated intermediate because it uses post stitches and shaping techniques; basic familiarity with single crochet, chains, and working in rows is recommended.

How long does this project typically take to complete?

Most crafters complete the project in 2-3 hours, though time may vary depending on experience and whether you block the leaves.