🧢 Beautiful ✨ Detailed πŸ’ Adorable

Christmas Bells Pattern

Christmas Bells Pattern
4.2β˜… Rating
2-3 Hours Time Needed
1.4K Made This
βœ‚οΈ

Intermediate Level

Ideal for those with basic crochet experience, featuring slightly more advanced stitches and techniques to expand your skills.

⏱️

Bite-Sized Project

Finishes in 2-4 hoursβ€”perfect for an afternoon of creative relaxation.

🏑

Cozy Accent

A warm touch for your space that transforms ordinary corners into inviting nooks filled with handmade charm.

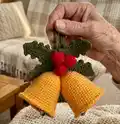
About This Christmas Bells Pattern

This pattern creates a decorative pair of Christmas bells with holly leaves and berries, finished with a hanging loop. You will crochet two bells, four leaves, three berries and a loop and assemble them into a charming ornament. The pattern includes step-by-step rounds, a bell tongue (language) tutorial, and assembly instructions with photos. Techniques used include magic ring, increases/decreases, and a crab (reverse) edge row.

Christmas Bells Pattern crochet pattern - detailed view of completed project

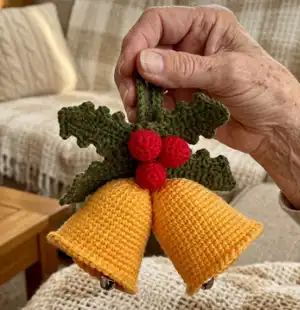
Perfect for an intermediate crocheter who wants a quick festive project with a polished finish. The finished decoration measures approximately 4.7 x 5.1 inches including the loop when made with the recommended materials.

Why You'll Love This Christmas Bells Pattern

I absolutely love this pattern because it turns simple shapes into a beautiful seasonal decoration that looks much more intricate than it is. I enjoy the clean bell shaping and the little details like the crab stitch edge and tiny berries that make the finished piece feel special. Sewing the leaves together and arranging the berries is a satisfying finishing step that brings the whole project to life. It is a quick make that still gives you the sense of creating a thoughtful handmade gift.

Christmas Bells Pattern step 1 - construction progress Christmas Bells Pattern step 2 - assembly progress Christmas Bells Pattern step 3 - details and accessories Christmas Bells Pattern step 4 - final assembly and finishing

Switch Things Up

I love how easy it is to customize these bells by changing colors; try metallic or variegated yarn for a different look.

I sometimes make minis by using fingering-weight yarn and a smaller hook to create tiny keychain-sized bells.

I often add beads or tiny pom-poms instead of the crocheted berries for a playful finish.

I recommend experimenting with contrasting edges using a different yarn color for the crab stitch row to highlight the bell rim.

I like to assemble a garland by crocheting several bells and joining them with a long chain or ribbon for a mantel display.

I will occasionally use metallic thread to embroider veins on the leaves for subtle shine and texture.

I advise using a sturdier jingle bell or bead if you want a stronger sound; test different tambourines to get a tone you like.

I sometimes add a small bow or a crocheted ribbon between the berries for a classic holiday touch.

I like to adjust the bell height by changing rounds before the crab stitch; adding more rounds makes a longer, sleeker bell.

I often experiment with stuffing levels and tension to change the bell firmnessβ€”less stuffing makes the bell bellower and lighter to hang.

Common Mistakes & How to Fix Them

βœ— Not crocheting tightly enough when making the bells can cause stuffing or the tambourine to show through; maintain a firm, consistent tension and use a smaller hook if needed. βœ— Forgetting to place or secure the bell language properly can cause the jingle to fall out; pull the thread through the bell eye carefully with a small hook and tie all knots securely. βœ— Skipping stitch counts on rounds with increases and decreases leads to misshapen bells; count stitches after each round, especially after rounds that include multiple increases. βœ— Not leaving long tails on leaves for sewing makes assembly fiddly; leave a generous tail for sewing and hide ends as you attach pieces to the back of the leaves.

Christmas Bells Pattern

Make a charming crocheted Christmas bells decoration with clear step-by-step instructions. This pattern walks you through crocheting two bells, leaves, berries and the hanging loop so you can create a festive ornament for your home or gifts. The design uses DK weight yarn and simple shaping techniques, with photos to guide assembly. Perfect for gifting or seasonal decor β€” make a set to hang on your door or tree.

Intermediate 2-3 Hours

Materials Needed for Christmas Bells Pattern

β€” Main Fabric

  • 01
    DK weight yarn - Yarn Art Jeans (55% cotton/45% acrylic; 50 g/160 m)
  • 02
    Yarn Art Jeans No. 35 (yellow) - bells (main color for bells)
  • 03
    Yarn Art Jeans No. 82 (dark green) - leaves and loop
  • 04
    Yarn Art Jeans No. 90 (red) - berries

β€” Tools Required

  • 01
    Crochet hook size 2.25 mm
  • 02
    Smaller crochet hook (for pulling thread through the bell eye for the bell language)
  • 03
    Stuffing material (fiberfill / polyester)
  • 04
    Tapestry needle
  • 05
    Scissors
  • 06
    Stitch marker (a scrap of contrasting yarn)
  • 07
    Tambourine (jingle bells) - 2 pieces
  • 08
    Yarn needle for sewing and finishing

Progress Tracker

0% Complete

β€” Notes :

Infos :

NOTE! Yarn consumption, size, and appearance of the toy depend on crochet density and how you hold the yarn. The presented toy is crocheted with V and X look single crochet: (First, you grab yarn over the hook, and for making the second stitch grab it under the hook). The finished product using the materials specified in this template has a size of ~4.7*5.1 inches with a loop. Make sure you crochet tight enough; otherwise, the stuffing will show through the holes. Crochet the toy in continuous spirals without turning chains.

β€” BELLS (make 2) :

Info :

Yarn - YarnArt Jeans No. 03 (yellow)

Rnd 1 :

6 into MR

Rnd 2 :

6 inc (12)

Rnd 3 :

(1 sc, inc)*6 (18)

Rnd 4 :

(2 sc, inc)*6 (24)

Rnd 5 :

(3 sc, inc)*6 (30)

Rnds 6-7 :

30 sc (2 rounds)

Rnd 8 :

(4 sc, inc)*6 (36)

Rnds 9-14 :

36 sc (6 rounds)

Rnd 15 :

(5 sc, inc)*6 (42)

Rnds 16-19 :

42 sc (4 rounds)

Info :

* Crochet the next row with Crab (Reverse) stitch

Rnd 20 :

42 sc (Crab stitch), 1 sl st

Info :

Break yarn. Pull tightly. Hide the tail inside.

β€” Bell Language :

Instruction :

Chain 16 with blue yarn. Using a smaller hook, pull the thread into the eye of the bell to grab and pull the thread.

Instruction :

Start working in the second chain from hook 15 sc. Break yarn.

Info :

We attach the finished language to the bell. Tie all the threads. Tie both bells together.

β€” LEAF (make 4) :

Info :

Yarn - YarnArt Jeans No. 82 (dark green)

Instruction :

Chain 15, crochet to the chain foundation. Start working in the second chain from hook - 13 sc, 3 sc in 1 stitch.

Instruction :

Continue crocheting on the other side of the chain foundation. – 12 sc, 3 sc in 1 stitch.

Rnd 2 :

(3 sc, chain 3, 1 sc in the previous stitch)*4, 3 sc, chain 3, 1 sc in the previous stitch, (3 sc, chain 3, 1 sc in the previous stitch)*4, 2 sc, 2 sl st.

Info :

Break yarn, leaving a long tail for sewing.

Info :

* Iron the part with steam if it is uneven. To do this, put a damp cloth on top of a crochet garment and steam it off for a few seconds.

β€” BERRIES (make 3) :

Info :

Yarn - YarnArt Jeans No. 90 (red)

Rnd 1 :

6 into MR

Rnd 2 :

6 inc (12)

Rnds 3-6 :

12 sc (4 rounds)

Info :

Complete stuffing with fiberfill. Tighten the hole using a tapestry needle.

β€” ASSEMBLY :

Step 1 :

Sew four leaves together.

Step 2 :

Using a needle, remove all the threads from the bell to the back of the sheet and tie them together.

Step 3 :

Sew the berries onto the leaves in a cluster as shown in the photos.

Step 4 :

Attach both bells to the tied threads so they hang together and secure any protruding threads by tying or weaving them to the back of the leaves.

Step 5 :

Attach the bell language (the jingle string) through the eye of each tambourine (jingle bell), tie securely and hide knots inside the bell.

β€” LOOP :

Info :

Yarn - YarnArt Jeans No. 82 (dark green)

Rnd 1 :

Chain 41, turn and continue crocheting on the other side of the chain.

Rnd 2 :

40 sc, 1 cp, turn

Rnd 3 :

40 sc

Info :

Cut off the long end of the thread. Use a needle to connect the ends. With the remaining piece of thread, sew the loop to the back of the leaves, thereby hiding all the protruding threads.

Assembly Instructions

  • Sew four leaves together at their bases so they form a cross shape, using the long tail left from each leaf to stitch through the center and tie securely.
  • Using a needle, draw the bell threads (from the bell tops) to the back of the leaf sheet and tie them together so both bells hang evenly.
  • Sew the berries to the top center of the leaves in a clustered triangle arrangement and secure the tails on the back to hide them.
  • Attach the loop to the back of the leaves with the remaining yarn tail, sewing it firmly and hiding all protruding threads for a neat finish.
  • Tie the bell language (jingle string) through the eye of each tambourine and secure inside the bell so the jingles are held in place and the knots are hidden.

Important Notes

  • πŸ’‘Use a small hook and tight tension for the bells to avoid gaps where stuffing or the tambourine can show through.
  • πŸ’‘Work in continuous spirals (amigurumi style) without turning chains for smooth shaping unless otherwise instructed.
  • πŸ’‘Leave long tails on leaves and berries for sewing and assembly to make attachment easier and neater.
  • πŸ’‘Use the crab (reverse) stitch for the final bell row to give a decorative edge and reinforce the bell rim.

These Christmas bells make a lovely festive accent for doors, trees, or gifts and are quick to crochet with DK yarn. Add a set to your holiday decor or make several as handmade gifts for friends and family. Happy crocheting and joyful decorating! πŸŽ„πŸ§Ά

You ask,

we answer.

FAQs

What size will the finished piece be?

The finished decoration measures approximately 4.7 x 5.1 inches with the loop when using the recommended yarn and hook size.

Can I use different yarn weights for this pattern?

Yes, you can use different yarn weights, but this will change the final size; adjust hook size accordingly and remember heavier yarn may need sturdier tambourines/jingles.

Do I need prior crochet experience for this pattern?

This pattern is rated intermediate; basic knowledge of magic rings, increases, decreases, and working in continuous spirals is recommended for best results.

How do I attach the jingle bells so they do not fall out?

Pull the thread through the eye of each tambourine with a smaller hook, tie securely inside the bell, and hide the knot by pulling it inside and weaving the tail to the back of the leaves.