🧢 Beautiful ✨ Detailed πŸ’ Adorable

Gnome Pillow Amigurumi Pattern

Gnome Pillow Amigurumi Pattern
4.3β˜… Rating
5-7 Hours Time Needed
2.1K Made This
βœ‚οΈ

Intermediate Level

Ideal for those with basic crochet experience, featuring slightly more advanced stitches and techniques to expand your skills.

⏱️

Weekend Treat

Takes 5-7 hours, making it an enjoyable project to finish over a couple of days.

🧸

Cute Companion

An adorable friend to cherish, handcrafted with love to bring comfort and joy for years to come.

About This Gnome Pillow Amigurumi Pattern

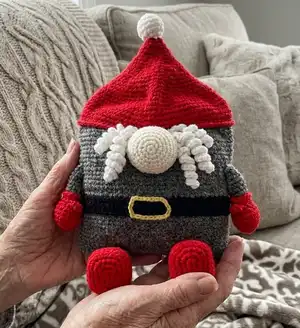
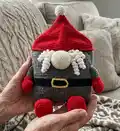
This pattern creates a decorative Gnome Pillow with a shaped hat, pompon, nose, moustache details and little arms and legs. You will work mainly in single crochet in continuous rounds and add finishing touches by sewing on small crocheted parts. The finished pillow is assembled and filled with holofiber for a soft, cuddly look. Photos and clear row counts help keep you on track through shaping and color changes.

Gnome Pillow Amigurumi Pattern crochet pattern - detailed view of completed project

Detailed instructions walk you through the pillow body, hat, pompon, nose, arms, legs and moustache. Ideal as a holiday decoration or a cozy handmade gift for friends and family.

Why You'll Love This Gnome Pillow Amigurumi Pattern

I absolutely love this pattern because it combines simple stitches with charming shaping to make a delightful decorative gnome. I enjoyed the way the hat and pompom give the pillow personality while the moustache details add playful texture. The project is fun to customize with different colors and finishing touches, making each gnome unique. I hope you find the same satisfaction in assembling and styling your gnome as I did designing it.

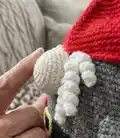
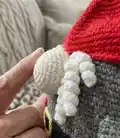
Gnome Pillow Amigurumi Pattern step 1 - construction progress Gnome Pillow Amigurumi Pattern step 2 - assembly progress Gnome Pillow Amigurumi Pattern step 3 - details and accessories Gnome Pillow Amigurumi Pattern step 4 - final assembly and finishing

Switch Things Up

I love how easy it is to personalize this gnome with color switches β€” try pastel tones for a soft nursery accent or deep jewel tones for a rich holiday look.

I sometimes make the pillow larger by switching to a bulkier yarn and using a 5 mm hook to create a chunky, cuddly version that is great for sofa decor.

I also experiment with the hat shape: lengthening the hat rounds creates a slouchy hat, while decreasing faster makes a small pointed top.

I often swap the moustache for a braided yarn beard or felted details for a different texture and personality.

Try small accessories like a crocheted gift bag, tiny heart, or bell sewn to the hat for seasonal flair and gifting appeal.

I like to change the belt color and add embroidered stitching to the belt closure for a more finished, custom touch.

If I want the gnome to stand upright, I add a cardboard insert in the base and increase stuffing firmness to stabilize the pillow.

I sometimes make mini versions of the pattern by using thinner yarn and a smaller hook to create a set of tiny pocket gnomes as ornaments.

For a child-safe version, I replace small sewn parts with embroidered details and avoid beads or safety eyes to make it fully soft and washable.

I encourage trying different fiber blends β€” a wool blend will feel warmer and more textured, while acrylic plush yarn gives a smoother, more uniform surface.

Don't be afraid to experiment β€” slight variations in stitch counts or row numbers can create entirely new characters from this base design.

Common Mistakes & How to Fix Them

βœ— Skipping stitch markers when working rows in a closed loop will make counting difficult; place a marker at the start of each row and move it to track your position. βœ— Not changing colors cleanly can leave loose ends showing on the wrong side; weave in ends or carry yarn neatly and secure color joins before continuing. βœ— Overstuffing the pillow or parts can distort the shape and make sewing more difficult; stuff gradually and shape as you go to maintain the intended silhouette. βœ— Crocheting too tightly at color loop joins can prevent the hat from folding correctly; maintain even tension and avoid pulling loops tight during front/back loop work.

Gnome Pillow Amigurumi Pattern

Make a charming handcrafted Gnome Pillow to decorate your home or give as a thoughtful gift. This pattern guides you through crocheting a plush sitting gnome with a hat, pompom, nose, beard details and little limbs. Clear step-by-step rounds and photos help you shape each piece for a polished finished pillow. Perfect for holiday decor, cozy corners, or a playful present.

Intermediate 5-7 Hours

Materials Needed for Gnome Pillow Amigurumi Pattern

β€” Main Fabric

  • 01
    Himalaya Dolphin Baby (or YarnArt Dolce) plush yarn: Red - about 1.5 skeins
  • 02
    Himalaya Dolphin Baby (or YarnArt Dolce): Gray - about 2 skeins
  • 03
    Himalaya Dolphin Baby (or YarnArt Dolce): Beige - small amount for body details
  • 04
    Himalaya Dolphin Baby (or YarnArt Dolce): White - less than 0.5 skein for pompon and nose
  • 05
    Himalaya Dolphin Baby (or YarnArt Dolce): Black - less than 0.5 skein for belt stripe
  • 06
    Small amount of yellow yarn for belt closure

β€” Tools Required

  • 01
    Crochet hook size 3.5 mm (you can use 4.0 mm)
  • 02
    Needle with a large eye for sewing
  • 03
    Scissors
  • 04
    Stitch markers
  • 05
    Polyester stuffing (holofiber)
  • 06
    Pins for assembly
  • 07
    Cardboard oval inserts for shoe soles (optional)

Progress Tracker

0% Complete

β€” Materials and tools :

Info :

Yarn Himalaya Dolphin baby (or YarnArt Dolce). Colors: red (1,5 skein), gray (2 skein), beige, white and black less than 0,5 skein, little bit of the yellow color for the belt.

Info :

Holofiber (filler). Hook β„– 3.5 (you can use β„–4). Needle with a large eye for sewing.

Info :

Symbols: Crochet in continuous rounds, in spiral. sc – single crochet. inc– increase. dec– decrease. ch – chain. sl st – slip stitch. {} – in brackets there is the number of the resulting loops.

β€” Pillow :

Info :

Crochet with gray yarn.

Round 1 :

crochet 90 ch

Round 2 :

connect with the first loop, crocheting 1 sc (it will be the first loop of the 2nd row) and crochet 89 sc {90}

Round 3 – 14 (13 rows) :

90 sc {90}

Round 15 – 18 (4 rows) :

90 sc {90} (crochet with black yarn)

Round 19 – 35 (17 rows) :

90 sc {90} (change the color to gray, continue to crochet with gray yarn)

Round 36 :

Crochet the next row with red yarn in front loops of the 35th row: 90 sc {90}

Round 36 :

crochet with red yarn in back loops of the 35th row: 90 sc {90}. This is the basic 36th row.

Round 37 :

crochet again with red yarn in front loops of the 36th row: 90 sc {90}

Round 37 :

crochet with gray yarn in back loops of the 36th row: 90 sc {90}

Info :

Do not cut off the red yarn, do not tighten the loop, we will crochet the hat later. Now continue to crochet with gray yarn, as usual. Crochet in both loops of the 37th row.

Round 38 – 40 (4 rows) :

90 sc {90}

Info :

To keep the top of the pillow flat, you can crochet more 8-9 sc.

Info :

Leave the long tail for sewing, tighten the loop. Sew the top of the pillow, secure the thread, hide it inside. Do not fill.

Info :

Crochet 21 ch with yellow yarn, tighten the last loop, leave the thread for sewing. Mark with pins the place where will be the belt closure and sew on it. Secure the thread, hide the ends inside. You can crochet less or more ch, if you want to make the other size of the closure.

Info :

Fill the pillow with the holofiber evenly, fill good the lower edges to make the pillow hold its shape.

β€” Hat :

Info :

Crochet the hat. Go back to the 37th row, continue to crochet with red yarn in the both sides of the loops as usual. Because it will be the 3rd row of the hat, start the numbering from the 3rd row.

Round 3 – 6 (4 rows) :

90 sc {90}

Round 7 :

(13 sc, dec) – repeat 6 times {84}

Round 8 :

(12 sc, dec) – repeat 6 times {78}

Round 9 :

(11 sc, dec) – repeat 6 times {72}

Round 10 :

(10 sc, dec) – repeat 6 times {66}

Round 11 :

66 sc

Round 12 :

(9 sc, dec) – repeat 6 times {60}

Round 13 :

(8 sc, dec) – repeat 6 times {54}

Round 14 :

54 sc

Round 15 :

(7 sc, dec) – repeat 6 times {48}

Round 16 :

(6 sc, dec) – repeat 6 times {42}

Round 17 :

42 sc

Round 18 :

(5 sc, dec) – repeat 6 times {36}

Round 19 :

(4 sc, dec) – repeat 6 times {30}

Round 20 :

30 sc

Round 21 :

(3 sc, dec) – repeat 6 times {24}

Round 22 :

(2 sc, dec) – repeat 6 times {18}

Round 23 :

18 sc

Round 24 :

18 sc

Round 25 :

(1 sc, dec) – repeat 6 times {12}

Round 26 :

12 sc

Round 27 :

(dec) – repeat 6 times {6}. Secure the thread and hide it inside.

β€” Pompon :

Info :

Crochet with white yarn.

Round 1 :

6 sc in magic ring {6}

Round 2 :

(inc) – repeat 6 times {12}

Round 3 :

(1 sc, inc) – repeat 6 times {18}

Round 4 – 6 (3 rows) :

18 sc

Round 7 :

(1 sc, dec) – repeat 6 times {12}. Fill with the holofiber.

Round 8 :

(dec) – repeat 6 times {6}. Leave the thread for sewing. Tighten the loop and sew on the pompon to the hat.

β€” Nose :

Info :

Crochet with white yarn.

Round 1 :

6 sc in magic ring {6}

Round 2 :

(inc) – repeat 6 times {12}

Round 3 :

(1 sc, inc) – repeat 6 times {18}

Round 4 :

(2 sc, inc) – repeat 6 times {24}

Round 5 :

(3 sc, inc) – repeat 6 times {30}

Round 6 :

(4 sc, inc) – repeat 6 times {36}

Round 7 – 9 (3 rows) :

36 sc

Round 10 :

(4 sc, dec) – repeat 6 times {30}. Leave the thread for sewing. Fill the nose and sew on it close to the hat. Tighten the thread, hide it inside the nose.

β€” Arms (2 details) :

Info :

Crochet the finger with red yarn:

Round 1 :

6 sc in magic ring {6}

Round 2 :

6 sc

Info :

Fold the edges and sew them together, crocheting 3 sc together.

Info :

Crochet the mitten with red yarn:

Round 1 :

6 sc in magic ring {6}

Round 2 :

(inc) – repeat 6 times {12}

Round 3 :

(1 sc, inc) – repeat 6 times {18}

Round 4 – 7 (4 rows) :

18 sc

Round 8 :

(1 sc, dec) – repeat 6 times {12}

Round 9 :

2 sc, add the finger, crocheting together with the mitten 3 sc, 7 sc {12}

Round 10 :

12 sc

Round 11 :

crochet 12 sc with gray yarn in back loops, do not tighten the loop, do not cut off the thread.

Round 11 :

crochet 12 sc, sl st with red yarn in the front loops of the 10th row and tighten the loop. Secure the red yarn, hide it inside. Fill the mitten with holofiber and continue to crochet with gray yarn.

Round 12 – 18 (7 rows) :

12 sc

Info :

Do not fill the arms, sew on the arms to the pillow on the sides between the 24th and 25th rows, counting from the bottom of the pillow.

β€” Legs (2 details) :

Info :

Crochet with red yarn.

Round 1 :

crochet 8 ch

Round 2 :

crochet the chain, starting from the 2nd loop from the hook: 6 sc, 3 sc in 1 loop, 6 sc, 3 sc in 1 loop {18}

Round 3 :

6 sc, inc, inc, inc, 6 sc, inc, inc, inc {24}

Round 4 :

8 sc, inc, 1 sc, inc, 9 sc, inc, 1 sc, inc, 1 sc {28}

Round 5 :

8 sc, inc, 1 sc, inc, 1 sc, inc, 9 sc. Finish the row here, do not crochet to the end. Move the marker, the beginning of the next row will be in this place.

Round 6 :

crochet 31 sc in back loops

Info :

At this step, you can cut out an oval from the carton to put inside the shoes, to give a flatter shape to the sole.

Round 7 :

crochet 31 sc as usual in the both sides of the loops, put the carton inside the shoe.

Round 8 :

31 sc

Round 9 :

dec, 1 sc, dec, 1 sc, dec, 21 sc, dec {27}

Round 10 :

1 sc, dec, 1 sc, dec, 19, dec {24}

Round 11 :

dec, dec, dec, 16 sc, dec {20}

Round 12 :

dec, dec, 16 sc {18}

Round 13 :

18 sc

Round 14 :

do not tighten the loop, do not cut off the thread. crochet 18 sc with gray yarn in back loops of the previous row. Do not tighten the loop, do not cut off the thread.

Round 14 :

crochet 18 sc, sl st with red yarn in front loops of the 13th row and tighten the loop, secure the thread and hide it inside the shoe.

Round 15 :

continue to crochet with gray yarn: 18 sc

Info :

Fill the shoe with holofiber, do not fill the leg.

Round 16 – 21 (6 rows) :

18 sc

Info :

Tighten the loop, leave the long thread for sewing. Sew on to the bottom of the pillow, the distance from the edge of the pillow is about 4-5 sc.

β€” Moustache (6 details) :

Info :

Crochet with white yarn.

Round 1 :

crochet 21 ch (if you want the longer moustache, you can crochet more ch)

Round 2 :

start to crochet from the 2nd loop from the hook: crochet 3 sc in each loop. Tighten the loop, leave the long thread for sewing.

Info :

Crochet 6 details and sew on it between the nose and edge of the hat. Sew on 3 details on each side.

Info :

The dwarf is ready!

Assembly Instructions

  • Sew the top of the pillow closed using the long tail left after the final round, hide the thread inside and do not fill the top.
  • Fill the pillow body evenly with holofiber and then sew on the yellow belt closure where marked with pins; hide ends inside for a clean finish.
  • Sew the arms to the pillow sides between the 24th and 25th rows (counting from the bottom) without stuffing the arms.
  • Attach the legs to the bottom of the pillow, spacing them evenly and securing firmly; the distance from the edge is about 4-5 sc.
  • Sew the nose to the hat area close to the top center, then attach the moustache details (3 on each side) between the nose and the hat edge for a balanced look.

Important Notes

  • πŸ’‘Work in continuous rounds (spiral) to avoid visible seam lines and keep your stitch counts consistent throughout the shaping.
  • πŸ’‘When changing colors for the front/back loop detailing, do not cut the red yarn until you have completed the hat setup to avoid loose ends.
  • πŸ’‘Stuff parts gradually and gently β€” overstuffing will distort the shape, while under stuffing makes pieces floppy.
  • πŸ’‘Use stitch markers and a row counter to track long even sections of single crochet, especially when repeating many rows with the same stitch count.

This cozy Gnome Pillow pattern makes a sweet handmade accent for holiday displays or everyday coziness. It combines plush yarn with simple shaping to create a charming sitting gnome that is both decorative and huggable. Make one as a gift or set a few around the house to add handmade holiday cheer. 🧢🎁

You ask,

we answer.

FAQs

What size will the finished piece be?

The finished pillow measures approximately 45x35 cm in the sitting position to the end of the hat, though final size depends on yarn, hook and personal tension.

Can I use a different yarn weight or hook?

Yes, you can substitute yarn and hook sizes but this will change the finished size and density; adjust stuffing and consider using a smaller hook for a denser fabric.

Do I need to know special stitches for this pattern?

This pattern uses basic stitches (single crochet, increase, decrease, slip stitch, and chains) so basic crochet experience is recommended; it is rated intermediate due to assembly and shaping.

How long will this project take to complete?

Most crocheters complete the Gnome Pillow in about 5-7 hours, depending on experience, speed, and how much time is spent on sewing and finishing details.