🧢 Beautiful ✨ Detailed πŸ’ Adorable

Monster Surprise (Mr. Love) Amigurumi Pattern

Monster Surprise (Mr. Love) Amigurumi Pattern
4.8β˜… Rating
8-10 Hours Time Needed
2.8K Made This
βœ‚οΈ

Intermediate Level

Ideal for those with basic crochet experience, featuring slightly more advanced stitches and techniques to expand your skills.

⏱️

All-Day Adventure

Requires 8-10 hours, ideal for a full day of immersive crocheting.

🧸

Cute Companion

An adorable friend to cherish, handcrafted with love to bring comfort and joy for years to come.

About This Monster Surprise (Mr. Love) Amigurumi Pattern

This pattern creates a soft, plush monster called Mr. Love with a secret mouth pocket and removable accessories. The design includes step-by-step rounds for each piece so you can follow along easily. It features a belly patch, legs, arms, tail, spikes, eyes, hearts and candies for playful details.

Monster Surprise (Mr. Love) Amigurumi Pattern crochet pattern - detailed view of completed project

Designed with Hobbii Honey Bunny plush yarn for a fluffy finish and worked in spiral rounds. Suitable for intermediate crocheters comfortable with increases, decreases and sewing pieces together.

Why You'll Love This Monster Surprise (Mr. Love) Amigurumi Pattern

I absolutely love this pattern because it brings together a playful design and tactile plush yarn for a cuddly finished toy. I enjoy the little surprises like the internal mouth pocket and the removable hearts and candies that make gifting so fun. Writing the rounds in detail helped me tune the shaping so the monster sits nicely and looks friendly. I get so much joy seeing makers customize the colors and tiny details to make each monster unique.

Monster Surprise (Mr. Love) Amigurumi Pattern step 1 - construction progress Monster Surprise (Mr. Love) Amigurumi Pattern step 2 - assembly progress Monster Surprise (Mr. Love) Amigurumi Pattern step 3 - details and accessories Monster Surprise (Mr. Love) Amigurumi Pattern step 4 - final assembly and finishing

Switch Things Up

I love how easy it is to personalize Mr. Love by changing yarn colors; try pastel shades for a softer look or bright contrasting colors for a whimsical result.

You can change the size by swapping yarn weight and hook size: bulky yarn with a larger hook will give you a chunky cuddly monster, while a thinner yarn will make a tiny, pocket-sized version.

I often add embroidery for eyebrows or freckles to give the monster a different personality and to practice simple surface crochet techniques.

For a safer toy for babies, choose a single-color body and embroider the eyes instead of using sewn pupils to avoid small parts.

Try adding wire in the arms or tail for posability if you want your monster to strike different poses on a shelf.

I like to make a set of accessories β€” hearts, candies and a tiny hat β€” so the monster has a wardrobe and playful props for photos.

Make the belly patch removable by adding a hidden snap or a small velcro tab to create a secret pocket for notes or small treasures.

If you prefer a firmer shape, use less stuffing and tighter tension, or add a small plastic pellet bag in the base for better stability when sitting.

Experiment with textured stitches or a faux fur yarn for the spikes to give your monster a unique tactile contrast and visual interest.

Finally, I encourage you to mix yarn brands and textures to discover your favorite combination β€” each variation makes every monster feel special and one-of-a-kind.

Common Mistakes & How to Fix Them

βœ— Skipping stitch markers during spiral rounds can cause you to lose track of the start of round; place a marker at the first stitch of each round and move it up as you go. βœ— Overstuffing the head will distort the inside mouth placement and shape; stuff gradually and check the mouth alignment by putting your hand inside before closing. βœ— Forgetting to count stitches after increases or decreases results in mismatched shaping; count your stitches at the end of each round, especially after shaping rounds. βœ— Using inconsistent tension makes pieces not match when sewing together; keep a steady tension and use the same hook throughout to ensure consistent gauge. βœ— Not sewing the belly patch correctly can make the top opening sit unevenly; sew with the first rows facing down and leave the six top stitches open as instructed.

Monster Surprise (Mr. Love) Amigurumi Pattern

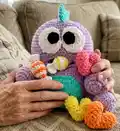
Make your own cuddly Monster Surprise (Mr. Love) with this detailed amigurumi pattern. You will be guided through every round, piece, and assembly step so you can crochet a lovable handmade friend. Perfect for gifting or decorating a nursery, this pattern uses plush yarn for a soft, huggable finish. Follow the clear instructions and enjoy bringing this cheerful monster to life.

Intermediate 8-10 Hours

Materials Needed for Monster Surprise (Mr. Love) Amigurumi Pattern

β€” Main Fabric

  • 01
    Hobbii Honey Bunny (plush yarn) - Lilac (63) approximately 330 g
  • 02
    Hobbii Honey Bunny - Turquoise (94) approximately 60 g
  • 03
    Hobbii Honey Bunny - Peach (33) approximately 15 g
  • 04
    Hobbii Honey Bunny - Candyfloss (45) approximately 15 g
  • 05
    Hobbii Honey Bunny - Lemon Curd (22) approximately 15 g
  • 06
    Hobbii Honey Bunny - White (01) approximately 35 g
  • 07
    Hobbii Honey Bunny - Black (124) approximately 4 g

β€” Tools Required

  • 01
    Crochet hook 6.5 mm
  • 02
    Yarn needle
  • 03
    Stuffing (polyester fiberfill)
  • 04
    Stitch markers (recommended)

Progress Tracker

0% Complete

β€” Before You Start :

Infos :

You'll need - Crochet hook: 6.5 mm. Yarn: I've used Hobbii Honey Bunny. 330 g lilac (63), 60 g turquoise (94), 15 g peach (33), 15 g candyfloss (45), 15 g lemon curd (22) 35 g white (01) and 4 g black (124). Yarn needle. Stuffing.

Infos :

Abbreviations: Mr - magic ring. Sc - single crochet. Ch - chain. Slst - slip stitch. Hdc - half double crochet. Inc - increase. Dec - decrease. Blo - back loop only. Flo - front loop only. St(s) - stitch(es). R - round. RW - row. (...) x - repeat x times. [...] - make everything in the same st.

Infos :

Important information - The total amount of stitches in a round is stated in the parentheses in the end (chains and slip stitches are not counted). Do not fill with stuffing unless the pattern tells you to. Rounds are not joined but made in a spiral. Rows are crocheted from side to side and turned after each row.

Info :

Size: The Monster will be 38 cm / 15 in if you use same yarn and hook size as me. You can use other sizes and/or yarn if you want a bigger or smaller result.

β€” Inside of Mouth (Lilac) :

Round 1 :

6 sc in mr (6)

Round 2 :

6 inc (12)

Round 3 :

12 inc (24)

Round 4 :

(inc - 3 sc) x 6 (30)

Round 5 :

(inc - 4 sc) x 6 (36)

Round 6 :

(inc - 5 sc) x 6 (42)

Round 7-13 :

42 sc (42)

Round 14 :

(dec - 5 sc) x 6 (36)

Round 15 :

36 sc (36)

Round 16 :

(dec - 4 sc) x 6 (30)

Round 17-19 :

30 sc (30)

Round 20 :

(dec - 3 sc) x 6 (24)

Info :

Fasten off and turn the inside out. The yarn tail will be hidden inside the monster when the mouth is crocheted onto the monster.

β€” Inside of Monster (Lilac) :

Round 1 :

6 sc in mr (6)

Round 2 :

6 inc (12)

Round 3 :

12 inc (24)

Round 4 :

(inc - 3 sc) x 6 (30)

Round 5 :

(inc - 4 sc) x 6 (36)

Round 6-18 :

36 sc (36)

Round 19 :

(dec - 4 sc) x 6 (30)

Round 20 :

(dec - 3 sc) x 6 (24)

Info :

Fasten off and turn the inside out. The yarn tail will be hidden inside the monster when the inside of the monster is crocheted onto the monster.

β€” Monster (Lilac) :

Info :

Start with the head.

Round 1 :

6 sc in mr (6)

Round 2 :

6 inc (12)

Round 3 :

12 inc (24)

Round 4 :

(inc - 3 sc) x 6 (30)

Round 5 :

(inc - 4 sc) x 6 (36)

Round 6 :

(inc - 5 sc) x 6 (42)

Round 7 :

(inc - 6 sc) x 6 (48)

Round 8 :

(inc - 7 sc) x 6 (54)

Round 9 :

(inc - 8 sc) x 6 (60)

Round 10 :

(inc - 9 sc) x 6 (66)

Round 11-19 :

66 sc (66)

Info :

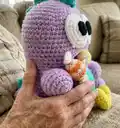
The inside of the mouth is crocheted onto the monster over the next 3 rounds.

Round 20 :

27 sc - 12 sc in both the monster + the inside of the mouth (you're inserting the hook in the next st of the monster and then through the inside of the mouth) (66)

Round 21 :

27 sc - 12 sc in flo of the remaining 12 sts of the inside of the mouth (see pictures) (66)

Round 22 :

27 sc - 12 sc in blo of the remaining 12 sts of the inside of the mouth (see pictures) (66)

Round 23-25 :

66 sc (66)

Info :

Now make the body.

Round 26 :

(inc - 10 sc) x 6 (72)

Round 27 :

(inc - 11 sc) x 6 (78)

Round 28-35 :

78 sc (78)

Info :

Fill the head with stuffing. Put your hand inside the mouth to make sure that you don't fill too much stuffing in the head (the inside of the mouth should be horizontal).

Round 36 :

(dec - 11 sc) x 6 (72)

Round 37 :

(dec - 10 sc) x 6 (66)

Round 38 :

(dec - 9 sc) x 6 (60)

Round 39 :

(dec - 8 sc) x 6 (54)

Round 40 :

(dec - 7 sc) x 6 (48)

Round 41 :

(dec - 6 sc) x 6 (42)

Round 42 :

(dec - 5 sc) x 6 (36)

Round 43 :

(dec - 4 sc) x 6 (30)

Round 44 :

(dec - 3 sc) x 6 (24)

Info :

Fill the body with stuffing. You can put your hand inside the mouth to even it out. Make a hole inside the stuffing and put the inside of the monster in the hole (see pictures).

Round 45 :

(dec in both the monster + the inside of the monster - 2 sc in both the monster + the inside of the monster) x 6 (18)

Round 46 :

18 slst (18)

Info :

Fasten off and sew in yarn tail.

β€” Belly Patch (Turquoise) :

Info :

The belly patch is made in rows. Chain 14 and start 1st row in the 2nd chain from the hook.

Row 1 :

inc - 11 sc - inc - ch - turn (15)

Row 2-8 :

skip ch - 15 sc - ch - turn (15)

Row 9 :

skip ch - dec - 11 sc - dec - ch - turn (13)

Row 10 :

skip ch - 13 sc - ch - turn (13)

Row 11 :

skip ch - dec - 9 sc - dec - ch - turn (11)

Row 12 :

skip ch - dec - 7 sc - dec - ch - turn (9)

Row 13 :

skip ch - dec - 2 sc - dec - sc - dec (6)

Info :

Do not turn, but sc all around the edge of the belly piece. Sew the belly piece onto the monster with the first rows facing down, but DO NOT sew the 6 top stitches - leave this part open for secret letters.

β€” Leg (Make 2) (Lilac) :

Info :

Chain 8 and start 1st row in the 2nd chain from the hook.

Round 1 :

6 sc - 13 sc1 in the last st - now crochet down the other side of the chains - 5 sc - inc (16)

Round 2 :

inc - 5 sc - 3 inc - 6 sc - inc (21)

Round 3 :

2 inc - 4 sc - hdc - [2 hdc] x 7 - hdc - 6 sc (30)

Round 4 :

30 sc in blo (30)

Round 5 :

sc - dec - 13 sc - dec - 12 sc (28)

Round 6 :

11 sc - 9 hdc - 8 sc (28)

Round 7 :

10 sc - 6 dec - 6 sc (22)

Round 8 :

8 sc - 5 dec - 4 sc (17)

Round 9 :

10 sc - dec - 5 sc (16)

Round 10-11 :

16 sc (16)

Info :

Fasten off leaving a long tail for sewing. Fill with stuffing and sew the legs onto the body.

β€” Arm (Make 2) (Lilac) :

Round 1 :

6 sc in mr (6)

Round 2 :

6 inc (12)

Round 3 :

12 inc (24)

Round 4-7 :

24 sc (24)

Round 8 :

(dec - 2 sc) x 6 (18)

Round 9-10 :

18 sc (18)

Round 11 :

(dec - sc) x 6 (12)

Round 12 :

12 sc (12)

Info :

Fasten off leaving a long tail for sewing. Sew the arms onto the body.

β€” Tail (Lilac) :

Round 1 :

4 sc in mr (4)

Round 2 :

(inc - sc) x 2 (6)

Round 3 :

(inc - sc) x 3 (9)

Round 4 :

(inc - 2 sc) x 3 (12)

Round 5 :

(inc - 3 sc) x 3 (15)

Round 6 :

(inc - 4 sc) x 3 (18)

Round 7 :

(inc - 2 sc) x 6 (24)

Round 8 :

(inc - 7 sc) x 3 (27)

Round 9 :

(inc - 8 sc) x 3 (30)

Round 10 :

(inc - 4 sc) x 6 (36)

Round 11 :

(inc - 11 sc) x 3 (39)

Round 12 :

(inc - 12 sc) x 3 (42)

Round 13 :

(inc - 6 sc) x 6 (48)

Round 14 :

(inc - 15 sc) x 3 (51)

Round 15 :

(inc - 16 sc) x 3 (54)

Round 16 :

(inc - 8 sc) x 6 (60)

Round 17 :

(inc - 19 sc) x 3 (63)

Round 18 :

(inc - 20 sc) x 3 (66)

Round 19 :

66 sc (66)

Info :

Fasten off leaving a long tail for sewing. Fill with stuffing and sew the tail onto the body 3 rounds from the hole.

β€” Spike (Make 5) (Turquoise) :

Round 1 :

4 sc in mr (4)

Round 2 :

(inc - sc) x 2 (6)

Round 3 :

(inc - sc) x 3 (9)

Round 4 :

(inc - 2 sc) x 3 (12)

Round 5 :

(inc - 3 sc) x 3 (15)

Round 6 :

(inc - 4 sc) x 3 (18)

Round 7 :

18 sc (18)

Info :

Fasten off leaving a long tail for sewing. Sew the spikes onto the body.

β€” Eye (Make 2) (White) :

Round 1 :

6 sc in mr (6)

Round 2 :

6 inc (12)

Round 3 :

12 inc (24)

Round 4 :

(inc - 3 sc) x 6 (30)

Info :

Fasten off leaving a long tail for sewing.

β€” Pupil (Make 2) (Black) :

Round 1 :

5 sc in mr (5)

Round 2 :

5 inc (10)

Info :

Fasten off leaving a long tail for sewing. Sew the pupil onto the eye. Sew the eyes onto the monster.

β€” Heart (Make 4 in Different Colors) :

Round 1 :

6 sc in mr (6)

Round 2 :

6 inc (12)

Round 3-4 :

12 sc (12)

Info :

Fasten off (1st piece). Repeat R1-4 but do not fasten off (2nd piece). Crochet the two pieces together as follows.

Round 5 :

sc in 1st piece (picture 1) - dec - 6 sc - dec - sc - sc in 2nd piece (picture 2) - dec - 6 sc - dec - sc (20)

Round 6 :

(dec - 3 sc) x 4 (16)

Round 7 :

16 sc (16)

Round 8 :

(dec - 2 sc) x 4 (12)

Round 9 :

12 sc (12)

Info :

Fill with stuffing.

Round 10 :

6 dec (6)

Info :

Close off and weave in yarn end. If there's a hole between the arches of the heart, sew it together.

β€” Candy (Make 4 in Different Colors) :

Round 1 :

6 sc in mr - change color to white (6)

Round 2 :

6 inc in blo - change color to the other color (12)

Round 3 :

(inc - 2 sc) x 4 - change color to white (16)

Round 4 :

16 sc - change color to the other color (16)

Round 5 :

16 sc - change color to white (16)

Round 6 :

(dec - 2 sc) x 4 - change color to the other color (12)

Info :

Fill with stuffing.

Round 7 :

6 dec (6)

Info :

Fasten off in blo - do NOT use the front loops. Sew in the yarn tail.

Infos :

Ends (white): The ends are made in rows in the 6 front loops from R1 and R7. Press the sides together and crochet them together 2 and 2.

Row 1 :

Press the sides together and pull the yarn through 2 x front loops - 2 ch - hdc in the same front loops you pulled the yarn through - hdc in the next 2 x front loops - hdc in the last 2 x front loops - 2 ch - turn (3)

Info :

If it's hard to insert the hook in the front loops, you can use a needle or a smaller hook to loosen them.

Row 2 :

skip 2 ch - [hdc - sc] - dec - [sc - hdc] (6)

Info :

Fasten off and sew in the yarn tails.

Assembly Instructions

  • Sew the inside of the mouth to the head by crocheting it onto the monster over rounds 20-22, ensuring the 12 stitches are worked through both the head and the inside piece as pictured.
  • Sew the belly patch onto the front of the body with the first rows facing down, leaving the 6 top stitches unsewn as an opening for secret letters.
  • Attach legs to the bottom of the body, evenly spaced and firmly sewn for stability, then attach arms to the sides of the body at desired rounds to create a natural pose.
  • Sew spikes along the center back of the monster, spacing the five spikes evenly from the head toward the tail.
  • Place the tail 3 rounds from the hole at the rear and sew securely through the tail's long tail to the body for a neat finish.
  • Sew eyes and pupils onto the face as shown in pictures, centering them above the mouth and aligning for a friendly expression.

Important Notes

  • πŸ’‘Use stitch markers to keep track of round starts when working in a spiral to avoid losing your place.
  • πŸ’‘Do not overstuff the head; put your hand inside the mouth to check that the inside mouth stays horizontal before closing.
  • πŸ’‘Rounds are worked in a spiral (not joined) and stitch counts are given in parentheses at the end of each round.

This Monster Surprise (Mr. Love) is designed to be playful, soft, and full of little details for gifting and play. The secret mouth pocket and removable hearts make it a delightful surprise to discover and personalize. Crochet your own cuddly companion and share the joy of handmade toys with friends and family. πŸ§ΆπŸ’œ

You ask,

we answer.

FAQs

What size will the finished piece be?

The finished amigurumi measures approximately 38 cm / 15 in tall when using the recommended Hobbii Honey Bunny plush yarn and a 6.5 mm hook.

Can I use different yarn weights for this pattern?

Yes, you can use different yarn weights, but this will affect the final size and texture. Use an appropriate hook for your chosen yarn and adjust stuffing amounts accordingly.

Do I need prior crochet experience for this pattern?

This pattern is rated intermediate, so a basic knowledge of crochet stitches and techniques such as working in the round, increases, decreases, and sewing pieces together is recommended.

How long does this project typically take to complete?

Most crocheters complete this project in 8-10 hours, though time may vary depending on experience level, customization, and how many accessory pieces you make.

How do I attach the inside pieces so they are hidden?

When fastening off and turning inside pieces (mouth/inside of monster), leave the yarn tail inside; when crocheting the pieces together you will work through both layers so tails are hidden inside the body.