🧢 Beautiful ✨ Detailed πŸ’ Adorable

Gnome Organizer Amigurumi Pattern

Gnome Organizer Amigurumi Pattern
4.9β˜… Rating
5-7 Hours Time Needed
1.6K Made This
βœ‚οΈ

Intermediate Level

Ideal for those with basic crochet experience, featuring slightly more advanced stitches and techniques to expand your skills.

⏱️

Weekend Treat

Takes 5-7 hours, making it an enjoyable project to finish over a couple of days.

🧸

Cute Companion

An adorable friend to cherish, handcrafted with love to bring comfort and joy for years to come.

About This Gnome Organizer Amigurumi Pattern

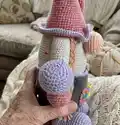
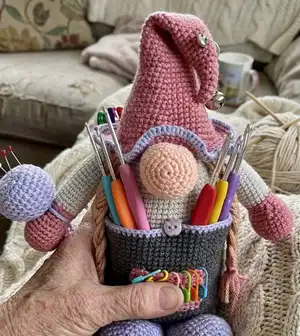
This pattern creates a 25 cm/10 inch gnome organizer with wearable pockets for tools and supplies. The gnome features a stable base, braided pigtails, a tall hat and a removable needle ball. It combines amigurumi shaping with functional pockets for everyday use.

Gnome Organizer Amigurumi Pattern crochet pattern - detailed view of completed project

Worked in continuous rounds with simple increases and decreases, the pattern uses basic stitches and finishing techniques. Photos and assembly notes included to help with placement and final touches.

Why You'll Love This Gnome Organizer Amigurumi Pattern

I absolutely love this pattern because it blends playful amigurumi design with a truly useful purpose β€” an organizer that looks adorable on your desk. I enjoyed designing the stable weighted base so the gnome stands securely while holding tools. I love how the pockets and needle ball make this both decorative and practical. Making the braids and ruffled hat are personal touches that add so much character and joy during the crafting process.

Gnome Organizer Amigurumi Pattern step 1 - construction progress Gnome Organizer Amigurumi Pattern step 2 - assembly progress Gnome Organizer Amigurumi Pattern step 3 - details and accessories Gnome Organizer Amigurumi Pattern step 4 - final assembly and finishing

Switch Things Up

I love customizing this gnome with different color palettes; try autumn tones or bright pastels to match your decor.

I often change yarn weight and hook to alter size β€” using bulkier yarn and a larger hook makes a chunky, huggable organizer.

I like to replace glass beads with washers or river stones for different weights if you cannot find glass beads.

I sometimes embroider small motifs or initials onto the pockets to personalize gifts and add character.

I add felt or crocheted appliques to the hat brim for seasonal themes like snowflakes or leaves.

I experiment with different pocket sizes and placements to hold specific tools like scissors or markers more securely.

I make the braids longer or shorter depending on the style I want, and knot the ends tightly so they do not fray.

I replace the needle ball with a tiny pompom or a small crocheted toy for a different look and feel.

I use safety eyes or embroidered eyes depending on whether the gnome will be handled by small children for safety or display purposes.

I sometimes add wire into the arms for poseability if I want the gnome to hold items at different angles.

Common Mistakes & How to Fix Them

βœ— Skipping the cardboard base and glass beads will make the organizer unstable; cut a rigid cardboard/plastic circle to the same diameter as the crocheted circle and insert 5–10 glass beads before adding stuffing to stabilize the base. βœ— Not stuffing as you go causes gaps or lumpy shape; add filler gradually while shaping, and leave some stuffing until after inserting the weight and base to maintain even form. βœ— Forgetting to change to BLO when instructed will change the edge appearance; switch to BLO exactly at the round noted to create the neat pant edge detail. βœ— Not weaving in ends securely can cause parts to come loose after use; weave in ends and knot securely, especially on pockets, hands and legs where handling is frequent. βœ— Sewing pockets to the body instead of only to pants can distort fit; follow the note to sew pockets only to the pants and attach buttons as indicated for a clean finish.

Gnome Organizer Amigurumi Pattern

Make a charming gnome organizer that doubles as a useful desk caddy. This pattern guides you through crocheting a sturdy body with pockets, a whimsical hat, braids and cute accessories so your tools stay tidy. You will love how practical and decorative this gnome is β€” perfect as a gift or for your own craft corner. Clear step-by-step rounds and helpful assembly notes make following along simple.

Intermediate 5-7 Hours

Materials Needed for Gnome Organizer Amigurumi Pattern

β€” Main Fabric

  • 01
    Acrylic yarn 50 g / 125 m (use multiple colors: grey, white, purple, pink, beige, brown)
  • 02
    Grey yarn - approximately 50g for body base and pants detail
  • 03
    White yarn - approximately 50g for top body and sleeves
  • 04
    Purple yarn - approximately 50g for legs, needle ball and pocket trims
  • 05
    Pink yarn - approximately 50g for hat and hands
  • 06
    Beige yarn - small amount for nose (approx. 10-20g)
  • 07
    Brown yarn - small amount for pigtails (approx. 10-20g)

β€” Tools Required

  • 01
    Crochet hook size 2.5 mm
  • 02
    Fiberfill stuffing
  • 03
    Sewing/embroidery needle
  • 04
    Thread for embroider
  • 05
    Hard cardboard or plastic circle for base (cut to size of crocheted circle)
  • 06
    5 to 10 glass balls (to weigh the base)
  • 07
    Scissors
  • 08
    Yarn needle for sewing and weaving ends
  • 09
    Pins for assembly and positioning parts

Progress Tracker

0% Complete

β€” Body :

Grey yarn :

1. (6 sc) into MR

Round R2 :

(inc) x 6 = 12 sc

Round R3 :

(1sc, inc) x 6 = 18

Round R4 :

(2sc, inc) x 6 = 24

Round R5 :

(3sc, inc) x 6 = 30

Round R6 :

(4sc, inc) x 6 = 36

Round R7 :

(5sc, inc) x 6 = 42

Round R8 :

(6sc, inc) x 6 = 48

Round R9 :

(7sc, inc) x 6 = 54

Round R10 :

(8sc, inc) x 6 = 60

Round R11 :

(9sc, inc) x 6 = 66

Round R12 :

(10sc, inc) x 6 = 72

Round R13 :

BLO = 72 sc

Rounds R14-15 :

= 72 sc (2 rounds)

Info :

Cut a circle out of hard cardboard or plastic. The size of the circle should be the same size as the crocheted circle.

Info :

Also put 5 to 10 glass balls inside. See the photo. This is necessary for the doll to stand well.

Info :

In the process of crocheting, put filler inside the body.

White yarn :

R16.- R42. = 72 sc (27 rounds)

Round R43 :

(10sc, dec) x 6 = 66

Rounds R44-45 :

= 66 sc (2 rounds)

Round R46 :

(9sc, dec) x 6 = 60

Rounds R47-48 :

= 60 sc (2 rounds)

Round R49 :

(8sc, dec) x 6 = 54

Rounds R50-51 :

= 54 sc (2 rounds)

Round R52 :

(7sc, dec) x 6 = 48

Round R53 :

(6sc, dec) x 6 = 42

Round R54 :

(5sc, dec) x 6 = 36

Round R55 :

(4sc, dec) x 6 = 30

Round R56 :

(3sc, dec) x 6 = 24

Round R57 :

(2sc, dec) x 6 = 18

Round R58 :

(1sc, dec) x 6 = 12

Round R59 :

(6 dec) = 6

Info :

To break yarn.

β€” Pants :

Attach yarn :

Attach yarn in 13 round

Pants R1 :

FLO (5sc, inc) x 12 = 84

Rounds R2-27 :

= 84 sc (26 rounds)

Purple yarn :

R28. = 84 sc

Info :

To break yarn.

β€” Hat :

Pink yarn R1 :

(3 sc) into MR

Round R2 :

= 3 sc

Round R3 :

(inc) x 3 = 6 sc

Rounds R4-5 :

= 6 sc (2 rounds)

Round R6 :

(1sc, inc) x 3 = 9

Rounds R7-8 :

= 9 sc (2 rounds)

Round R9 :

(2sc, inc) x 3 = 12

Rounds R10-11 :

= 12 sc (2 rounds)

Round R12 :

(3sc, inc) x 3 = 15

Rounds R13-14 :

= 15 sc (2 rounds)

Round R15 :

(4sc, inc) x 3 = 18

Rounds R16-17 :

= 18 sc (2 rounds)

Round R18 :

(5sc, inc) x 3 = 21

Rounds R19-20 :

= 21 sc (2 rounds)

Round R21 :

(6sc, inc) x 3 = 24

Rounds R22-23 :

= 24 sc (2 rounds)

Round R24 :

(7sc, inc) x 3 = 27

Rounds R25-26 :

= 27 sc (2 rounds)

Round R27 :

(8sc, inc) x 3 = 30

Rounds R28-29 :

= 30 sc (2 rounds)

Round R30 :

(9sc, inc) x 3 = 33

Rounds R31-32 :

= 33 sc (2 rounds)

Round R33 :

(10sc, inc) x 3 = 36

Rounds R34-35 :

= 36 sc (2 rounds)

Round R36 :

(5sc, inc) x 6 = 42

Rounds R37-38 :

= 42 sc (2 rounds)

Round R39 :

(6sc, inc) x 6 = 48

Rounds R40-41 :

= 48 sc (2 rounds)

Round R42 :

(7sc, inc) x 6 = 54

Round R43 :

= 54 sc

Round R44 :

(8sc, inc) x 6 = 60

Round R45 :

= 60 sc

Round R46 :

(9sc, inc) x 6 = 66

Round R47 :

= 66 sc

Round R48 :

(5sc, inc) x 11 = 77

Round R49 :

(6sc, inc) x 11 = 88

Purple yarn R50 :

(1 sc, 1inc) x 44 = 132

Info :

To break yarn. To weave in ends.

β€” Hands :

Pink yarn R1 :

(6 sc) into MR

Round R2 :

(inc) x 6 = 12 sc

Round R3 :

(1sc, inc) x 6 = 18

Round R4 :

(2sc, inc) x 6 = 24

Rounds R5-9 :

= 24 sc (5 rounds)

Round R10 :

(2sc, dec) x 6 = 18

Round R11 :

(1sc, dec) x 6 = 12

Round R12 :

(1sc, inc) x 6 = 18

Round R13 :

= 18 sc

White yarn R14 :

= BLO 18 sc

Rounds R15-R31 :

= 18 sc (17 rounds)

Info :

Put the filler inside not completely.

Info :

Fold the part in half. Crochet 9 sc. To break yarn. To weave in ends.

Info :

Attach hands to the body.

β€” Legs :

Purple yarn R1 :

(6 sc) into MR

Round R2 :

(inc) x 6 = 12 sc

Round R3 :

(1sc, inc) x 6 = 18

Round R4 :

(2sc, inc) x 6 = 24

Round R5 :

(3sc, inc) x 6 = 30

Rounds R6-10 :

= 30 sc (5 rounds)

Round R11 :

(3sc, dec) x 6 = 24

Round R12 :

= 24 sc

Round R13 :

(2sc, dec) x 6 = 18

Round R14 :

= 18 sc

Info :

Put the filler inside not completely.

Info :

Fold the part in half. Crochet 9 sc. To break yarn. To weave in ends.

Info :

Attach legs to the body.

β€” Nose :

Beige yarn R1 :

(6 sc) into MR

Round R2 :

(inc) x 6 = 12 sc

Round R3 :

(1sc, inc) x 6 = 18

Round R4 :

(2sc, inc) x 6 = 24

Round R5 :

(3sc, inc) x 6 = 30

Rounds R6-9 :

= 30 sc (4 rounds)

Round R10 :

(3sc, dec) x 6 = 24

Round R11 :

(2sc, dec) x 6 = 18

Info :

In the process of crocheting, put filler inside the nose.

Info :

Fold the part in half. Crochet 9 sc. To break yarn. To weave in ends.

Info :

Attach legs to the body.

β€” Needle ball :

Purple yarn R1 :

(6 sc) into MR

Round R2 :

(inc) x 6 = 12 sc

Round R3 :

(1sc, inc) x 6 = 18

Round R4 :

(2sc, inc) x 6 = 24

Round R5 :

(3sc, inc) x 6 = 30

Rounds R6-9 :

= 30 sc (4 rounds)

Round R10 :

(3sc, dec) x 6 = 24

Round R11 :

(2sc, dec) x 6 = 18

Round R12 :

(1sc, dec) x 6 = 12

Round R13 :

(6 dec) = 6

Info :

In the process of crocheting, put filler inside the nose.

Info :

To break yarn. To weave in ends. Attach thread to tie to hand.

β€” Pigtails :

Brown :

Yarn length for a 3-ply braid 15 cm / 6 in.

β€” Pockets :

Front pocket (1 part) pink yarn R1 :

13 ch, crochet into the 2nd ch from the hook 12 sc, turn knit

Rounds R2-R8 :

12 sc, turn knit (7 rounds)

Info :

To break yarn.

Back pockets (2 parts) purple yarn R1 :

14 ch, crochet into the 2nd ch from the hook 13 sc, turn knit

Rounds R2-R10 :

13 sc, turn knit (9 rounds)

Info :

To break yarn. Attach pockets to the pants.

Info :

Attention, pockets are sewn only to the pants. Not to pants and body!

Info :

Attach the button to the front of the pants and body.

Assembly Instructions

  • Cut a cardboard or plastic circle the same diameter as the crocheted base and insert it into the bottom of the pants before finishing the last rows to create a rigid base.
  • Before closing the bottom, place 5–10 glass balls into the base, then add fiberfill and sew closed so the gnome stands securely.
  • Pin and sew the legs to the lower front of the body, spacing evenly and stitching through the pant edge to secure them firmly.
  • Attach the hands to either side of the body between the sleeve rounds, folding and sewing the hand tops as instructed for a neat seam.
  • Sew front and back pockets only to the pants, not the body; attach the button to the front of the pants as shown for decoration and closure.
  • Attach the needle ball to the hand using a length of yarn, and secure braids/pigtails to the head with tied threads and sewn stitches.

Important Notes

  • πŸ’‘Use stitch markers or a contrasting thread to mark round starts so you maintain correct stitch counts.
  • πŸ’‘Insert the cardboard base and glass balls before finishing stuffing to ensure a stable foundation.
  • πŸ’‘Weave in and secure ends after finishing each part to prevent unraveling during assembly.
  • πŸ’‘Pin parts in place and check symmetry before sewing to make sure the gnome looks balanced and neat.

This adorable Gnome Organizer brightens any craft table while keeping tools close at hand. It doubles as a playful desk caddy and a handmade gift full of charm. Give it as a sweet present or keep it for your own projects β€” handmade joy in every stitch! 🧢✨

You ask,

we answer.

FAQs

What size will the finished piece be?

The finished gnome organizer measures approximately 25 cm / 10 inches tall when worked with the recommended yarn and 2.5 mm hook.

Can I use different yarn weights for this pattern?

Yes, you can use different yarn weights but the finished size and stability will change; use an appropriate hook size and consider more or fewer glass beads to maintain balance.

Do I need prior crochet experience for this pattern?

This pattern is rated intermediate; basic knowledge of amigurumi techniques (magic ring, increases, decreases, working in rounds) is recommended for best results.

How long does this project typically take to complete?

Most crafters finish this gnome in about 5-7 hours, depending on experience and assembly time; adding pockets and braids may extend the time.