🧶 Beautiful ✨ Detailed 💝 Adorable

Fruit Snack Coozie Pack Pattern

Fruit Snack Coozie Pack Pattern
4.5★ Rating
2-3 Hours Time Needed
1.2K Made This
✂️

Beginner Friendly Level

Perfect for those just starting their crochet journey, with clear instructions and simple techniques

⏱️

Bite-Sized Project

Finishes in 2-4 hours—perfect for an afternoon of creative relaxation.

Warm Welcome

A comforting piece for home or gifts that brings handmade warmth to everyday moments and special occasions.

About This Fruit Snack Coozie Pack Pattern

This pattern pack includes three fun fruit-themed coozies: strawberry, watermelon, and lemon. Each coozie is worked from the bottom up with basic crochet stitches and finished with simple appliqued leaves or sewn 'seeds'. The patterns use worsted-weight mercerized cotton and include clear notes on color changes and placement.

Fruit Snack Coozie Pack Pattern crochet pattern - detailed view of completed project

Ideal for gifting or a sunny weekend project, these coozies are quick to make and customizable. Photos and stitch notes are included to help you match gauge and finish neatly.

Why You'll Love This Fruit Snack Coozie Pack Pattern

I absolutely love this pattern because it turns a simple everyday object into something joyful and handmade. I enjoy how quickly each coozie works up — you can finish one in an afternoon and already have a cute gift. I also love that the patterns are flexible: you can change colors, add different appliques, or adapt the size with a different yarn and hook. The little sewn seeds and leaves add personality and make each coozie feel special. Sharing these as gifts always brings a smile, and I love hearing how makers customize them.

Fruit Snack Coozie Pack Pattern step 1 - construction progress Fruit Snack Coozie Pack Pattern step 2 - assembly progress Fruit Snack Coozie Pack Pattern step 3 - details and accessories Fruit Snack Coozie Pack Pattern step 4 - final assembly and finishing

Switch Things Up

I love how easy these coozies are to customize — try swapping the colors to create different fruits, such as using orange and green for a tiny orange design.

You can make the coozie larger or smaller by changing yarn weight and hook size; bulky yarn with a larger hook results in a chunky cozy while lighter yarn creates a mini can cozy.

I often add embroidery instead of sewn seeds for a slightly flatter finish — a series of French knots or single crochet stitches in contrasting yarn works well.

If you prefer a non-cotton option, try an acrylic worsted yarn but check gauge because stitch size changes and can affect fit around the can.

To make a snugger rim, work one extra round of single crochet at the top, or for a looser rim, slip stitch loosely around as suggested in the pattern.

I sometimes replace the leaf appliques with little bows, buttons, or felt cutouts for a different look — sew them on where the photos show the leaves positioned.

For a set theme, make all three coozies using the same accent color for the leaves or seeds to tie them together as a gift set.

Consider adding a small hanging loop by chaining a few stitches and attaching it to the rim if you want to hang the coozie as an ornament or for storage.

I recommend testing one coozie as your sample and taking notes on hook size and tension, then repeat with any changes to create consistent matching sets.

Finally, I enjoy mixing in a textured stitch for the body (such as a half double crochet spike or lemon peel variations) to give a subtle surface interest; experiment and have fun with it!

Common Mistakes & How to Fix Them

✗ Placing the first sc into the ch-1 space after turning; instead insert your first sc into the first stitch as shown in the photos to keep rows even. ✗ Not checking gauge before starting on different yarns; solution: make the bottom circle and measure to match approximately 6.5 cm after round 6 so the coozie will fit the can. ✗ Changing hook size without testing stitch count may break the pattern math; solution: adjust hook until you achieve the 36-stitch count at round 6 before continuing. ✗ Sewing the seeds without planning spacing can look uneven; solution: mark or count stitches and insert seeds every four sc as directed for consistent spacing. ✗ Pulling yarn too tight when joining color changes can pucker the work; solution: join colors loosely and finish with a slip stitch and weave in ends smoothly. ✗ Skipping the turning instruction and failing to alternate RS/WS rows; solution: follow the explicit TURN or DO NOT TURN notes each round to maintain pattern shaping.

Fruit Snack Coozie Pack Pattern

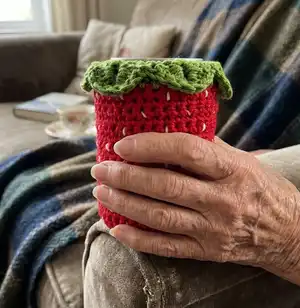
Make three playful fruit-themed can coozies — Strawberry, Watermelon and Lemon — perfect for brightening up drinks and gifting. This pack uses simple stitches, color changes, and a little applique to create charming fruit details. Clear step-by-step instructions and photos help you follow along so you can finish a cheerful coozie in an afternoon.

Beginner Friendly 2-3 Hours

Materials Needed for Fruit Snack Coozie Pack Pattern

— Main Fabric

  • 01
    Worsted weight (size 4) cotton - Lion Brand 24/7 100% mercerized cotton (recommended)
  • 02
    Strawberry colors: Red, Ecru (for seeds), Grass (green) for leaves
  • 03
    Watermelon colors: White, Mint (green), Pink, Black (for seeds)
  • 04
    Lemon colors: Lemon (yellow) and Grass (green) for leaves
  • 05
    Small amounts of contrast yarn for details; plan on a few grams per color (pattern testers used small skeins)

— Tools Required

  • 01
    Crochet hook size H (4.0 mm)
  • 02
    Crochet hook size E (3.5 mm) for standard can option (lemon notes)
  • 03
    Tapestry needle for sewing and weaving ends
  • 04
    Stitch marker
  • 05
    Scissors
  • 06
    Small length of ecru yarn (about 110 inches) for sewing seeds (strawberry example)
  • 07
    Optional: yarn needle for embroidery of seeds

Progress Tracker

0% Complete

— General Pattern Notes :

Infos :

Always Ch 1 at beginning of the round (does NOT count as stitch). Must have understanding of how to make Magic Ring. Written in US terms. I suggest sewing the 'seeds' on as you go. You will always end each round by joining with a sl st in first sc of that round. I suggest having a can besides you to continuously measure throughout to make sure the can fits. Must have an understanding of Color Change between rounds.

Infos :

Gauge: Standard: after round 6: ~ 6 1/2 cm across (stated for Strawberry/Watermelon) ; For Lemon: Bottom after round 6: ~6 cm across, Height from bottom to top lying flat: 5". Difficulty for patterns listed as Upper Beginner in original notes.

— Stitch Notes :

Info :

Make sure not to place your first sc in the ch 1 space after turning (See photo at bottom of pattern for reference). Again, if your gauge is too small, check your tension or hook size. Photos on making the stem/leaves portion at bottom of pattern.

— Strawberry Coozie :

Info :

Make a Magic Circle with Red

Round 1 :

into the magic circle, work 6 sc. Sl st to first sc [6]

Round 2 :

Ch 1, (sc inc) x 6. Sl st to first sc [12]

Round 3 :

Ch 1, (sc, sc inc) x 6. Sl st to first sc [18]

Round 4 :

Ch 1, (2 sc, sc inc) x 6. Sl st to first sc [24]

Round 5 :

Ch 1, (3 sc, sc inc) x 6. Sl st to first sc [30]

Round 6 :

Ch 1, (4 sc, sc inc) x 6. Sl st to first sc [36]

Round 7 :

Ch 1, BLO 36 sc. Sl st to first sc. TURN [36]

Round 8 :

(WS) Ch 1, 36 sc, sl st to first sc. TURN [36]

Round 9-24 :

Repeat round 8 *be sure to turn after each round, alternating from RS to WS* [36] at the end of round 24, change color to Grass/green you will now begin making leaves *photos at bottom of pattern for reference*

Round 25 :

(RS) Ch 3, skip st, dc in next st, ch 1, skip st (dc in next 2 sts, ch 1, skip a st) repeat x11, sl st in ch 3 *see photos: 1 & 2 at bottom of page* [24, including ch 3]

Round 26 :

Follow steps below: 1. Ch 1, fold and rotate coozie vertically with ch 3 at the top *see photo 3*. 2. 4 fpdc on the previous row ch 3 {you are going to stack them one on top of the other start from the top of coozie working down} *see photo 4*. 3. rotate coozie back horizontally with red part on bottom *see photo 5*. 4. fold and rotate coozie vertically the opposite direction *see photo 6*. 5. 4 fpdc on the next dc from the previous row, starting from bottom working to top of coozie *see photo 7*. 6. Ch 1, sk the next two dc *see photo 8*. 7. Repeat steps 1 to 6 till the end, (make sure to end on a ch 1) sl st to end [6 leaves]

Sewing on the 'seeds' (placement is a suggestion) :

as noted above, I sew them as I go but that's optional, just do what you feel most comfortable doing. You'll need to cut at least 110 inches of ecru. *photos at end for reference* 1. Starting in hole just above and in between the first sc and ch 1 from round 7, insert needle from WS through, pull yarn all the way through leaving a small tail. 2. Reinsert needle from RS in hole just below the first sc from round 9. 3. Count 4 sts, insert hook from WS (in 4th st) in this case just above and in between the 4th and 5th sc of same row. 4. Continue sewing in seeds every 4 sc. 5. Next row: insert needle in hole just above and in between 2nd and 3rd sc of round 9, repeat same steps as 2 and 3. 6. Next 8 rows of seeds: just as previous row, seeds will be sewn in every 4 sc, and every other round, alternating inserting needle between (sc and ch 1) and (2nd and 3rd sc). Fasten off and weave in ends.

— Watermelon Coozie :

Info :

Make a Magic Circle with Mint (green)

Round 1 :

into the magic circle, work 6 sc. Sl st to first sc [6]

Round 2 :

Ch 1, (sc inc) x 6. Sl st to first sc [12]

Round 3 :

Ch 1, (sc, sc inc) x 6. Sl st to first sc [18]

Round 4 :

Ch 1, (2 sc, sc inc) x 6. Sl st to first sc [24]

Round 5 :

Ch 1, (3 sc, sc inc) x 6. Sl st to first sc [30]

Round 6 :

Ch 1, (4 sc, sc inc) x 6. Sl st to first sc [36]

Round 7 :

Ch 1, BLO 36 sc, Sl st to first sc. TURN [36 for remainder of pattern]

Round 8 :

(WS) Ch 1, 36 sc. Sl st to first sc. color change to white, turn

Round 9 :

(RS) Ch 1, 36 sc. Sl st to first sc. color change to Pink DO NOT TURN

Round 10 :

(RS) Ch 1, 36 sc, Sl st to first sc. turn

Round 11 :

(WS) Ch 1, 36 sc, Sl st to first sc. turn

Round 12 :

(RS) Ch 1, 36 sc, Sl st to first sc. turn

Round 13 :

(WS) Ch 1, 36 sc, Sl st to first sc. turn

Round 14 :

(RS) Ch 1, (5 sc, color change to black, HDC spike st in next st, CC to pink) rep 6 x to end. Note: You should end with a HDC spike st, BUT before you sl st color change to pink, Sl st to first sc. turn

Round 15 :

(WS) Ch 1, 36 sc, Sl st to first sc. turn

Round 16 :

(RS) CH 1, 36 sc, Sl st to first sc. turn *if you want, as i wrote in stitch notes, I do spike sts around black seeds to hide the black) pictures at bottom of pattern*

Round 17 :

(WS) Ch 1, 36 sc, Sl st to first sc. turn

Round 18 :

(RS) Ch 1, 2 sc in pink, change color to black, hdc spike, change color to pink, (5 sc in pink, change color to black, hdc spike in next stitch, change color to pink) rep 5x, end with sc in the last 3 sts, sl st with first sc, turn

Round 19 :

(WS) Ch 1, 36 sc, Sl st to first sc. turn

Round 20 :

(RS) Ch 1, 36 sc, Sl st to first sc. turn

Round 21-24 :

Repeat rounds 13-16

Round 25-28 :

Repeat rounds 17-20

Round 29 :

(WS) Ch 1, 36 sc, Sl st to first sc. turn

Round 30 :

(RS) Loosely sl st in each st around. If you find that the rim is too tight around, you can just sc in each st around instead

Info :

Fasten off and weave in ends

— Watermelon Optional Notes :

Info :

Optional Spike Stitch over black seeds as shown in photos to hide black seed yarn if desired.

— Lemon Coozie :

Info :

Make a Magic Circle with Lemon (yellow)

Round 1 :

into the magic circle, work 6 sc [6]

Round 2 :

Ch 1, (sc inc) x 6. Sl st to first sc [12]

Round 3 :

Ch 1, (sc, sc inc) x 6. Sl st to first sc [18]

Round 4 :

Ch 1, (2 sc, sc inc) x 6. Sl st to first sc [24]

Round 5 :

Ch 1, (3 sc, sc inc) x 6. Sl st to first sc [30]

Round 6 :

Ch 1, (4 sc, sc inc) x 6. Sl st to first sc [36]

Round 7 :

Ch 1, BLO (sc, dc), repeat to end. Sl st to first sc. TURN [36 for remainder of pattern]

Round 8 :

Ch 1, (sc, dc), repeat to end. Sl st to first sc. turn

Round 9-22 :

repeat round 8, making sure to turn after each round alternating working on RS and WS

Round 23 :

Ch 1, 36 sc, do not sl st at end, instead cut yarn and fasten off and join with invisible seam to 1st sc of round

Leaves :

Using Grass (green) Yarn you will make two, 1 big and 1 small

Big Leaf :

Ch 11, sc in the 2nd ch from hook, hdc, 5 dc, 2 hdc, sc inc, ch 2. Now rotate so you are now working on opposite side. Sc inc, 2 hdc, 5 dc, hdc, sc. sl st all the way around the leaf. fasten off leaving a long tail for sewing on applique. sew onto coozie as show in photo

Small leaf :

Ch 9, sc in 2nd ch from hook, hdc, 4 dc, hdc, sc inc, ch 1, working on opposite side, sc inc, hdc, 4 dc, hdc, sc, then sl st around entire leaf. fasten off leaving long enough tail for sewing. sew onto coozie as shown in photo

Info :

Where to place first stitch when turning: place 1st sc in each row here (see photos). Follow images for visual reference of where to place first stitch and leaf placement.

Assembly Instructions

  • Sew leaves onto the top rim as shown in the photos; position the big and small leaves symmetrically and use long tails to stitch appliques securely to the coozie.
  • Sew the ecru 'seeds' into the red Strawberry coozie by inserting needle through the holes described: start above and between the first sc and ch1 from round 7, then follow the 4-stitch spacing guideline and alternate rows.
  • Join the final round (when indicated) with an invisible seam for a neat finish, or loosely sl st around the rim for a decorative edge if preferred.
  • Weave in all ends securely and block lightly as needed; keep a can nearby while working to ensure the coozie fits snugly but not too tight.
  • If adding the strawberry leaf ruffle (fpdc rows), follow the folding and rotating steps carefully so leaves stack correctly and match the photos.

Important Notes

  • 💡Use stitch markers and count stitches frequently to ensure you maintain the 36-stitch circumference for the math to work correctly.
  • 💡Test gauge after round 6 and adjust hook size if necessary so the coozie will fit the can as intended.
  • 💡When changing colors, join and tension loosely to avoid puckering; slip stitch to secure and weave ends neatly.
  • 💡Sew seeds and appliques with the coozie positioned on a can to confirm placement before permanently securing.

This Fruit Snack Coozie Pack brings playful handmade charm to your drinks and gifts. Bright colors, tiny seed details, and sweet leaves make each coozie unique and fun to create. Perfect for maker gatherings, gifting, or a sunny afternoon project. 🧶🍋🍓

You ask,

we answer.

FAQs

What size will the finished piece be?

The finished coozie fits a standard 12 oz can when you match the gauge; bottom after round 6 measures about 6-6.5 cm across depending on the specific pattern.

Can I use different yarn weights for this pattern?

Yes, but changing yarn weight will alter the final size; if you go up or down in weight, adjust your hook and check gauge so the circumference is 36 stitches at round 6 for the pattern math to work.

Do I need prior crochet experience for this pattern?

This pack is beginner friendly but assumes you know basic stitches (sc, dc, hdc), how to make a magic circle, and how to change colors within rounds.

How long does this project typically take to complete?

Most makers finish one coozie in 2-3 hours, though time may vary depending on experience and whether you add seeds or appliques.