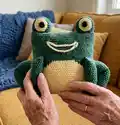
🧢 Beautiful ✨ Detailed πŸ’ Adorable

Frog Pillow Amigurumi Pattern

Frog Pillow Amigurumi Pattern
4.7β˜… Rating
8-10 Hours Time Needed
2.6K Made This
βœ‚οΈ

Intermediate Level

Ideal for those with basic crochet experience, featuring slightly more advanced stitches and techniques to expand your skills.

⏱️

All-Day Adventure

Requires 8-10 hours, ideal for a full day of immersive crocheting.

🧸

Cute Companion

An adorable friend to cherish, handcrafted with love to bring comfort and joy for years to come.

About This Frog Pillow Amigurumi Pattern

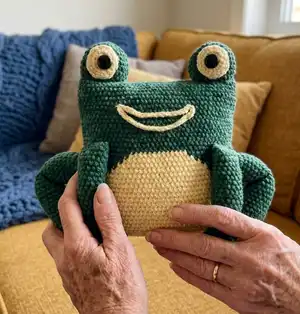
This pattern creates a soft frog-shaped pillow with textured limbs and charming facial details. Youll work mostly in continuous rows and alternate colors to form the belly and body panels. The pattern includes full instructions for eyes, mouth, arms (with fingers), and legs so you can assemble a complete toy-pillow.

Frog Pillow Amigurumi Pattern crochet pattern - detailed view of completed project

Perfect as a gift or nursery decoration, the finished pillow can sit or have dangling legs depending on how you sew them. Clear step-by-step rounds and photos are included to help you finish with confidence.

Why You'll Love This Frog Pillow Amigurumi Pattern

I absolutely love this pattern because it combines simple stitches with playful shaping to make something both decorative and huggable. I enjoyed designing the alternating-color belly so the frog feels lively and detailed without complicated colorwork. The limbs and fingers let you practice small amigurumi assembly while producing expressive results that kids and adults adore. Sewing options let me personalize whether the frog sits proudly or lounges with dangling legs, which is a fun finishing choice.

Frog Pillow Amigurumi Pattern step 1 - construction progress Frog Pillow Amigurumi Pattern step 2 - assembly progress Frog Pillow Amigurumi Pattern step 3 - details and accessories Frog Pillow Amigurumi Pattern step 4 - final assembly and finishing

Switch Things Up

I love how easily this pattern adapts to different sizes by switching yarn and hook; use chunky yarn and a larger hook for a fluffy, oversized frog pillow.

I sometimes change the body color to two-tone pastels to create a softer nursery-friendly version that coordinates with baby bedding.

For a mini keychain version, use fingering weight yarn with a 2.5 mm hook and reduce the starting chain and rounds proportionally to keep the same shape.

I often add embroidered freckles or a tiny felt crown for personalityβ€”these small touches really make each frog unique and gift-ready.

You can swap shank buttons for safety eyes or embroider pupils for a child-safe option that still looks expressive and bright.

If you want posable legs, slip a thin floral wire into the leg tubes before finishing; this lets you shape perches or poses for display.

I recommend experimenting with different belly shapes: a wider yellow panel or a heart-shaped belly can give the frog a different character.

Try outlining the mouth with a contrasting thread for more definition, or stuff the mouth chain lightly so it sits raised off the face for extra expression.

I sometimes crochet little accessories like a tiny blanket or bow tie to make a set of frogs for gifting β€” mix and match colors across a family of frogs.

Finally, consider using variegated yarn for the body to produce a subtle mottled effect that looks especially textured with the Dolphin Baby yarn used in the sample.

Common Mistakes & How to Fix Them

βœ— Changing colors without securing and weaving tails can result in loose loops and visible ends; always cut and secure yarn at each color change, then weave ends neatly inside the piece. βœ— Skipping stitch counts when increasing the color separation will distort the belly shape; count stitches after every round where you add or move stitches to keep the total at 90. βœ— Overstuffing the pillow makes seams hard to close and corners look bulky; stuff gradually and firmly but not excessively, paying special attention to corners to keep nice shape. βœ— Sewing the legs in the wrong round causes imbalance or incorrect pose; mark and count rounds from the bottom when attaching hands and legs to ensure symmetrical placement. βœ— Crocheting too tightly when working small parts like fingers makes the details too stiff and short; relax your tension slightly and check stitch counts often for consistent shaping.

Frog Pillow Amigurumi Pattern

Make a cuddly frog pillow that doubles as a playful companion and charming decor piece. This pattern guides you step-by-step through crocheting the textured pillow body, cute eyeballs, smiling mouth, arms and posable legs. Youll enjoy the mix of continuous-row shaping and simple amigurumi construction while customizing colors and stitch tension to get the perfect size.

Intermediate 8-10 Hours

Materials Needed for Frog Pillow Amigurumi Pattern

β€” Main Fabric

  • 01
    Himalaya Dolphin Baby Yarn (or YarnArt Dolce) - Green color: approximately 3.5 skeins
  • 02
    Himalaya Dolphin Baby Yarn (or YarnArt Dolce) - Yellow color: approximately 1 skein
  • 03
    Polyfil (stuffing) - enough to fill a 35x47 cm pillow (estimate 200-400g depending on how firmly you stuff)

β€” Tools Required

  • 01
    Crochet hook E (3.5 mm) or any size that matches your tension
  • 02
    Tapestry needle with large eye for sewing
  • 03
    Shank buttons 22-24 mm (for eyes)
  • 04
    Scissors
  • 05
    Stitch markers (optional but helpful)
  • 06
    Pins for assembly (optional)

Progress Tracker

0% Complete

β€” Body :

Info :

Work in continuous rows. Use green color.

Round 1 :

90 ch

Round 2 :

green: Connect the chain by working the first sc into the first chain, being careful not to twist the chain (this is the first stitch of the second round), 43 sc, yellow: 46 sc {90}

Round 3 :

green: 44 sc, yellow: 46 sc {90}

Round 4 :

green: 44 sc, yellow: 46 sc {90}

Round 5 :

green: 45 sc, yellow: 44 sc, green: 1 sc {90}

Round 6 :

green: 46 sc, yellow: 43 sc, green: 1 sc {90}

Round 7 :

green: 47 sc, yellow: 41 sc, green: 2 sc {90}

Round 8 :

green: 48 sc, yellow: 40 sc, green: 2 sc {90}

Round 9 :

green: 49 sc, yellow: 38 sc, green: 3 sc {90}

Round 10 :

green: 50 sc, yellow: 37 sc, green: 3 sc {90}

Round 11 :

green: 51 sc, yellow: 35 sc, green: 4 sc {90}

Round 12 :

green: 52 sc, yellow: 34 sc, green: 4 sc {90}

Round 13 :

green: 53 sc, yellow: 32 sc, green: 5 sc {90}

Round 14 :

green: 54 sc, yellow: 31 sc, green: 5 sc {90}

Round 15 :

green: 55 sc, yellow: 29 sc, green: 6 sc {90}

Round 16 :

green: 56 sc, yellow: 28 sc, green: 6 sc {90}

Round 17 :

green: 57 sc, yellow: 26 sc, green: 7 sc {90}

Round 18 :

green: 58 sc, yellow: 25 sc, green: 7 sc {90}

Round 19 :

green: 59 sc, yellow: 23 sc, green: 8 sc {90}

Round 20 :

green: 60 sc, yellow: 22 sc, green: 8 sc {90}

Round 21 :

green: 62 sc, yellow: 19 sc, green: 9 sc {90}

Round 22 :

green: 64 sc, yellow: 16 sc, green: 10 sc {90}

Round 23 :

green: 66 sc, yellow: 13 sc, green: 11 sc {90}

Rounds 24 - 41 :

green: 90 sc {90} (18 Rounds)

Round 42 :

We need to make a few shift stitches to bring the yarn to the corner of the pillow. I had to make 9 sc. Depending on your tension you may have to make more or less.

Info :

Weave all the ends. Cut the yarn leaving a long tail for sewing the top edge of the pillow. Stuff the pillow tightly, especially in the corners. Sew the bottom edge of the pillow, keep stuffing as you go. Secure the yarn and weave the end inside the pillow.

β€” Eyes :

Info :

(2 details made of two parts each)

Part one (P1) :

Make 2. Use green color. Round 1: 6 sc in magic ring {6}. Round 2: 6 inc {12}. Round 3: (1 sc, inc) *6 {18}. Round 4: (2 sc, inc) *6 {24}. Round 5: (3 sc, inc) *6 {30}. Rounds 6 - 10: 30 sc {30}. Round 11: (3 sc, dec) *6 {24}. Cut the yarn leaving a long tail for sewing.

Part two (P2) :

Make 2. Use yellow yarn. Round 1: 6 sc in magic ring {6}. Round 2: 6 inc {12}. Round 3: (1 sc, inc) *6 {18}. Round 4: (2 sc, inc) *6, 1 sl st {24}. Cut the yarn leaving a long tail for sewing. Sew on part1 to the top corners of the pillow, stuffing the detail as you sew. Next, sew on part2 to part1. Then, sew on shank buttons to the yellow part. Secure the thread, hide inside the eyes, and cut off the excess.

β€” Mouth :

Info :

Make two separate chains using yellow yarn.

Item :

Chain 21.

Item :

Chain 25.

Info :

Leave long tails for sewing. Sew on the mouth, secure that yarn and weave in the ends. (Refer to the photos in the pattern for placement.)

β€” Arms (2 details) :

Info :

Make 3 separate details for fingers. Tighten the yarn of the first 2 fingers and leave a little tail for sewing the hole between fingers. Do not cut the yarn of the 3rd finger but continue to crochet.

Fingers (Make 3) :

Round 1: 6 sc in magic ring {6}. Round 2: (inc) *6 {12}. Round 3: (dec) *6 {6}.

Continue :

Continue to crochet to connect fingers as follows: Round 4: 3rd finger: 2 sc, 2nd finger: 3 sc, 1st finger: 6 sc, now crochet on other side of fingers, 2nd finger: 4 sc, 3rd finger: 4 sc {19}.

Round 5 :

19 sc

Round 6 :

3 sc, dec, 7 sc, dec, 5 sc {17}

Round 7 :

3 sc, dec, 6 sc, dec, 4 sc {15}

Round 8 :

2 sc, dec, 6 sc, dec, 3 sc {13}

Round 9 :

6 sc, inc, 5 sc, inc {15}

Round 10 :

7 sc, inc, 6 sc, inc {17}

Round 11 :

17 sc

Rounds 12 - 23 :

17 sc {12 Rounds}. Loosely stuff the detail and continue to crochet.

Close :

Fold the detail to close the edge by crocheting 8 sc inserting the hook through both layers. Leave a long tail for sewing.

β€” Legs (Make 2) :

Info :

Make 3 separate details for fingers for each leg. Tighten the yarn of the first 2 fingers and leave a little tail for sewing the hole between fingers. Do not cut the yarn of the 3rd finger but continue to crochet.

Fingers (Make 3) :

Round 1: 6 sc in magic ring {6}. Round 2: (inc) *6 {12}. Round 3: (1 sc, inc) *6 {18}. Round 4: (1 sc, dec) *6 {12}.

Connect :

Round 5: 3rd finger: 5 sc, 2nd finger: 6 sc, 1st finger: 12 sc, now crochet on other side of fingers, 2nd finger: 7 sc, 3rd finger: 7 sc {37}

Info :

There are 2 holes left between fingers. Close the holes by crocheting 1 sc using tails from 1st and 2nd fingers (or you can sew it on using a needle). Cut the yarn and hide inside.

Round 6 :

37 sc {37}

Round 7 :

8 sc, dec, 8 sc, dec, 7 sc, dec, 6 sc, dec {33}

Round 8 :

8 sc, dec, 6 sc, dec, 6 sc, dec, 7 sc {30}

Round 9 :

dec, 5 sc, dec, 5 sc, dec, 6 sc, dec, 6 sc {26}

Round 10 :

5 sc, dec, 5 sc, dec, 5 sc, dec, 3 sc, dec {22}

Round 11 :

5 sc, dec, 4 sc, dec, 3 sc, dec, 4 sc {19}

Round 12 :

dec, 3 sc, dec, 3 sc, dec, 3 sc, dec, 2 sc {15}

Round 13 :

15 sc

Round 14 :

(3 sc, inc) *3, 3 sc {18}

Round 15 :

(2 sc, inc) *6 {24}

Round 16 :

24 sc

Rounds 17 - 30 :

24 sc {14 Rounds}. Keep stuffing loosely.

Round 31 :

(2 sc, dec) *6 {18}

Round 32 :

(1 sc, dec) *6 {12}

Round 33 :

(1 sc, inc) *6 {18}

Round 34 :

(2 sc, inc) *6 {24}

Rounds 35 - 42 :

24 sc {8 Rounds}. Loosely stuff again and fold detail to close the edge by crocheting 12 sc inserting the hook through both layers. Leave a long tail for sewing.

β€” Assembly :

Info :

Sew on the hands to round 24 (count the rounds from the bottom of the pillow). Sew on the legs. Option 1: Sew on the legs on the bottom corners. Option 2: Sew on the legs to the sides of round 18 (count the rounds from the bottom of the pillow). Fold the legs as shown in the photos and sew the bottom part of the leg to the corner of the pillow. Tighten the thread and weave the ends. Frog is finished!

Assembly Instructions

  • Sew the green eye parts (part 1) into the top corners of the pillow and stuff each eye as you sew, then attach the yellow eye centers and sew shank buttons to secure the pupils.
  • Place and sew the mouth chains on the front of the pillow using the long tails, secure the yarn and weave in the ends so the smile is neat and evenly placed.
  • Attach arms (hand details) to round 24 of the pillow (count rounds from the bottom) using the long tail and whipstitch, positioning them symmetrically and reinforcing with multiple passes for durability.
  • Attach legs using either option: sew legs to the bottom corners for a sitting frog, or sew legs to sides of round 18 for dangling legs; fold and tack the bottom of the leg to the pillow corner and weave ends securely.

Important Notes

  • πŸ’‘Work in continuous rows for the body to achieve the smooth rectangle before shaping and avoid joining rounds unless you want a seam.
  • πŸ’‘Cut and secure the yarn each time you alternate colors, then weave ends inside the work to prevent loose threads showing on the pillow surface.
  • πŸ’‘Stuff the pillow firmly but not overpacked; focus on the corners to retain a square shape and add stuffing gradually while sewing the final edge closed.
  • πŸ’‘When attaching eyes and limbs, pin or mark placement first and double-check symmetry before sewing permanently to avoid uneven placement.

This Frog Pillow pattern gives you a lovable handmade friend with a soft belly and expressive limbs that can sit or dangle. Whether you make it for a child, a nursery, or your own sofa, this pillow brings playful charm and cozy texture to any room. Happy crocheting and enjoy every stitchβ€”your frog is waiting to hop into its new home! 🧢🐸

You ask,

we answer.

FAQs

What size will the finished piece be?

The size of the finished pillow while sitting is approximately 35 x 47 cm (height x width); with stretched legs the full length is about 63 x 30 cm, depending on yarn, hook size, and tension.

Can I use different yarn weights for this pattern?

Yes, you can use different yarn weights, but it will change the final size and texture; adjust your hook size to match the yarn and be prepared for stitch count or round adjustments.

Do I need prior crochet experience for this pattern?

This pattern is rated intermediate, so a basic understanding of single crochet, increases, decreases, and working in the round is recommended for best results.

How long does this project typically take to complete?

Most crocheters complete this project in about 8-10 hours of focused work, although time will vary based on experience, speed, and how many details you customize.