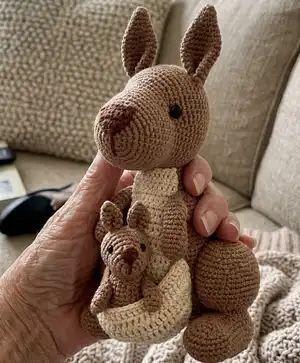
Create an adorable Mommy Kangaroo with a tiny baby in her pouch using this detailed crochet pattern. You will enjoy step-by-step instructions, clear photographs, and tips for assembly so your amigurumi turns out neat and sturdy. The pattern uses DK weight yarn and a 2.5 mm hook for a compact, cuddle-ready toy. Perfect for gifting or adding to your handmade toy collection.
Progress Tracker
0% Complete
— Head :
Info :
Work with Brown color.
Round 1 :
6 sc in a magic ring (6)
Round 3 :
[1 sc, inc] x 6 (18)
Round 4 :
1 sc, inc, [2 sc, inc] x 5, 1 sc (24)
Round 5 :
[3 sc, inc] x 6 (30)
Round 7 :
2 sc, inc, [4 sc, inc] x 5, 2 sc (36)
Round 8-11 :
36 sc - 4 rounds (36)
Round 12 :
18 sc, inc, 17 sc (37)
Round 13 :
18 sc, inc, 18 sc (38)
Round 14 :
19 sc, inc, 18 sc (39)
Round 15 :
19 sc, inc, 19 sc (40)
Round 16 :
20 sc, inc, 19 sc (41)
Round 17 :
20 sc, inc, 20 sc (42)
Round 18 :
3 sc, inc, [6 sc, inc] x 5, 3 sc (48)
Info :
Now we will mark where to place the security eyes. Take a piece of yarn in another color and draw it in the hole under the stitch. Use another piece of yarn for the other eye.
Round 19 :
7 sc, inc, 7 sc, mark the hole under next stitch: inc, [7 sc, inc] x 2, mark next stitch same way, 1 sc, 6 sc, inc, 7 sc, inc (54) See picture 01.
Round 20 :
4 sc, inc, [8 sc, inc] x 5, 4 sc (60)
Round 21-28 :
60 sc - 8 rounds (60)
Info :
Now place the security eyes where you marked with different yarn on round 19. Use 11 mm security eyes (if using 2.5 mm hook, otherwise use what fits the gauge best).
Round 29 :
4 sc, dec, [8 sc, dec] x 5, 4 sc (54)
Round 31 :
[7 sc, dec] x 6 (48)
Round 33 :
3 sc, dec, [6 sc, dec] x 5, 3 sc (42)
Round 34 :
[5 sc, dec] x 6 (36)
Round 35 :
2 sc, dec, [4 sc, dec] x 5, 2 sc (30)
Info :
Stuff the head firmly with filling and keep doing as you go.
Round 36 :
[3 sc, dec] x 6 (24)
Round 37 :
1 sc, dec, [2 sc, dec] x 5, 1 sc (18)
Continue :
Continue on next page.
Round 38 :
[1 sc, dec] x 6 (12)
Info :
Fasten off and leave a small yarn tail. Weave the yarn tail through the front loops of each stitch and pull it tight to close. Then weave in the yarn end. (Head finished, see picture 02 and 03.)
Info :
Give the eyes more depth by drawing a piece of yarn from one side to the other. Optional: add white area to the eyes as shown on the pictures. A tip is to draw the tails to the bottom of the head where you will place the neck and make a double knot so you don't need to weave in tails.
— Ears :
Info :
Make 2. Work with Brown color. Do not stuff.
Round 1 :
6 sc in a magic ring (6)
Round 2 :
[2 sc, inc] x 2 (8)
Round 3 :
[3 sc, inc] x 2 (10)
Round 4 :
[4 sc, inc] x 2 (12)
Round 5 :
[5 sc, inc] x 2 (14)
Round 6 :
[6 sc, inc] x 2 (16)
Round 7 :
[7 sc, inc] x 2 (18)
Round 8 :
[8 sc, inc] x 2 (20)
Round 9-14 :
20 sc - 6 rounds (20)
Round 15 :
[8 sc, dec] x 2 (18)
Round 16 :
[7 sc, dec] x 2 (16)
Info :
Fold the piece, and crochet 4 sc across the stitches (see picture 08, 09 and 10). If easier, take a needle and sew across instead of crocheting. Fasten off and leave a long tail to sew to the head. (Ears finished, see picture 12.)
— Nose :
Info :
This piece will be worked in rows. Chains are not counted in the total. Work with Darkbrown color.
Row 1 :
3 sc in a magic ring (3)
Row 2 :
1 ch, turn the piece, skip ch and start on next st; inc, 1 sc, inc (5)
Row 3 :
1 ch, turn, skip ch and start on next st; inc, 3 sc, inc (7)
Row 4-6 :
1 ch, turn, skip ch and start on next st; 7 sc - 3 rows (7)
Info :
Fasten off and leave a long tail to sew the nose to the head. (Nose finished, see picture 11.)
— Body :
Info :
Work with Brown color.
Round 1 :
6 sc in a magic ring (6)
Round 3 :
[1 sc, inc] x 6 (18)
Round 4 :
1 sc, inc, [2 sc, inc] x 5, 1 sc (24)
Round 5 :
[3 sc, inc] x 6 (30)
Round 6 :
2 sc, inc, [4 sc, inc] x 5, 2 sc (36)
Round 7 :
[5 sc, inc] x 6 (42)
Round 8 :
3 sc, inc, [6 sc, inc] x 5, 3 sc (48)
Round 9 :
[7 sc, inc] x 6 (54)
Round 10 :
4 sc, inc, [8 sc, inc] x 5, 4 sc (60)
Round 12 :
[9 sc, inc] x 6 (66)
Round 13-25 :
66 sc - 13 rounds (66)
Round 26 :
[9 sc, dec] x 6 (60)
Round 27 :
3 sc, [2 sc, dec] x 4, 41 sc (56)
Round 28 :
6 sc, dec, 4 sc, dec, 42 sc (54)
Round 29 :
[7 sc, dec] x 6 (48)
Round 30 :
2 sc, [2 sc, dec] x 3, 34 sc (45)
Round 32 :
26 sc, dec, 2 sc, dec, 13 sc (43)
Info :
Stuff the body firmly with filling and keep doing as you go.
Round 34 :
6 sc, dec, 20 sc, dec, 13 sc (41)
Round 35 :
6 sc, dec, 33 sc (40)
Round 36 :
6 sc, dec, 32 sc (39)
Round 37 :
[11 sc, dec] x 3 (36)
Round 39 :
2 sc, dec, [4 sc, dec] x 5, 2 sc (30)
Round 40-43 :
30 sc - 4 rounds (30)
Info :
Fasten off and leave a long tail to sew the body to the head. (Body finished, see picture 13.)
— Belly :
Info :
Work with Beige color. Both BELLY and POUCH will be worked in rows. Chains are not counted in the total. BELLY is worked with hdc.
Info :
Make 12 chains. Start on the third ch from the hook.
Row 1-3 :
10 hdc, 2 ch - 3 rows (10)
Row 4 :
Hdc-inc, 8 hdc, hdc-inc, 2 ch (12)
Row 5-6 :
12 hdc, 2 ch - 2 rows (12)
Row 7 :
Hdc-inc, 10 hdc, hdc-inc, 2 ch (14)
Row 8-9 :
14 hdc, 2 ch - 2 rows (14)
Row 10 :
Hdc-inc, 12 hdc, hdc-inc, 2 ch (16)
Row 11-12 :
16 hdc, 2 ch - 2 rows (16)
Row 13 :
Hdc-inc, 14 hdc, hdc-inc, 2 ch (18)
Row 14-19 :
18 hdc, 2 ch - 6 rows (18)
Row 20 :
18 hdc, 1 ch (18)
Row 21 :
Skip first hdc, 15 hdc, dec, 2 ch (16)
Row 22 :
16 hdc, 1 ch (16)
Row 23 :
Skip first hdc, 13 hdc, dec (14)
Info :
Fasten off and leave an extra long tail to sew the belly to the body. Belly finished, see picture 14.
— Pouch :
Info :
Work with Beige color. POUCH is worked with dc. Make 42 chains. Start on the third ch from the hook.
Row 3 :
Skip first dc, 1 dc, dc-dec, 32 dc, [dc-dec] x 2, 1 ch (36)
Row 4 :
33 dc, dc-dec, 2 ch (34)
Row 6 :
Skip first dc, 31 dc, dc-dec, 1 ch (32)
Row 7 :
Skip first dc, 1 dc, [3 dc, dc-dec] x 6, 1 ch (25)
Row 8 :
Skip first dc, 2 dc, dc-dec, [2 dc, dc-dec] x 5, 1 ch (18)
Row 9 :
Skip first dc, 1 dc, dc-dec, [1 dc, dc-dec] x 4, dc-dec, 1 ch (11)
Row 10 :
Skip first dc, 1 dc, [dc-dec] x 4, 1 dc (6)
Info :
Fasten off and leave an extra long tail to sew the pouch to the belly and body. Pouch finished, see picture 15 and 16.
— Legs :
Info :
Make 2. Work with Brown color. Before you start, leave a long tail to use for sewing the leg to the body.
Round 1 :
6 sc in a magic ring (6)
Round 3 :
[1 sc, inc] x 6 (18)
Round 4 :
1 sc, inc, [2 sc, inc] x 5, 1 sc (24)
Round 5 :
[3 sc, inc] x 6 (30)
Info :
Insert the crochet hook between round 3 and 4, and pull out the long tail you left before making the magic ring. This yarn tail is to attach the leg to body, so it has to be outside of the piece. (See picture 17.)
Round 6 :
2 sc, inc, [4 sc, inc] x 5, 2 sc (36)
Round 7 :
[17 sc, inc] x 2 (38)
Round 8 :
[18 sc, inc] x 2 (40)
Round 9 :
[19 sc, inc] x 2 (42)
Round 10-15 :
42 sc - 6 rounds (42)
Round 16 :
[5 sc, dec] x 6 (36)
Round 18 :
2 sc, dec, [4 sc, dec] x 5, 2 sc (30)
Round 19 :
[3 sc, dec] x 6 (24)
Round 20 :
[2 sc, dec] x 6 (18)
Info :
Stuff the leg very lightly with filling so it still looks flat. Tip: press the piece against the body to check how much you want it to stick out and then add filling accordingly.
Info :
Now make 8 ch. (See picture 18.) Next stitch will be the new beginning for next round, so move your stitch marker.
Round 21 :
Start on the second chain from the hook; inc, 6 sc, continue on the leg, 8 sc, [inc] x 2, 8 sc, continue on the other side of the chain, 6 sc, inc (36) See picture 19 or watch my tutorial - I do the body for my other patterns, but the process is the same for this round.
Round 22 :
[Inc] x 2, 5 sc, dec, 8 sc, [inc] x 2, 8 sc, dec, 5 sc, [inc] x 2 (40)
Round 23 :
[1 sc, inc] x 2, 12 sc, [1 sc, inc] x 3, 14 sc, [1 sc, inc] x 2 (47)
Continue :
Continue on next page.
Round 24 :
[2 sc, inc] x 2, 12 sc, [2 sc, inc] x 3, 14 sc, [2 sc, inc] x 2 (54)
Round 25-26 :
54 sc - 2 rounds (54)
Round 27 :
[7 sc, dec] x 6 (48)
Round 28 :
3 sc, dec, [6 sc, dec] x 5, 3 sc (42)
Round 30 :
Work this round in back loops: [5 sc, dec] x 6 (36). See steps to the right how to make dec in back loops.
Round 31 :
[4 sc, dec] x 6 (30)
Round 32 :
[dec] x 3, 8 sc, [dec] x 3, 10 sc (24)
Info :
Stuff the foot (so it stands steady) with filling and keep doing as you go.
Round 33 :
[dec] x 2, 5 sc, [dec] x 3, 7 sc, dec (18)
Round 34 :
[1 sc, dec] x 6 (12)
Info :
Fasten off and leave a small yarn tail. Weave the yarn tail through the front loops of each stitch and pull it tight to close. Then weave in the yarn end. (Legs finished, see picture 20.)
— Tail :
Info :
Work with Brown color.
Round 1 :
6 sc in a magic ring (6)
Round 2 :
[2 sc, inc] x 2 (8)
Round 3 :
[3 sc, inc] x 2 (10)
Round 4 :
[4 sc, inc] x 2 (12)
Round 5 :
[5 sc, inc] x 2 (14)
Round 6 :
5 sc, [inc] x 2, 5 sc, dec (15)
Round 7 :
6 sc, [inc] x 2, 7 sc (17)
Round 8 :
7 sc, [inc] x 2, 6 sc, dec (18)
Round 9 :
5 sc, [1 sc, inc] x 2, [inc, 1 sc] x 2, 5 sc (22)
Round 11 :
5 sc, [2 sc, inc] x 2, [inc, 2 sc] x 2, 5 sc (26)
Round 13 :
5 sc, [3 sc, inc] x 2, [inc, 3 sc] x 2, 5 sc (30)
Round 14 :
dec, 28 sc (29)
Round 15 :
4 sc, [4 sc, inc] x 2, [inc, 4 sc] x 2, 5 sc (33)
Round 16 :
31 sc, dec (32)
Round 17 :
4 sc, [5 sc, inc] x 2, [inc, 5 sc] x 2, 4 sc (36)
Round 18 :
dec, 34 sc (35)
Round 19 :
3 sc, [6 sc, inc] x 2, [inc, 6 sc] x 2, 4 sc (39)
Round 20 :
dec, 37 sc (38)
Round 21 :
dec, 15 sc, [inc] x 2, 19 sc (39)
Round 22 :
17 sc, [inc] x 2, 20 sc (41)
Round 23 :
dec, 16 sc, [inc] x 2, 21 sc (42)
Round 24 :
18 sc, [inc] x 2, 22 sc (43)
Info :
Stuff the tail with filling. Fasten off and leave a long tail to sew to the body. (Tail finished, see picture 26.)
— Assembly :
Info :
Tip! If you haven't already, start by giving more depth to the eyes by pulling a yarn between the eyes. Start by attaching the nose to the head between rnd 3 and 7. With the yarn tail make a line under the nose, twice to between rnd 4 and 5.
Item :
Attach the pouch around the lower part of the belly. The pouch should follow the edge of the belly.
Item :
Attach the head to the body between rounds 18 and 27 of the head. Before closing up, add some filling to the neck so the body and head is steady.
Item :
Attach the ears to the head between rounds 25 and 28, aligned above the eyes. The ears should point upwards.
Item :
Attach the belly on the body's front - top of the belly (the narrow side) should be aligned with the top of the body. The 'bump' on the body is the back (see picture on page 8).
Item :
Note! Before attaching the legs - have in mind that when baby is inside the pouch it can be a little bit heavy in the front and make the mommy kangaroo fall forward. If you want to be absolutely sure it will not fall forward, place something small in the pouch, or make the baby first.
Item :
Now attach the legs. Place the legs on each side of the body. Before you start to sew, pin the legs to the body, then pin the tail too. This is to check the overall balance. Make also sure the legs are pointing straight forward. The body should be approx 3,5 cm (1,5 inch) above the ground.
Item :
Attach the tail on the body between rounds 6 and 21, centered between the legs on the back. Before you start to sew, pin the tail to the body and make sure you have correct balance.
Item :
Attach the arms on each side of the body between rounds 31 and 35.
Item :
When you sew the legs to the body, press the legs against the body for a neat finish.
— Baby Head :
Info :
Work with Brown color. Use smaller set for baby — instructions shown in pattern images.
Round 1 :
6 sc in a magic ring (6)
Round 3 :
[1 sc, inc] x 6 (18)
Round 4-6 :
18 sc - 3 rounds (18)
Round 7 :
1 sc, inc, [2 sc, inc] x 5, 1 sc (24)
Round 8 :
[3 sc, inc] x 6 (30)
Round 9-11 :
30 sc - 3 rounds (30)
Info :
Place the security eyes between round 7 and 8 with 8 stitches (on rnd 8) between the eyes. Use 7 mm security eyes for baby.
Round 12 :
[3 sc, dec] x 6 (24)
Info :
Stuff the head firmly with filling and keep doing as you go.
Round 14 :
1 sc, dec, [2 sc, dec] x 5, 1 sc (18)
Round 15 :
[1 sc, dec] x 6 (12)
Info :
Fasten off and leave a small yarn tail. Weave the tail through front loops and close. (Head finished.)
— Baby Body :
Info :
Work with Brown color.
Round 1 :
6 sc in a magic ring (6)
Round 3 :
[1 sc, inc] x 6 (18)
Round 4 :
1 sc, inc, [2 sc, inc] x 5, 1 sc (24)
Round 5-8 :
24 sc - 4 rounds (24)
Round 9 :
2 sc, dec, [4 sc, dec] x 3, 2 sc (20)
Round 10-12 :
20 sc - 3 rounds (20)
Round 13 :
[3 sc, dec] x 4 (16)
Round 14-15 :
16 sc - 2 rounds (16)
Info :
Stuff the body with filling and fasten off leaving a tail to sew to head. (Body finished, see picture 30.)
— Baby Ears, Arms, Tail, Feet, Upper Legs :
Baby Ears :
Make 2. Work with Brown color. Do not stuff. Rnd1: 4 sc in a magic ring (4). Rnd2: [inc, 1 sc] x 2 (6). Rnd3: [inc, 2 sc] x 2 (8). Rnd4: [inc, 3 sc] x 2 (10). Rnd5-6: 10 sc - 2 rounds (10). Rnd7: [dec, 3 sc] x 2 (8). Fold, sew across and fasten off. (Ears finished, see picture 32.)
Baby Arms :
Make 2. Work with Brown color. Do not stuff. Rnd1: 6 sc in a magic ring (6). Rnd2-4: 6 sc - 3 rounds (6). Put stitches together and make 3 sc across. Rnd5: 1 ch, skip ch and start on next stitch; 3 sc in front loops, 3 sc in back loops (6). Rnd6-9: 6 sc - 4 rounds (6). Fasten off and leave tail for attaching. (Arms finished, see picture 33.)
Baby Tail :
Work with Brown color. Do not stuff. Rnd1: 4 sc in a magic ring (4). Rnd2: [1 sc, inc] x 2 (6). Rnd3: 6 sc (6). Rnd4: [inc] x 2, 4 sc (8). Rnd5: 1 sc, [inc] x 2, 5 sc (10). Rnd6: 2 sc, [inc] x 2, 6 sc (12). Fasten off and leave a long tail to sew to body. Do not stuff; it should be soft and bendable when baby is placed in pouch. (Tail finished, see picture 34.)
Baby Feet :
Make 2. Work with Brown color. Do not stuff. Rnd1: 6 sc in a magic ring (6). Rnd2-7: 6 sc - 6 rounds (6). Fasten off and leave long tail. Weave tail through front loops and pull to close, insert needle into middle of magic ring and pull out between rounds 5-6. Do not cut yarn tail; use this to sew to upper legs. (Feet finished, see picture 36.)
Baby Upper Legs :
Make 2. Work with Brown color. Rnd1: 6 sc in a magic ring (6). Rnd2: [inc] x 6 (12). Rnd3: [1 sc, inc] x 6 (18). Rnd4: 18 sc (18). Rnd5: [1 sc, dec] x 6 (12). Stuff very lightly. Rnd6: [dec] x 6 (6). Fasten off and leave tail to sew to body. (Upper legs finished, see picture 37.) Place feet on each leg on the opposite of each other. (See picture 39.)
This delightful Mommy Kangaroo and Baby pattern brings a sweet handmade duo to life with clear instructions and charming details. Make one as a keepsake or a thoughtful gift that can be cherished for years. Enjoy every stitch, personalize the colors, and have fun creating this cuddly pair! 🧶🧵