🧢 Beautiful ✨ Detailed πŸ’ Adorable

Mini Hulk Amigurumi Pattern

Mini Hulk Amigurumi Pattern
4.6β˜… Rating
2-4 Hours Time Needed
2.5K Made This
βœ‚οΈ

Beginner Friendly Level

Perfect for those just starting their crochet journey, with clear instructions and simple techniques

⏱️

Bite-Sized Project

Finishes in 2-4 hoursβ€”perfect for an afternoon of creative relaxation.

🧸

Cute Companion

An adorable friend to cherish, handcrafted with love to bring comfort and joy for years to come.

About This Mini Hulk Amigurumi Pattern

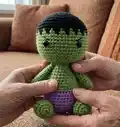
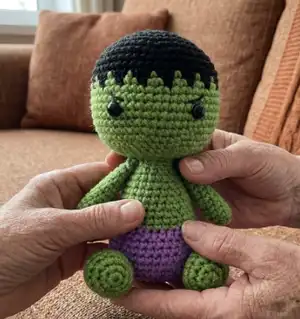
This pattern makes a small, adorable Hulk-inspired amigurumi about 13 cm tall using the listed materials. It combines simple rounds, basic increases and decreases, and a fun two-color hair detail. You will practice color changes and small-piece assembly for a polished finished toy. The instructions are compact and friendly for those with basic crochet skills.

Mini Hulk Amigurumi Pattern crochet pattern - detailed view of completed project

Worked in continuous rounds with clear round-by-round instructions, this design is easy to follow. The finished toy is perfect for gifting, display, or collecting.

Why You'll Love This Mini Hulk Amigurumi Pattern

I absolutely love this pattern because it turns simple stitches into a charming little character that brings a smile. I enjoy the playful hair detail created by alternating colors β€” it adds personality without complicated techniques. The pattern is streamlined so I can make multiple gifts quickly while still enjoying shaping and assembly. I love that it helps you practice basic amigurumi skills like color changes and stuffing while producing a cute, finished toy.

Mini Hulk Amigurumi Pattern step 1 - construction progress Mini Hulk Amigurumi Pattern step 2 - assembly progress Mini Hulk Amigurumi Pattern step 3 - details and accessories Mini Hulk Amigurumi Pattern step 4 - final assembly and finishing

Switch Things Up

I love experimenting with color schemes, so try swapping the purple shorts for a bright blue or red to create a different look.

You can make the toy larger by using thicker yarn and a bigger hook, or smaller by using finer yarn and a smaller hook.

I often add tiny accessories like a crocheted scarf or belt to give each doll a unique personality.

Embroider different eyebrows or mouths to change the expression from grumpy to happy or surprised.

Try using safety eyes of different sizes for a more stylized or realistic facial look.

I sometimes use felt pieces glued under the hairline for a sharper color boundary instead of alternating rounds.

For a posable figure, consider adding a short length of wire in the arms before stuffing to allow slight movement.

You can mix yarn textures (a slightly fuzzy yarn for hair) to add tactile contrast and visual interest.

I recommend making a matching mini set by altering colors and sizes to create a family of characters or themed collection.

If you like embroidery, add tiny chest or clothing details to personalize each amigurumi and make a thoughtful gift.

Common Mistakes & How to Fix Them

βœ— Skipping stitch markers during rounds makes it easy to lose your place; place a marker at the start of every round and move it as you work to maintain accurate stitch counts.
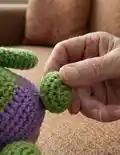
 βœ— Not stuffing as you go can result in lumps and collapsing sections; stuff gradually and evenly while shaping the body and head to keep smooth curves and firm structure. βœ— Changing colors incorrectly will leave loose loops or visible joins; loop the new yarn over your hook and crochet the new yarn through the two loops on the hook to secure a neat color change. βœ— Placing safety eyes too late or unevenly can give the face an off look; place eyes between the recommended rounds (between rounds 16 and 17) and count stitches to space them 11 stitches apart before securing.

Mini Hulk Amigurumi Pattern

Make your own adorable Mini Hulk amigurumi with clear, friendly instructions you can follow at home. This pattern creates a cuddly 13 cm tall character with a cute stitched expression and contrasting hair detail. You'll enjoy the simple shaping and color changes while practicing basic amigurumi skills. Perfect as a handmade gift or a playful desk companion.

Beginner Friendly 2-4 Hours

Materials Needed for Mini Hulk Amigurumi Pattern

β€” Main Fabric

  • 01
    YarnArt Jeans yarn - Green color, amount as needed for body, head and limbs
  • 02
    YarnArt Jeans yarn - Purple color, amount as needed for lower body (shorts)
  • 03
    YarnArt Jeans yarn - Black color, amount as needed for hair detail

β€” Tools Required

  • 01
    Crochet hook Clover Soft Touch 2.00 mm
  • 02
    8 mm black safety eyes (2 pieces)
  • 03
    Toys filler (polyester stuffing)
  • 04
    Black thin thread for embroidering eyebrows
  • 05
    Scissors
  • 06
    Tapestry needle
  • 07
    Pins for assembly
  • 08
    Stitch marker

Progress Tracker

0% Complete

Info :

Stuff body and head firmly, stuffing as you go.

β€” Body + head :

Round R1 :

Start working with purple yarn. R1. 6 scMR (6)

Round R2 :

R2. 6 inc(12)

Round R3 :

R3. (1 sc, inc)x6 (18)

Round R4 :

R4. (2 sc, inc)x6 (24)

Round R5 :

R5. (3 sc, inc)x6 (30)

Round R6 :

R6. (4 sc, inc)x6 (36)

Round R7 :

R7. (5 sc, inc)x6 (42)

Round R8 :

R8. -R10.42 sc (3 rounds) (42)

Round R11 :

R11. (5 sc, dec)x6 (36)

Round R12 :

R12. 36 sc (36)

Round R13 :

R13.36 hdc (36)

Info :

Continue on with green.

Round R14 :

R14. (4 sc, dec)x6 (30)

Round R15 :

R15. 30 sc (30)

Round R16 :

R16. (13 sc, dec)x2 (28)

Round R17 :

R17. 28 sc (28)

Round R18 :

R18. (12 sc, dec)x2 (26)

Round R19 :

R19. 26 sc (26)

Round R20 :

R20. (11 sc, dec)x2 (24)

Round R21 :

R21.24 sc (24)

Round R22 :

R22. (2 sc, dec)x6 (18)

Round R23 :

R23. 18 sc (18)Cut the yarn.

Info :

Stuff the body firmly.

β€” Arm x2 :

Info :

Crochet with green.

Round R1 :

R1. 6 sc MR(6)

Round R2 :

R2.(2 sc, inc)x2 (8)

Round R3 :

R3. -R8. 8 sc (8)

Info :

Stuff only half of the arms.

Round R9 :

R9. -R13. 8 sc (8)

Info :

Do not stuff of the arms. This way the arm doesn't stick out too much after sewing it to the body. Press the opening with your fingers, aligning 3 stitches side by side. Break the yarn and leave a long tail to sew arms to body.

β€” Head :

Info :

Crochet with black yarn.

Round R1 :

R1. 6 sc MR(6)

Round R2 :

R2. 6 inc(12)

Round R3 :

R3. (1 sc, inc)x6 (18)

Round R4 :

R4. (2 sc, inc)x6 (24)

Round R5 :

R5. (3 sc, inc)x6 (30)

Round R6 :

R6. (4 sc, inc)x6 (36)

Round R7 :

R7. (5 sc, inc)x6 (42)

Round R8 :

R8. (6 sc, inc)x6 (48)

Round R9 :

R9. (7 sc, inc)x6 (54)

Round R10 :

R10. -R11. 54 sc (2 rounds)(54)

Info :

In the next 12 and 13 rounds we will alternate green and black colors.

Round R12 :

R12. (green 1 sc, black 2 sc)x18 (54)

Round R13 :

R13. (green 2 sc, black 1 sc)x18 (54)

Info :

Continue on with green.

Round R14 :

R14. -R19. 54 sc (6 rounds)(54)

Round R20 :

R20. (7 sc, dec)x6 (48)

Round R21 :

R21. (6 sc, dec)x6 (42)

Info :

Place safety eyes between rounds 16 and 17, 11 stapart.

Round R22 :

R22. (5 sc, dec)x6 (36)

Round R23 :

R23. (4 sc, dec)x6 (30)

Round R24 :

R24. (3 sc, dec)x6 (24)

Info :

Start to stuff the head.

Round R25 :

R25. (2 sc, dec)x6 (18)

Round R26 :

R26. Only through back loops, (1 sc, dec)x6 (12)

Round R27 :

R27. 6 dec. Leave the thread for sewing.

β€” Leg x2 :

Info :

Start working with green yarn.

Round R1 :

R1. 6 sc MR(6)

Round R2 :

R2. 6 inc(12)

Round R3 :

R3. inc, 3 sc, 3 inc, 3 sc, 2 inc(18)

Round R4 :

R4. 7 sc, 3 inc, 8 sc (21)

Round R5 :

R5. Only through back loops, 21 sc (21)

Round R6 :

R6. 7 sc, 3 dec, 8 sc (18)

Round R7 :

R7. 4 sc, 4 dec, 6 sc (14)

Round R8 :

R8. 2 sc, 4 dec, 4 sc (10)

Round R9 :

R9. (3 sc, dec)x2 (8)

Info :

Stuff only half of the legs.

Round R10 :

R10. -R15. 8 sc(6 rounds) (8)

Round R16 :

R16. Only 5 sc. Do not stuff of the legs. Press the opening with your fingers, aligning 3 stitches side by side. Break the yarn and leave a long tail.

β€” Finishing :

Infos :

Sew the head to the body. Sew the legs to the body. Sew the arms to the body symmetrically. Embroider eyebrows.

Assembly Instructions

  • Sew the head to the body using the remaining thread from R27, aligning the neck opening and attaching securely with a whipstitch or ladder stitch.
  • Position and sew the legs to the bottom of the body so the toy sits evenly, spacing them symmetrically and securing with tight stitches.
  • Attach the arms to the sides of the body, aligning openings so 3 stitches meet and sewing them in place using the long tail left from the arm.
  • Place safety eyes between rounds 16 and 17 of the head spaced 11 stitches apart before stuffing fully, then secure eyes and continue stuffing.
  • Embroider thin black eyebrows with black thread above the eyes to give the character its expression, using reference photos for placement.

Important Notes

  • πŸ’‘Crochet continuously in a spiral, unless otherwise specified, to avoid visible seams.
  • πŸ’‘Use a stitch marker to mark the beginning of each round so you don’t lose track during increases and decreases.
  • πŸ’‘Crochet tightly so the filler is not visible through the holes between loops and finish stuffing gradually for smooth shaping.
  • πŸ’‘Fill the toy tightly and gradually, stuffing details as you go to maintain the intended shape and avoid lumps.

This little Mini Hulk amigurumi is designed to be fun, fast, and full of character for makers of all skill levels. 🧢 It combines simple shaping with a playful hair detail and easy assembly for great results every time. πŸ’š Make one for a friend or keep it on your shelf as a cheerful handmade companion.

You ask,

we answer.

FAQs

What size will the finished piece be?

The finished amigurumi measures approximately 13 cm (about 5.1 inches) tall when using the recommended YarnArt Jeans yarn and a 2.00 mm hook.

Can I use different yarn weights for this pattern?

Yes, you can change yarn weight, but this will affect the final size. Use an appropriate hook for your chosen yarn and note that tighter or looser tension will also change dimensions.

Do I need prior crochet experience for this pattern?

This pattern is rated beginner friendly and requires basic crochet skills such as single crochet, increases, decreases, and working in the round.

How long does this project typically take to complete?

Most makers complete this project in about 2-4 hours, depending on experience, finishing choices, and assembly time.